Add a Desk Station
Add a Desk Station
Learn how to add a desk station to receive Verkada Intercom calls
Updated over a week ago
The Verkada Desk Station is one of the various types of receivers for the Verkada Intercom. It allows users, such as those at a front desk, to stream video from a door, communicate, and unlock remotely.
Supported features
• A total of 4 tiles per page are available for configuration.
• Doors, cameras, and intercoms can be added to the desk station.
• Allows users to remotely unlock paired doors.
• Remotely communicates with a caller.
Note: A desk station license is needed for every iPad running the Verkada Desk Station app.
Add a desk station to Command
Download the Verkada Desk Station app and add it to your Verkada Command dashboard:
1.Unlock your iPad and go to the Home screen.
2.Locate and open the App Store application.
3.In the App Store, search for Desk Station.
4.Find the app in the search results and tap Install.
5.Wait for the Desk Station app to download and install.
Add your desk station to the Command dashboard
Adding your Desk Station to the Command dashboard works slightly differently than other Verkada products.
1.On your iPad, launch the Verkada Desk Station app.
2.Locate the desk station’s serial number, which should now be visible within the app.
3.In Verkada Command, go to All Products > Devices.
5.Add the desk station using the serial number.
Configure a desk station
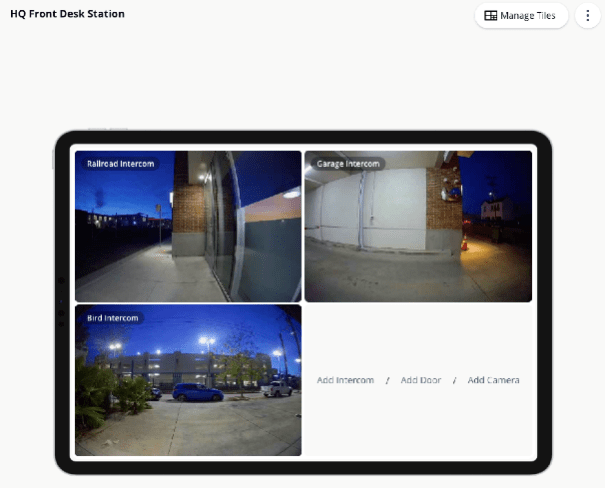
The Verkada Desk Station uses tiles to configure what is displayed. Tiles are configurable and can display intercoms, doors, or cameras.
This example shows when the Desk Station is selected, where this station has been previously configured:
Add a tile to the desk station
2.Select the desk station that needs to be configured. The current state of the desk station displays in the center of the page.
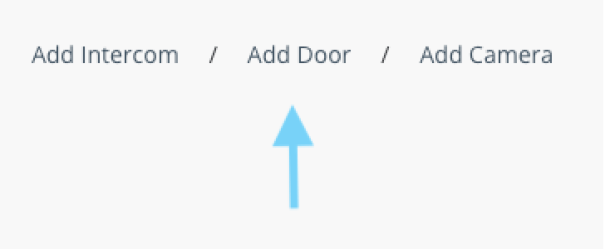
3.Select an option from the desk station.
4.When the tile manager opens, search and select any Intercom, door, or camera. You can also open the tile manager at the top left.
The configured tile should now appear on the desk station with these possible scenarios:
• If an intercom was selected, then the live feed from the intercom and an unlock button for the paired door displays.
• If a camera was selected, then only the live feed displays on the screen.
• If a door was selected, then an unlock button (and if a camera is paired) and camera feed displays.
Remove a tile from the desk station
1.In Command, go to the desk station.
2.At the top right, click Manage Tiles.
3.Deselect any of the currently added tiles.
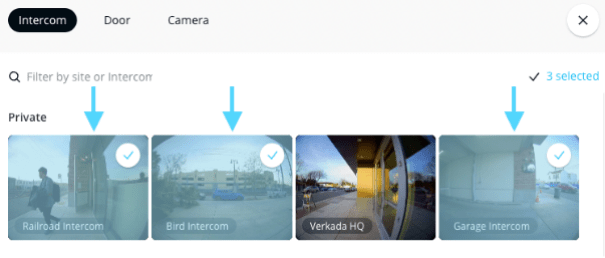
Note: Once a tile has been deselected, it no longer displays on the desk station.
Reset tiles all at once
1.In Command, go to the desk station.
2.Click Settings > Settings > Reset Tiles.
Delete a desk station
1.In Command, go to the desk station.
2.Click Settings > Delete.
3.When prompted, confirm the delete request.
SIP Integration: Cisco Unified CM
SIP Integration: Cisco Unified CM
Configure Cisco Unified CM SIP integration
Updated over a week ago
You can easily add a Verkada intercom to Cisco Unified Communications Manager (Unified CM) just as you can add any other third-party advanced SIP device. Learn how to get started with a Verkada intercom.
Once completed, you can receive calls from your TD52 on your SIP devices and initiate talk-down calls to your TD52 from your SIP devices.
Integrate your intercom to Cisco Unified CM
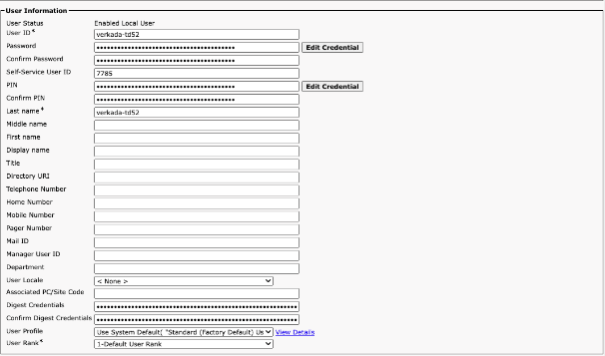
1.Add your TD52 as an end user.
1.In the Cisco Unified CM portal, navigate to User Management > End User > Add New.
2.Create a User ID, Password, and Self-Service User ID (This will be the TD52’s extension you will use in step 3.) We recommend setting the Last Name as the User ID.
3.Ensure that your Digest Credentials are the same as the password you defined.
4.The PIN is irrelevant for the integration to work, but must be set to something. As long as the field is non-empty we’re ready to move to the next step.
2.Add your TD52 as a device.
1.In the Cisco Unified CM portal, navigate to Device > Phone > Add New.
2.For phone type, select Third Party SIP Device (Advanced).

3.After saving, you’ll be directed to the device’s configuration page. Navigate to the Device Information section.
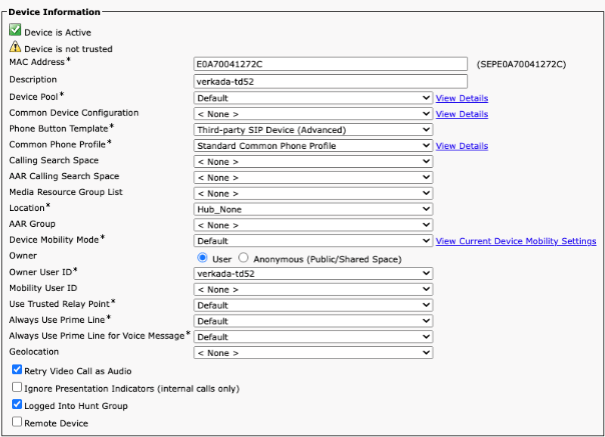
4.Enter the media access control (MAC) address of your TD52. Find the MAC address on the back of the device or, in the device’s settings. Copy the rest of the settings shown above, making sure you select the Owner User ID that corresponds to the end user you created in step 1.
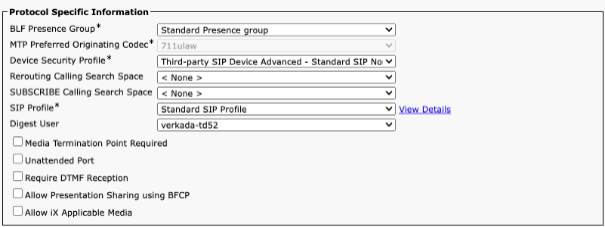
5.Scroll down to Protocol Specific Information and copy the settings (as shown below). Be sure to select the Digest User that matches the end user you created in step 1 and the Owner User ID you created in step 2.
3.Click Save. The Association window should appear on the left side of the screen.

1.In the Association window, click Add a New DN and navigate to the Directory Number Information section.

2.Copy the extension (defined in step 1) and paste it in to the Directory Number field.
4.Enable SIP functionality in Command.
1.Navigate to your TD52’s Settings page and scroll to the Call section.

2.Click Add Account. You should be redirected to the SIP Account configuration menu.
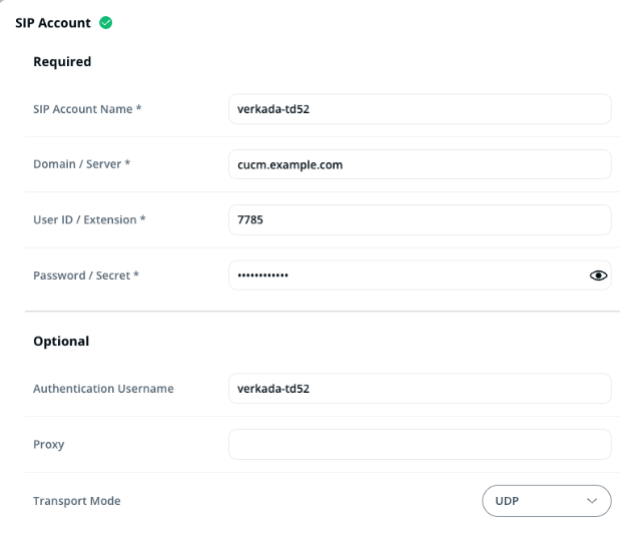
3.Verify that your Authentication Username exactly matches the End User ID/Owner User ID/Digest User that you configured in steps 1, 2 and 3.
4.In the Domain/Server field, type your SIP domain. Note: The default port is 5060, but you can change it by appending a custom port number; for example, cucm.example.com:5061.
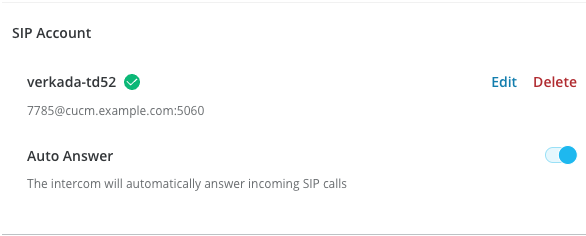
5.Fill in the User ID and Password fields with the values created in step 1 and click Save. If provisioning was successful, you’ll see a green checkmark under SIP Account in the Device settings.
5.Add SIP extensions as receivers.
1.Navigate to your TD52’s Receivers tab.

2.Click the plus (+) icon and select SIP Phone.
3.Enter the extension of the recipient you want to add to the call list. When someone presses the call button, the call will be routed to the specified SIP extension. Alternatively, to call the intercom from your SIP device, simply dial its extension.

Wire a Traditional Doorbell Chime for TD52
Wire a Traditional Doorbell Chime for TD52
Wire a traditional doorbell chime and transformers to your Verkada TD52 Video Intercom
Updated over a week ago
The Verkada TD52 Video Intercom includes an output relay that you can use to trigger a doorbell/chime.
Configure a Chime output
Requirements
• 1 or more door bell chimes (
example)
How it works
1.In Verkada Command, go to All Products > Intercom.
2.Select your Verkada TD52 intercom and click Settings.
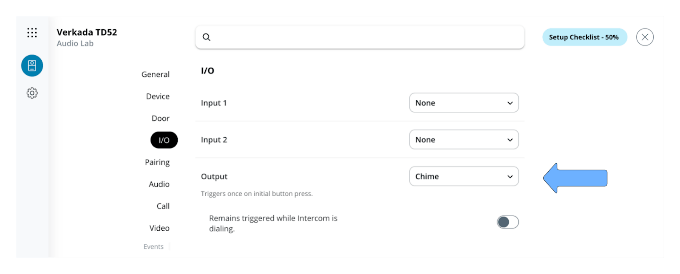
3.Click I/O > Output and select Chime. The TD52’s relay will change state and a third-party chime can be powered.
Wire your TD52
Note: This configuration was tested using a 16V MAXDOT Doorbell Transformer (part #T57-0052) and Newhouse Hardware chimes (part #CHM1), both of which can be found on Amazon.com.
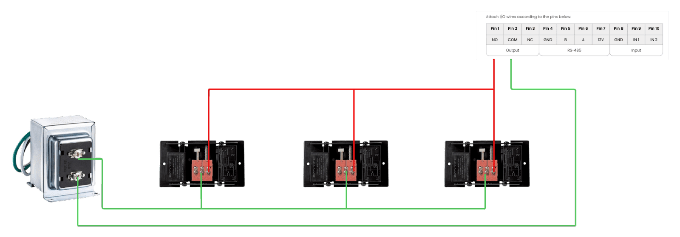
1.Remove the terminal block from the rear of your TD52.
2.Wire the COM output on the terminal block to one of the terminal screws on the doorbell transformer.
3.For each doorbell, wire the Front and Trans terminals to the NO terminal on the intercom, and the remaining terminal on the doorbell transformer, respectively, as shown.
4.Reinsert the terminal block.
Example: For multiple doorbells, wire in parallel
Make Your First Call with TD52
Make Your First Call with TD52
Learn how to make your first call with the Verkada TD52 Video Intercom
Updated over a week ago
The Verkada TD52 Video Intercom enables you to effortlessly make calls to receivers. The Verkada Command dashboard allows for different configurations to complete calls such as, through a phone number, through a desk station, and direct to a user (through the Verkada Pass App).
Before you begin
Required. The intercom must be installed and configured before a call can take place.
1.The intercom must be added to the Command dashboard.
2.The intercom must be plugged into a Power over Ethernet (PoE)-enabled switch.
3.A door must be paired to the intercom.
4.A receiver must be added.
Set up your first call
Once you have completed the required steps, the intercom is ready to make calls. To test, follow these steps:
1.In Verkada Command, go to All Products > Intercom.
2.Select an intercom view you want to test.
3.At the top, click Settings.
4.On the Settings page > left sidebar, click Troubleshooting.
5.You should see a live feed of the Intercom, along with any additional paired camera(s).
6.In the middle of the intercom, click the rectangular button to initiate a call.
Note the volume of the call. To change the volume of the audio coming from the Intercom, on the left sidebar, click Call and update the volume, as needed.
Make a call
Once the Intercom is set up in Command, it is ready to make calls.
1.In Verkada Command, go to All Products > Intercom.
2.Select an intercom view you want to test.
3.At the top, click Settings.
4.On the Settings page > left sidebar, click Troubleshooting.
You should see a live feed of the intercom camera, along with any additional paired camera(s).
5.In the middle of the intercom, click the rectangular button with the white LED (below camera) to initiate a call.
6.When the intercom starts ringing, it attempts to contact receivers listed in the call list (on the Receivers tab).
7.Once the receiver picks up, the call session can begin to process and the receiver has the option to unlock the door or end the session.
Receive a call
When a call is made from the intercom, it is sent to a desk station, a user, a phone number, or a SIP phone.
Desk station
The desk station can be a tablet that runs the Intercom app. It acts as a live view receiver and is always on. This type of receiver is typically used at a desk or reception environment. Learn how to add a desk station.
How it works
1.When a call is made to a front desk station, the person watching the tablet can see the caller on screen and has the option to speak to and unlock the door for the caller.
2.Once the station is setup, you can add up to 4 tiles. A persistent live stream from the intercom camera is displayed along with an unlock icon. You can easily unlock the paired door anytime before or during a call made to the desk station.
3.Once a call has started, the receiver has the option to unlock the door or end the call at any point during the call.
User
A user is any granted-access user in your organization and who has access to Verkada Command.
How it works
2.Once a call is made, then the receiver can see the caller and has the option to unlock the door, speak through the pass app, and end the call at any time.
Phone number
A phone number allows a caller to reach someone via a phone call. A phone number can be any standard mobile or landline phone number. You can add international phone numbers using the appropriate international identifier, or you can select the correct country at the time the receiver is added.
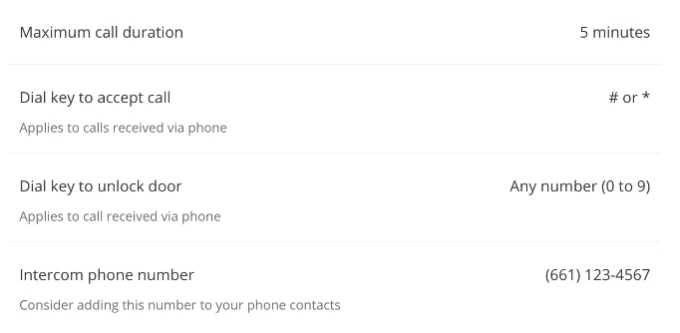
Both SIP and regular phone numbers have the option to toggle ‘press # or * to accept the call.
How it works
1.When a call is initiated from the Intercom to a phone number, the receiver receives a call from a standard number.
2.When the phone call is answered, the call from the Intercom has not yet started, and the call will start when an asterisk (*) or hashtag (#).
3.The receiver can accept the call and has the option to speak to the caller and unlock the door using any digits (0–9).
You can find information about answering a call and the phone number where an Intercom initiates a call from the Settings page.
SIP phone
You can have the Intercom call a Session Initiation Protocol (SIP) extension. Learn more about SIP.
How it works
1.When a call is initiated from the Intercom to a phone number, the receiver receives a call from a standard number.
2.When the phone call is answered, the call from the Intercom has not yet started, and the call will start when an asterisk (*) or hashtag (#).
3.The receiver can accept the call and has the option to speak to the caller and unlock the door using any digits (0–9).
