
Video Loss Troubleshooting for DVRs NVRs This is a basic setup guide that you need to double check if in case your cameras are not showing any images. On this guide, it will show you a bit more detailed version of your Hardware QSG that came with your unit. You might see Video Loss, No Link, or No Video on your screen and if that is the case, then we need to check their connections first.
What error message do you see on the screen?
We need to identify first the error message that your screen shows.
- If you see No Signal, Video Mode Not Supported, or Signal Out of Range, check this article to help you out: Video Mode Not Supported or Signal Out of Range or No Signal
- If you can access the Menu interface of your recorder but you see Video Loss or No Video, it is just your cameras that are not showing images. Read the rest of the article to learn how to fix it.
Here are some error message because of cameras not displaying any image:
 (from a DVR-4900)
 (from a DVR-5580)
Here is an overview of the things we need to check:

1. Camera to extension cable connection
For some you who installed the cameras already and forgot to test the cameras first, that’s alright. You can skip this step for now. You just need to make sure that the 2 connectors of your camera are both connected firmly to the extension lead; otherwise, you might end up with a powered camera but no video connection or a powerless camera with video connection. Check the image below, that’s how your camera needs to be connected to the extension cable.
- Connect the power lead first.


- Connect the video cable next.
- Align

- Push

- Twist

- Align
Here is what it should look like after the connection.

2. Extension cable to power splitter
The extension will have 2 connectors on each end and you already used one end for the camera’s video and power connection. The other end of that cable needs to be connected to the power splitter especially if you have multiple cameras on your setup (disregard the splitter if you are dealing with an additional camera since it will come with its own power supply). The splitter will have 4 leads on one end and a single lead on the other. Pick one lead from those 4 and connect the power lead of the extension cable to it. See the image below on how it should be connected.
- Single camera connection – this is a connection from the extension cable to the power adapter.

- Multiple camera connection

3. Power splitter to power adapter
Grab the single lead from the splitter and connect it to the power adapter. Use the provided power adapter from the kit. There is a red tag or sticker and has a label if the adapter is for cameras or DVR. Once done, plug the adapter to your power socket. Check the image below.

4. Extension cable to the DVR
Going back to the extension cable, we are left with one connector. That connector will be connected to the ports at the back of the DVR. These ports are normally labeled as Video In or Video Input. You need to push the connectors and twist it to lock it firmly to the DVR. Check the image below for a step-by-step procedure on how to connect the cable.
- Align

- Push

- Twist

You are all set! Images captured by your cameras should now display on your screen. If in case it didn’t you might want to check Video Loss Troubleshooting for DVRs for some advance troubleshooting.
Video Loss Troubleshooting for NVRs (basic connections)
This is a basic setup guide that you need to double check if in case your cameras are not showing any images. On this guide, it will show you a bit more detailed version of your Hardware QSG that came with your unit. You might see Video Loss, No Link, or No Video on your screen and if that is the case, then we need to check their connections first.
What error message do you see on the screen?
We need to identify first the error message that your screen shows.
- If you see No Signal, Video Mode Not Supported, or Signal Out of Range, check this article to help you out: Video Mode Not Supported or Signal Out of Range or No Signal
- If you can access the Menu interface of your recorder but you see Video Loss or No Link, it is just your cameras that are not showing images. Read the rest of the article to learn how to fix it.
Here are some error message because of cameras not displaying any image:
 (from NVR-8000)
(from NVR-8580 and NVR-7400)
Here is an overview of the things we need to check:

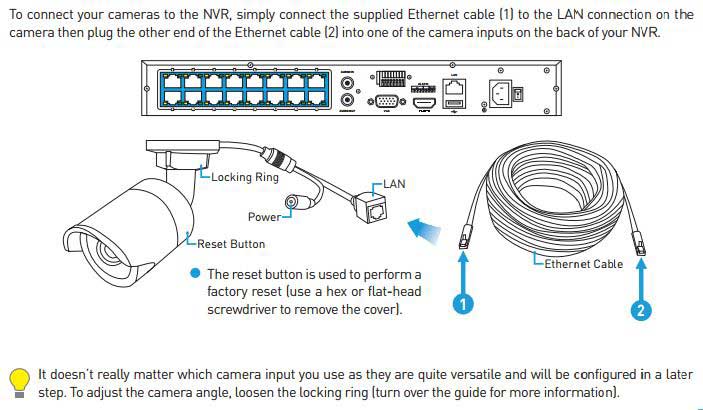
Connect the cables
Camera to Ethernet cable
Grab the cable of the camera and look for the port as shown at the left side of this clip. Then grab the extension cable (Ethernet cable) that came with the kit shown at the right. Connect these two together.
Here is what it should look like after the connection.

Ethernet cable to the PoE ports
Grab the other end of the Ethernet cable and connect it at the back of your NVR system. Only connect this cable to the Ethernet port that has a number and in a group with other Ethernet ports. An isolated Ethernet port is used for network connection; not cameras. See the sample clip below.

If your PoE port has LEDs, they should light up once a connection has made.
If it didn’t, try the following:
- Plug the cable to another port.
- Use a different Ethernet cable.
- Use another camera.
This will help in identifying which one is causing the problem. NVR cameras can take up to 30 secs to boot up and display on the screen, you may need a little patience.
You are all set! Images captured by your cameras should now display on your screen. If in case it didn’t you might want to reboot your NVR and give it a minute or two until the image shows up. An in-depth troubleshooting article will be posted soon for specific models in case it doesn’t work for the first time

can you help me please
hello nice sharing thanks