Have you lost the H.264 DVR’s password reset and don’t know how to recover it?
Some generic DVRs usually don’t even come with instructions on how to reset their passwords, but don’t worry, in this article you will learn how to reset H.264 network DVRs. So, keep reading..
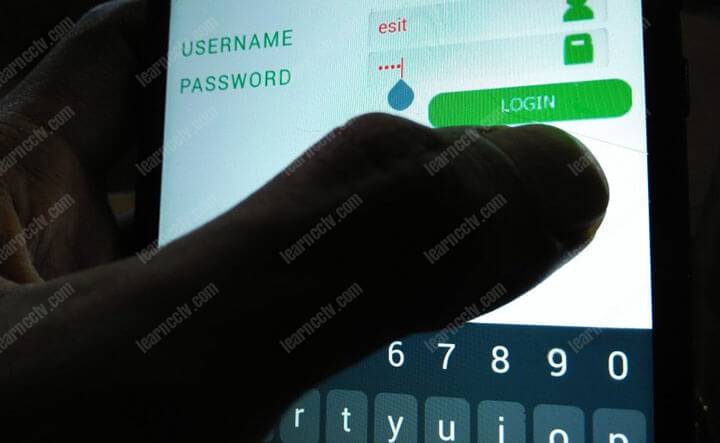
I will talk about some methods for h.264 network reset that are used with most H.264 DVRs, however there are thousands of DVRs brands on the market and the way to reset the password can vary from one model to another.
The first recommendation for a h.264 network reset is to read the equipment’s manual or to contact the DVR’s dealer, especially if you have a well-known brand DVR such as Samsung, Bosch, Panasonic, etc.
However sometimes you have a DVR with an unknown brand and there’s no manual available and no technical support number available.
 Well-known brand such as Samsung, Bosch and Pelco have technical support team
If you are unlucky and lost the password for a generic H 264 DVR, I will list some ways to get around the problem, check which one may work for you.
Load More : How to Reset Password by Serial Number on the Monitor?
Here are the ways you can recover from a lost password.
1. Use the DVR factory default password
2. Use a DVR password generator
3. Update the firmware and reset the DVR
4. Reset the DVR by removing the battery
5. DVR physical reset with jumpers
6. Delete the password file by using telnet
1. Use the DVR factory default password
It seems obvious, but trying to use the DVR default password must be the first thing for a h.264 network reset password recovery attempt, since in many cases the original DVR’s password has never been changed.
Check the DVR manufacturer’s manual or a password list for specific DVR models, the most common brands are Swann, Voyager and Dahua.
See the table below with the DVR default password for different manufacturers. Perhaps your DVR is here…
2. DVR password generator
There are software that can generate password for some DVRs to allow administrator access, you just need to enter the current date that appears on your DVR and click OK to get the new password.
Several companies buy unbranded Chinese DVRs and put their own brand, so when you turn the equipment on you can see that the DVR’s menu is similar to the ones used by generic DVRs because they use the same chip.
DVRs that are known to accept this type of reset are Luxvision 5716, 6008T-EL, HA-1648, CP-Plus, Citrox, BB-4CH, Sansco, Kare and other generic brands such as “H.264 network, H.264 DVR” , etc.
If your DVR has a login screen like the one in the picture, it probably uses the chip that works with the DVR password generator.
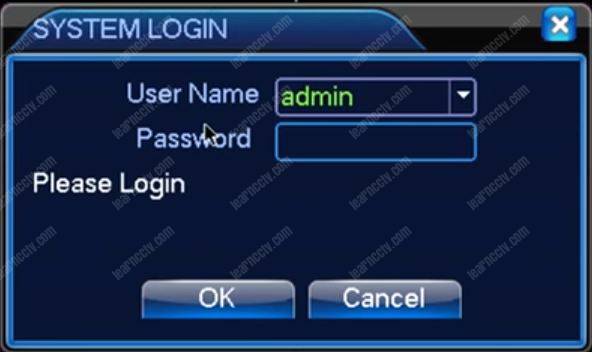
There is no need to connect the DVR to the computer, just run the software on your computer, look at the DVR screen to see the date and time and use it in the password generator software.
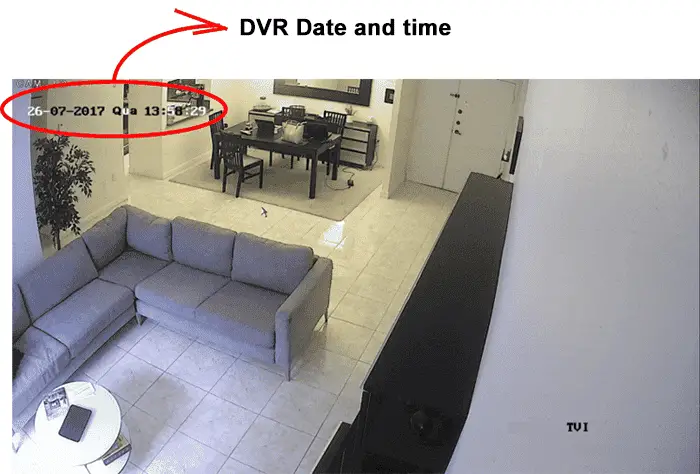
Keep in mind that DVR password generators will work only with specific chip models, obviously not suitable for all models in the market.
HiSilicon DVR password generator
If your DVR has the internal chip manufactured by Hisilicon, there is a great chance that the DVR password generator will work, depending on the model and year it was manufactured. See the chart below:
Inside your DVR there are chips responsible for certain functions. See below a table that shows some DVR models that use those chips.
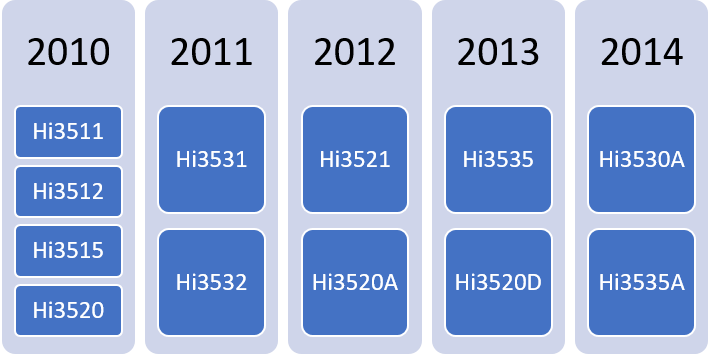
There are 3 versions of the DVR password generator that work with this chip, you can try each of them to reset your DVR.
If your DVR has one of these chips, your problem is solved. Just click the links below to download the DVR password generators.
How to use the HiSilicon DVR password generator
The image below shows an example of how to use this software, type the year month and day (YYYYMMDD) that you see on your DVR.
Example. For 07/26/2017 Type: 20170726
Below is an example of the password generated by the software that should be typed into the DVR, it is unique and valid only for that day.
IMPORTANT: This type of password generator software works with DVR models that use an internal chip manufactured by Hisilicon
Dahua DVR password generator
If your DVR is Dahua or model based on that manufacturer, the Dahua password generator may work for you. Just download and test it.
How to use the Dahua DVR password generator
The images below show an example of using the Dahua password generator, type the year month and day (YYYYMMDD) you see on the DVR.
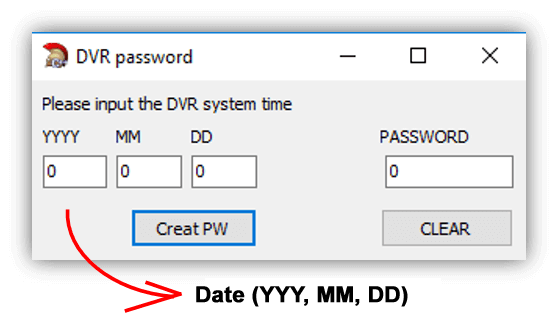
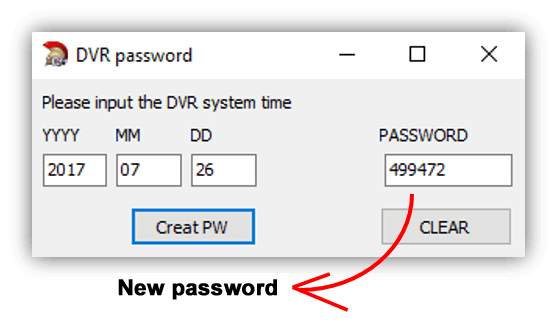
After entering the DVR date, click on “Create PW” and you will see the password created in the “PASSWORD” window. Test this it on your device.
Remember that over the years the chips that are used by DVRs can change and there is no guarantee that it works for all cases.
If you tried this method but it didn’t work, You can find extra information in the article: How to reset Dahua DVR admin password.
H.264 DVR password generator
There are cases where the DVR has an unknown brand, this happens a lot with Chinese models that are manufactured without a brand and sold to third parties that use a name like H.264 DVR for example.
Keep in mind that H.264 is not really a brand but just the name of the a compression algorithm. Read more on the article: How CCTV codec work.
How to use the H.264 DVR password generator
The images below show an example of using the H.264 password generator, choose the date that you see on your DVR.
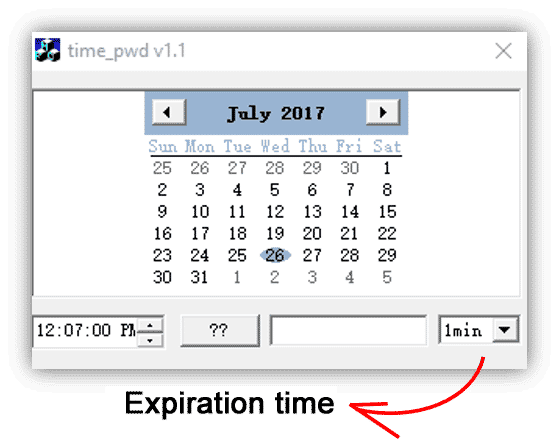
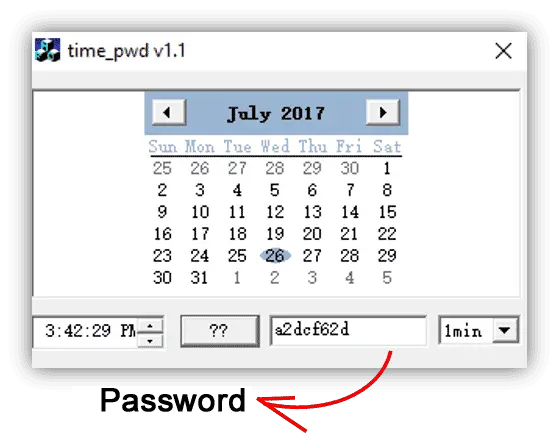
Important: The fact that your DVR is named as H.264 DVR or something similar does not guarantee that the software will work, as explained above, this is a generic name given by the distributor who purchased an unbranded Chinese DVR to resell to the customers.
Either way, you can try to use the H 264 password generator and see if it works for the DVR model you own.
Excel DVR password generator
There is also an Excel spreadsheet that can generate passwords for DVRs, it works the same way, just put the current date and look at the result in the yellow cell, it works only for dates after the year 2000.
Click the image to enlarge
Fill in the date in the green cells and hit enter to obtain the password
3. DVR reset by firmware upgrade
DVRs are equipment that have an internal operating system and that can be protected by password, This operating system is called Linux.
The manufacturer provides firmware so that customers can update the equipment for better security and new features, in most cases these updates do not delete the existing password nor reset the DVR, however in specific rare cases the firmware update can reset to the factory default.
If the manufacturer has this option available, you can download a file from a website and put it on a pen drive that should be connected to the DVR, after restart the equipment it will read the contents of the pen drive, update the firmware and reset the password to factory default.
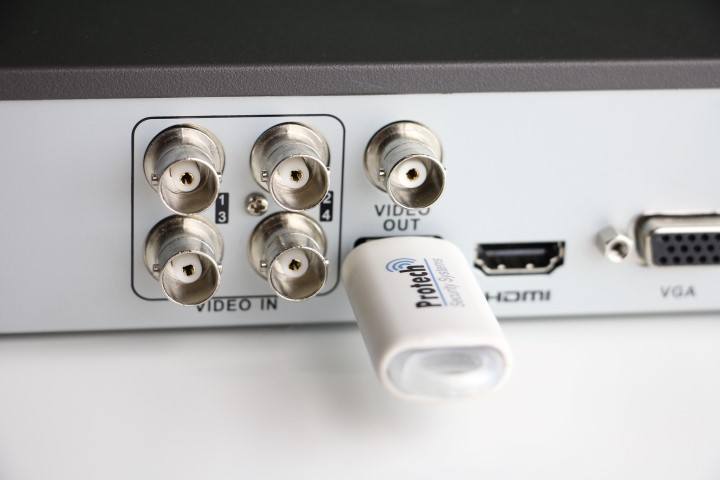
I’m describing this alternative here because it does exist, but I have to say that it’s really rare to find a DVR that works that way. You also need to ask the manufacturer for the special firmware or contact technical support.
4. DVR reset by removing the battery
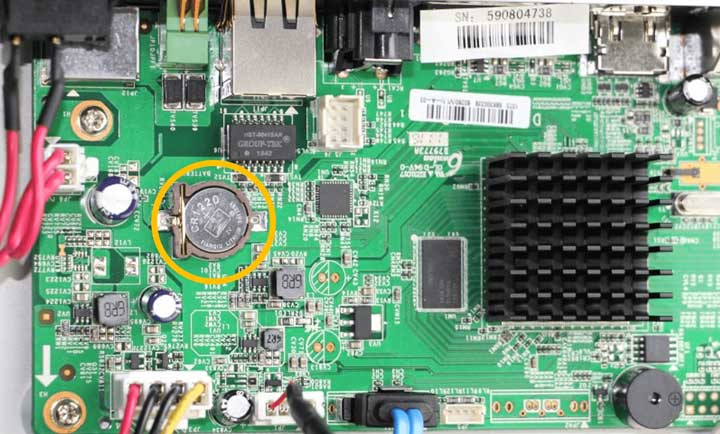
Some DVR models allow you to reset the clock to factory default by removing the battery for a few minutes. This procedure works for some old Dahua DVR models and Z-mode DVR.
Battery removal time may vary, some technicians report that it is sometimes necessary to wait up to 6 minutes for the card to fully discharge and reset the DVR’s clock.
Remove the battery from the DVR shown in the image below:
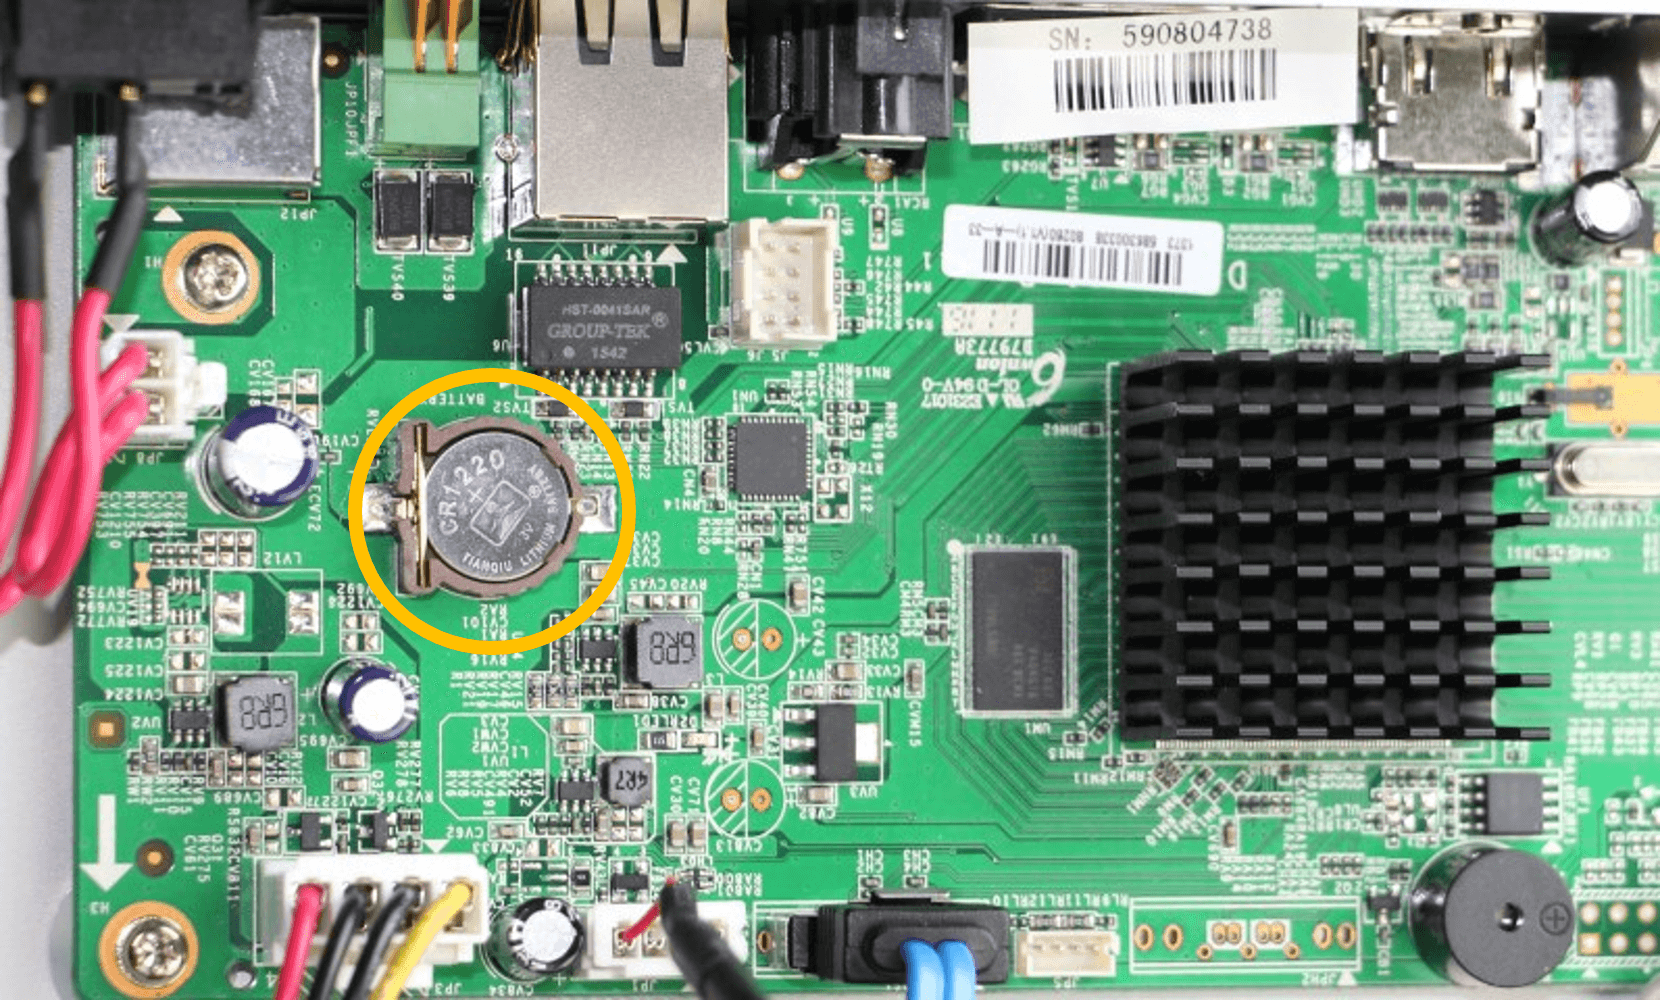
What happens is that the DVR runs out of battery for a while and goes back to the factory default date, such as 1/1/2000 for example, so you can use the DVR password generator to create a new passwords based on this date.

Make sure the clock has returned to the old date before attempting to use the password.
After resetting the DVR just enter the original password that also varies for each model, for old Dahua DVRs the password can be “000000“
5. DVR reset using a jumper
For this type of reset it is necessary to open the equipment and physically close the contacts of two specific pins. That work for some Swann DVR models that have some jumpers for DVR reset.
In other cases such as on AVTech DVRs, it’s possible to reset the DVR to factory default by closing the contact of the battery.
See below an example of DVR reset by using jumpers
DVRs with removable battery
Some models allow this reset by removing the battery and closing the contacts for about 2 minutes. See the picture below:
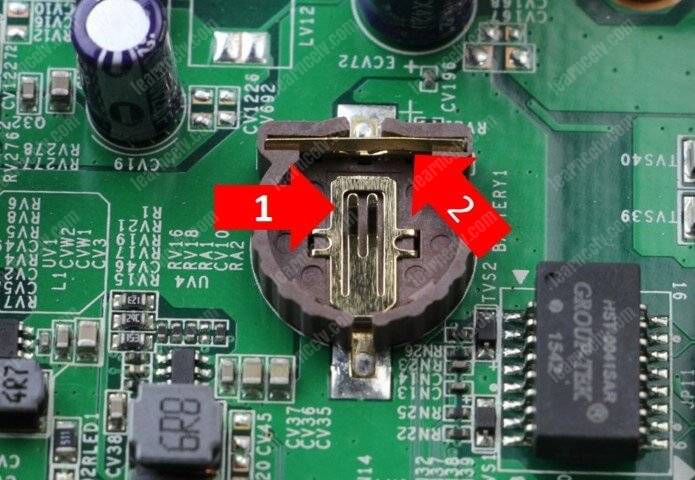
This method works with some old Swann DVR models, and the factory default password after the reset is 123456.
DVRs with fixed battery
This procedure works on some DVRs with fixed yellow battery and the factory default password may vary between models. (see previous table)
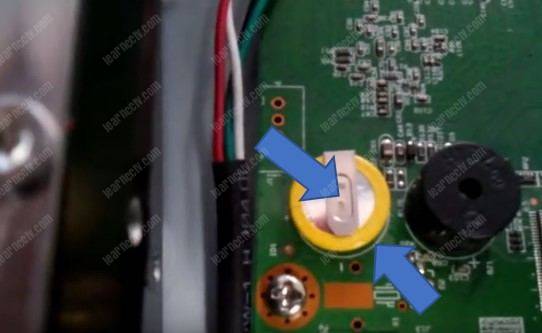
This type of battery is fixed to the board. Use tweezers with the tip on the top of the battery holder and the other end on the bottom, close the contact for about 1 to 2 minutes to reset the DVR.
The idea is to execute the procedure so the date goes back to 01/01/2000 so you try to enter the passwords according to the table you saw before
IMPORTANT: I am not responsible for damages that may occur during the DVR reset process, this procedure is at your own risk.
AVTECH DVRs reset
Old models of AVTECH DVRs can be reseted by closing specific pins of the equipment board.
When the DVR Off, follow these steps:
1. With a tweezers close the contact between the pins
2. Turn on the DVR and wait until you hear a beep.
3. Remove the tweezers while the DVR is still on
4. Wait until the DVR restarts
5. Use the admin/username and password to login
The pins that are to be closed vary from one model to another, but usually have the TP nomenclature followed by a number, for example TP2-TP3 or TP4-TP5 as shown in the images below:
DVR AVTECH AV792D-D
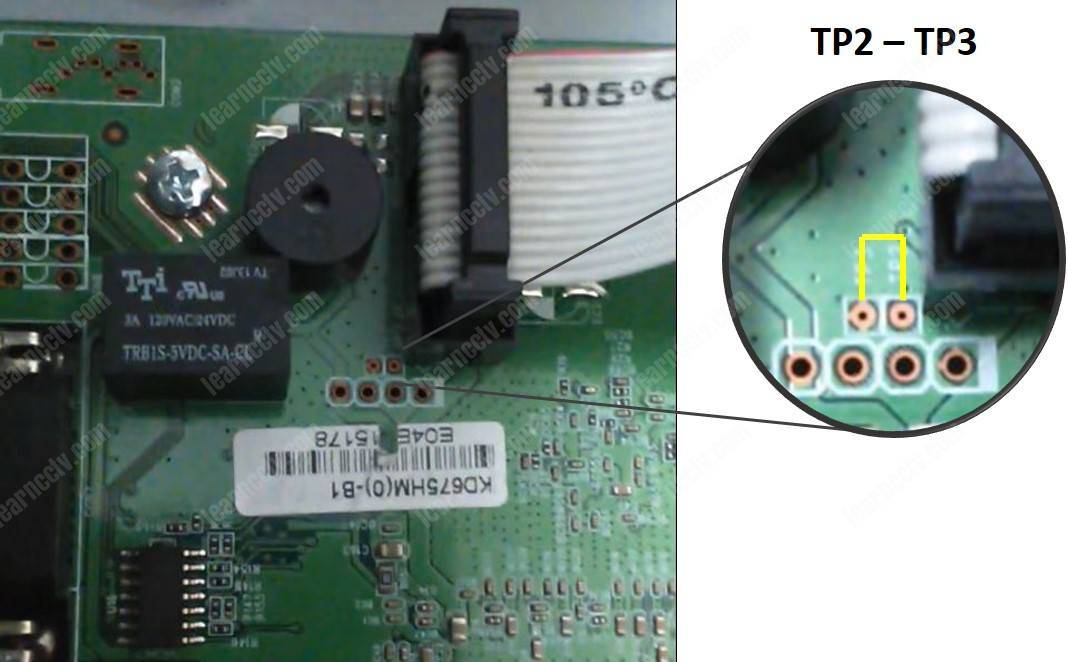
AVTECH AVC-704H Jumper
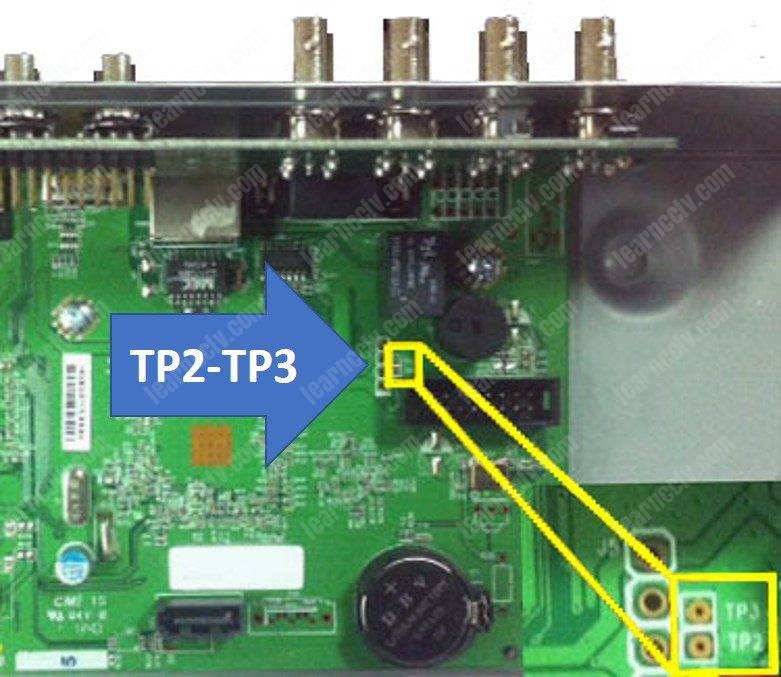
AVTECH AVC-706H Jumper
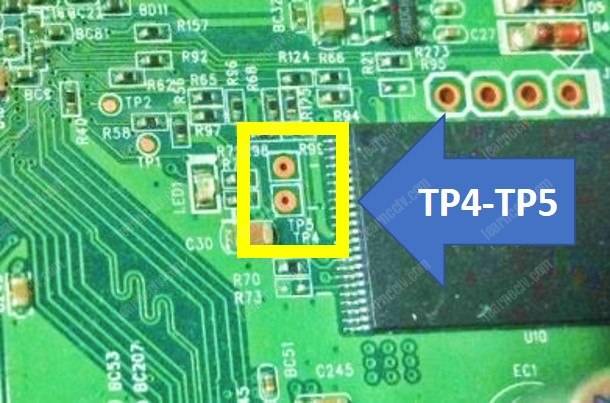
After the reset use the factory default user and password: admin/admin
If you have another model from AVTECH, look for these pins that in most cases are TP2 – TP3 or TP4 – T5, the reset procedure is simple and fast, just follow the steps that have been described.
Swann DVRs reset
Some Swann DVRs models have a physical jumper to reset the password, it is clearly marked on the board (PASS-CLR)
Follow the steps below to reset the DVR
1. Close the jumpers with tweezers
2. Turn on the power and wait for the DVR initialization
3. The DVR starts and shows a login screen
4. Use the admin/admin username and password to login
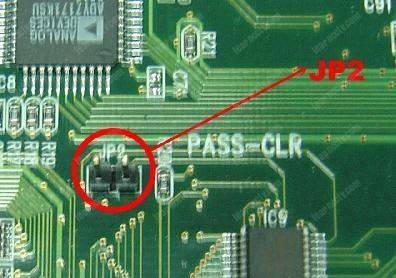
If you are looking for information on how to factory reset Swann DVR 4500 and similar models such as the 4500,4900,805o and 8075 read the article: Swann DVR password reset
6. DVR reset using telnet
As I mentioned before, a DVR has a Linux operating system, and on some models there is a way to access this system and delete the file that represents the account and contains the access password.
This process works with DVRs that have a chip manufactured by a Chinese company that accepts a Telnet connection with a standard XC3511 password. Some models known to have this chip are the H264 DVRs:
If your DVR has the login screen like this below, it indicates that it uses this type of chip that accepts the connection via telnet, no matter if the brand is, the internal chip is from the same manufacturer.

Below is another example of a login screen of a DVR that has this type of chip. You can see the word “NetSurveillance” on the left side of the menu.
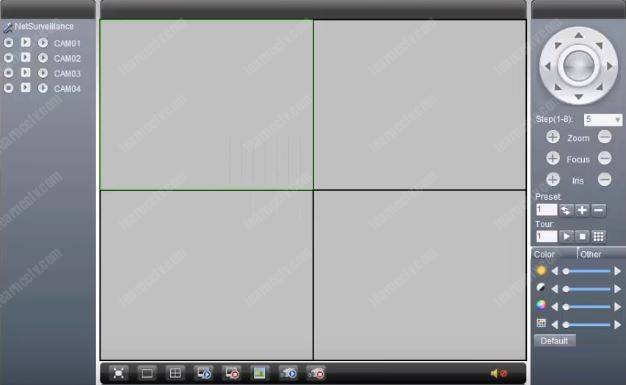
To reset the password, you must connect your computer to the same network as the DVR and start the procedure. You can connect directly from the DVR to your computer or use a router.
Option 1: Direct from DVR to computer with network cable (UTP)

Option 2: Connecting the DVR to the computer through the router

Make sure the physical connection is OK and devices are using IPs of the same network, as in this example where their IP are 192.168.1.1 and 192.168.1.2, it is now necessary to use a telnet software to send commands from the computer to the DVR.
On Windows just press the Windows key + R on the keyboard to initiate the run windows and type: “CMD”. See the picture below for details:

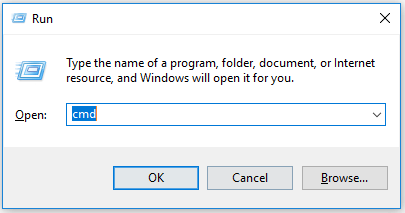
Since this command window will be able to communicate with the DVR, it will respond by asking for username and password and then after entering this information, you will have access to the operating system and will be able to view the files in the directories and folders and also remove them.
To start the process type “telnet <IP of your DVR>” as shown in the image example below:
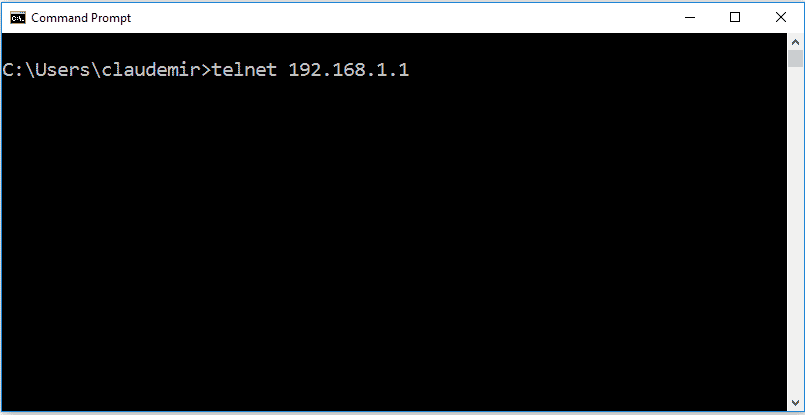
After the connection, a user and password is requested, the screen shown below will appear with the information of LocalHost login: and Password
For localHost login type: root
For Password type: xc3511

You should see a screen as shown in the image below, which shows the version of the operating system (BusyBox V1.1.2) and a welcome message (Welcome to Tech Monitor)
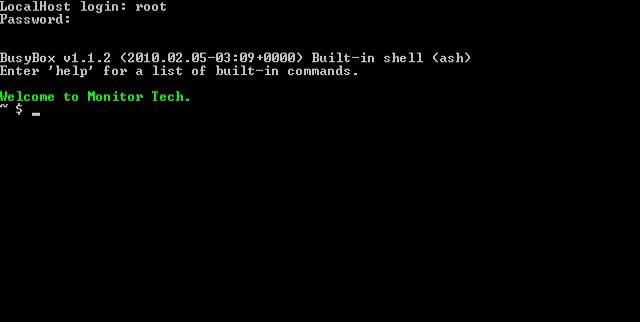
At that point you already have access to the Linux operating system, and you can enter commands to read directories (folders), enter those directories, and delete files.
The commands are:
ls: List the directory
cd: Get into the directory
rm: Remove file
Follow the sequence of commands below (without the quotation marks)
Enter the “ls” command to read the contents of the directory (folder)
Note that there are several directories (folders) in blue
In the next step we will enter the mnt directory

Type “cd mnt” to get into the mnt directory
Type “ls” to read the content of the directory
Note that there are a lot of directories including the mnt
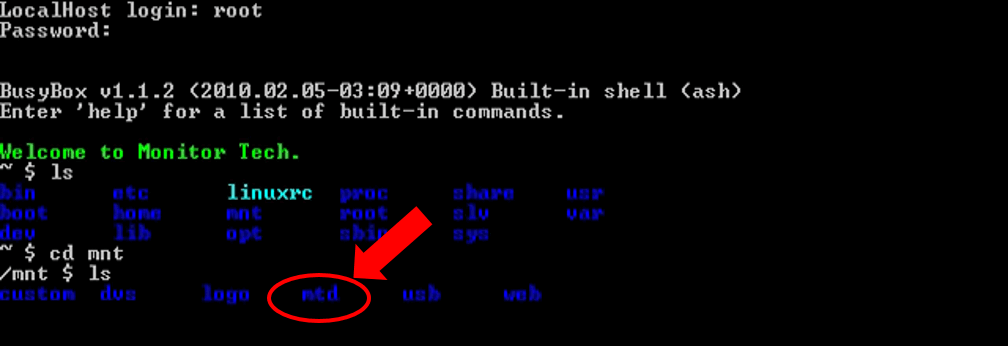
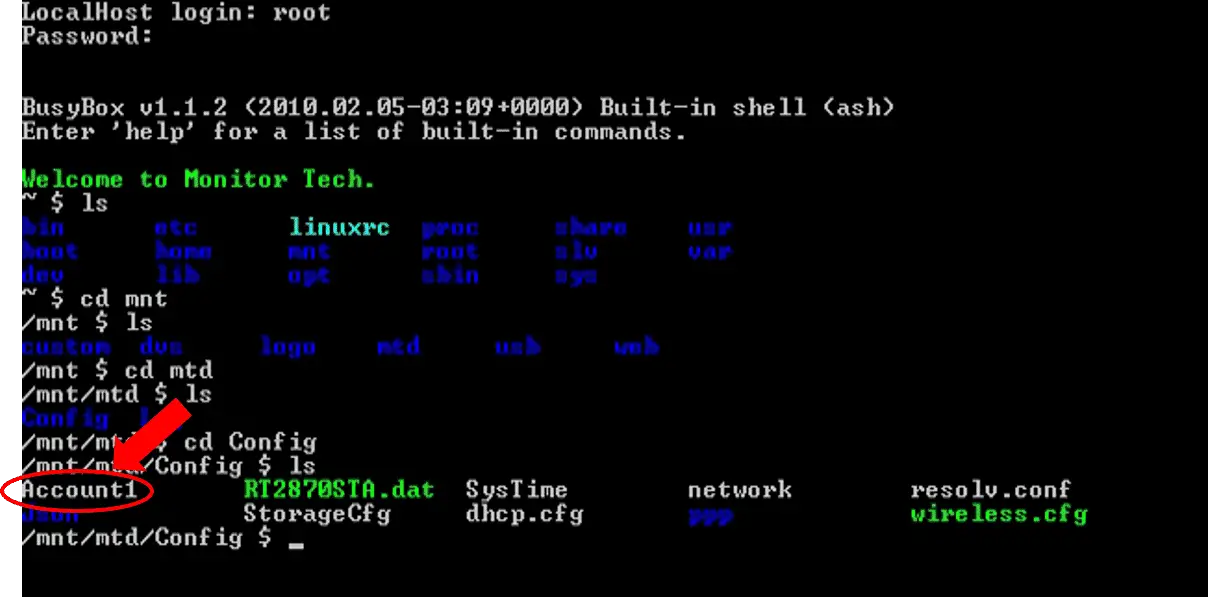
Type “cd mtd” to enter the directory mtd
Type “ls” to get into the directory
Note that there are a lot of directories including the mtd
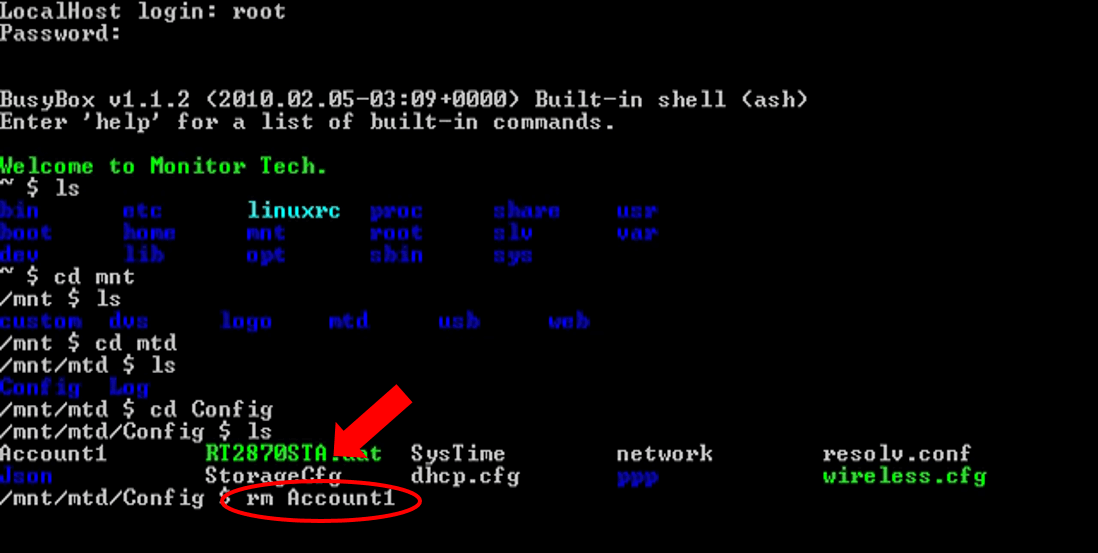
You are going to remove the Account file
Type “rm Account1” to remove the file
The system will remove the file without asking for confirmation
Final consideration
Here are some ways to try to solve the lost password problem, if any of the methods worked for you please leave your comment below to help others.
If you have another experience that solved the problem, also leave your comment to share the knowledge with others,
If you still have problems and can not reset the password of your DVR try contacting who sold the equipment or leave your comments here, sometimes someone has already experienced the same problem and can help solve.
It is easier to help if you provide more accurate DVR information.
Saying things like “I lost the password of my H.264 DVR” is not useful since H.264 is actually the name of a video algorithm (CODEC) created years ago
“H.264 DVR” may be the name of thousands of DVRs that exist in the low-cost market and they may be using totally different internal chips, and therefore have different procedures for resetting the password.
Look for tags in the DVR that say something else about the model, or check to see if there is any information on the screen when it starts.
Open the DVR, you may also find something that is relevant information, or perhaps you can see that the login screen is the same one that is used by another brand, this may indicate that they have an internal chip from the same manufacturer. The more information, the better.
I am having trouble with the installation
I am having trouble with the installation
It was a great sharing
hi how can i do
It was a great sharing
It really worked, I appreciate it!
please provide support for me i leave my email address
I really love you
please provide support for me i leave my email address
I really love you
I really love you