ClareVision Cameras Setup Guide,The following article provide the following information: Setting up your WiFi camera, Configuring motion, image, and event settingsAdding the camera to the ClareVision App
Getting Started with ClareVision – WiFi Cameras
Overview
The following article provide the following information:
- Setting up your WiFi camera
- Configuring motion, image, and event settings
- Adding the camera to the ClareVision App
Step One: Connect the Camera to Your LAN
To add the camera to a WiFi network, first connect the camera to the Local Area Network (LAN) through a router, modem, or network switch.
- Using an Ethernet cable, connect the WiFi camera to a router, switch, or modem that is on the network you would like to configure WiFi for.
- Power up the camera using the included power supply (Bullet and Turret cameras)
- Once the camera has connected to the network, use the IP Search Tool to discover the camera IP Address.
IMPROTANT: The WiFi Turret (CLR-V100-4T36WF-W) and Bullet (CLR-V100-4B36WF-W) do not support POE. You must connect the camera to the network using an Ethernet cable and power the camera with the included power supply.
ClareVision Cameras Setup Guide
Read Next :
- ClareVision Camera and NVR Setup Documentation
- ClareVision Camera and NVR Firmware
- Hikvision AX PRO Configuration Full Setup – Video
Step Two: Discover the Camera
All Clarevision cameras ship with DHCP turned on. DHCP simply means the router will assign an IP address to the camera when it boots up using the LAN IP address scheme. Example:
- Router IP Address: 192.168.1.1 (typical)
- IP address range that may be available: 192.168.1.2 through 192.168.1.255
- Router will assign an address like this: 192.168.1.x, where x can be any number between 2 and 255.
- Install and launch the IP Search Tool and select “Search”
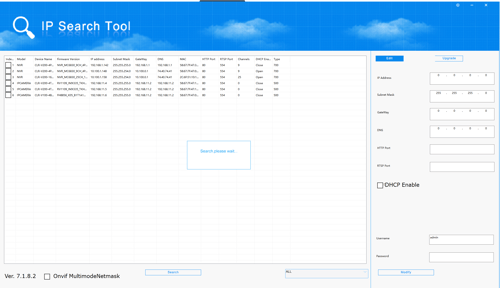
- Open a Chrome or Edge browser and input the WiFi camera’s IP address into the URL field on your web browser
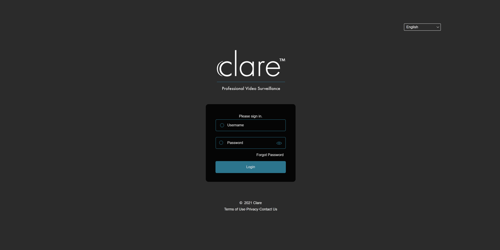
- Input the default username and password.
IMPORTANT:
The default username is: admin
The default password is the first six characters of the UUID. The UUID can be found on the camera label or the quick start guide. If those are not available or inconvenient, you can use one of these methods found HERE to discover the UUID.
Tip:
When you login, you will be asked to change the password and answer security questions. Make sure you configure the security questions and store them. If you do not and you lose the password you will have to go to the camera and physically reset it.
Step Three: Update the Camera to the Latest Firmware Release
Clare Controls releases camera firmware with new features about once every four months. Chances are, your camera will need to be updated when you take out of the box. The camera firmware database is located here.
- Log into the camera and go to the Configuration > System Configuration > Device Information to review the firmware version.
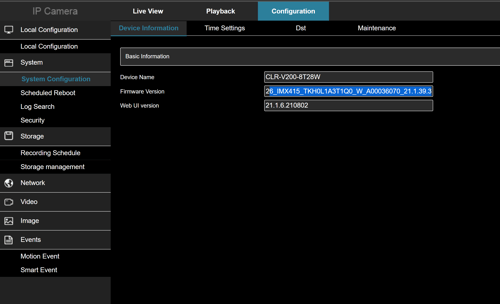
- Cameras with version numbers where the last 3 digits are lower than 30.x will require you to to to the maintenance tab and upload the firmware to the camera you retrieved from our website. Cameras with version numbers greater than 30.x will have online update services directly from the web console as shown below:
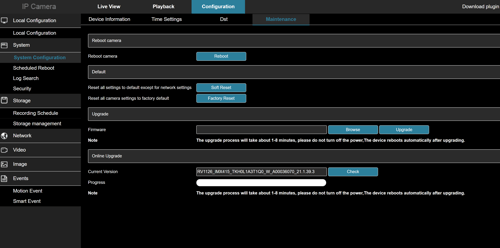
- Simply click on the “Check” button and the camera will check our servers for an update and if available ask you if you want the camera updated. Updates take about 3 minutes.
Step Four: Configure the WiFi Settings
Make sure the camera is connected to a router, switch, or modem before proceeding with the next steps.
- Select WiFi Configuration on the home page or navigate to Configuration > Network > Advanced Setup > WiFi.

- Tap Scan to discover available WiFi 2.4GHz WiFi networks.
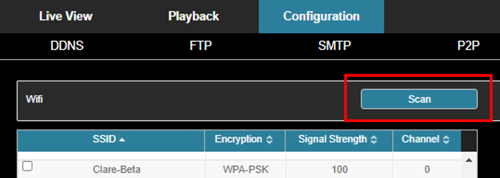
- Select the desired WiFi network you would like to connect the camera to.
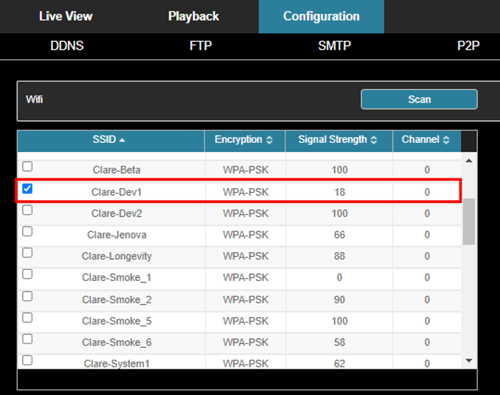
- All fields should automatically populate when you select a WiFi network. Input the WiFi password into the Key field.

- Check DHCP if you would like the network to assign the network parameters automatically. Leave this field unchecked if you would like to manually configure settings such as IP Address, Netmask, Default Gateway, and Preferred DNS Server.

- Tap Save to complete and save your configuration.

Step Five: Configure the Video Stream
Video stream: the IP Camera streams one or more streams to mobile apps, NVR’s and integrated systems. The video settings control the configuration of those streams. Image settings control the parameters that affect the way the image is captured.
The video stream is configured through two basic menu items: Video and Image.
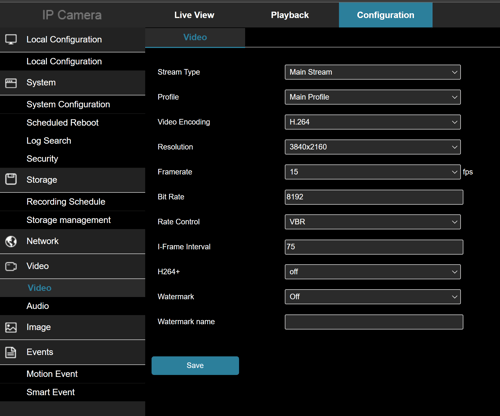
ClareVision Cameras are configured for best optimal settings out of the box. You will most likely not need to adjust settings unless specific settings require it. You can adjust image settings under Configuration > Image > Image Adjustment.
Tip:
We have configured the encoder for H.264 encoding on all streams. You may want to encode the main stream (stream 1) using H.265 as it requires about 50% of the network bandwidth and 50% of the HDD storage space vs. H.264. We set the main stream to H.264 because certain control systems and mobile phones do not decode H.265. You can tune this to your application.
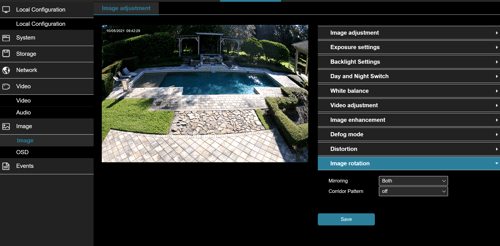
Step Six: Configure Events
Events are the heart of the intelligent camera. All configuration is found under the Configuration Tab/Events. Events are broken into two categories: motion and smart.
The standard configuration for events from the factory is as follows:
- Motion detection: enabled, full field (entire field of view
- Motion sensitivity: 5 (medium) – will detect a human about xx feet for Value Series and yy for Performance Series
- Motion record calendar: 7×24
- Motion event arm calendar: 7×24
- Motion record: main stream (except V100 4mp, which is set to sub-stream)
- Smart event: disabled
1. Determine whether you want to use Smart Events or Motion Events:
-
- Smart Events: detects human objects only and is quite accurate. Use this when other objects, like vehicles are not required. Smart events include intrusion zone, line cross detection, loitering and people gathering. False positives with Smart Events are very rare.
- Motion Events: detects motion of any kind (human, package, vehicle, animal)
Tip:
When using the camera stand alone, do not set up more than one event type (motion, smart). It is the event arming action that sends the event to the push notification server and the recording engine inside the camera. The camera will only record ONE event type (motion OR smart). If you arm both, you will get both event types sent to the user as push notifications but only one will record. The user could then receive a push notification for which there is no recording.
2. Go HERE for details on setting up motion events
3. Go HERE for tips on setting up smart events.
Step Seven: Configure Storage
While you may store events locally to the SD Card and to an NVR at the same time, in this example, we will discuss the SD Card storage only.
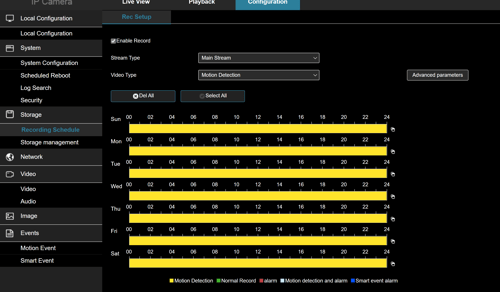
1. Go to Configuration > Storage > Recording Schedule.
Set the storage schedule and event type you wish to store.
Tip:
It is the COLOR of the bars that indicate the events that are going to be recorded NOT the drop down box above.
Caution:
Always set the recording schedule to 7×24 and use the EVENT ARMING calendar to control when something will actually be detected, recorded and a push notification sent.
2. Click on storage management to see the status of the SD Card. If it needs to be formatted it will indicate that, simply press the FORMAT button. The SD Card overwrites by default.
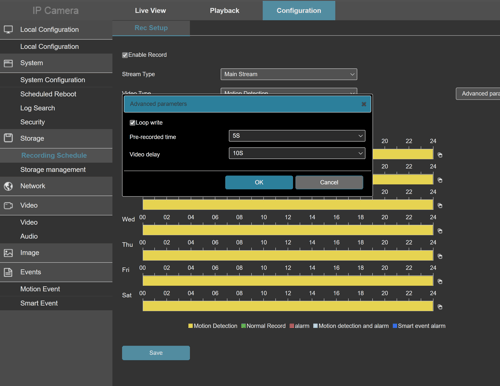
3. Advanced properties allows you to control the pre-record and post record interval. When an event is detected in the example below, the camera will store the 5 seconds leading up to the event and 10 seconds after the event ends.
Step Eight: Add the Camera to the Mobile App
Now that you have set up your camera, it is time to add it to the ClareVision app. It is quite simple.
- Launch the ClareVision App
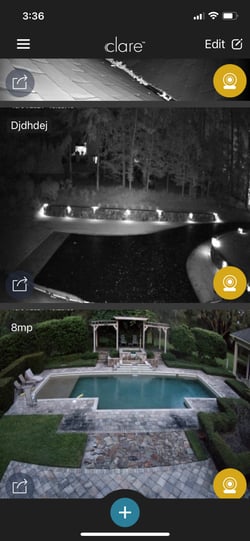
- Tap the ‘Plus’ sign and you will be presented with the three options shown below.
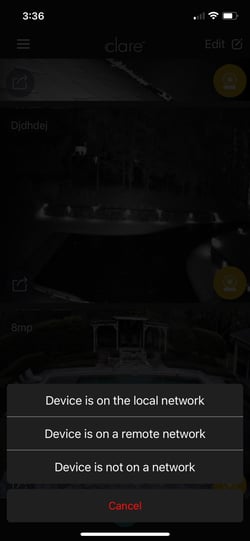
- If you tap device is on the network, the app will scan the LAN for any ClareVision cameras and present them in the following screen. Device is on a remote network provides you with the option of scanning a QR code for a camera on a remote network.
The system will locate it anywhere in the world and provide you with a login screen to add the remote camera.In our example, we tapped on “Device is on the local network” and two devices were found.
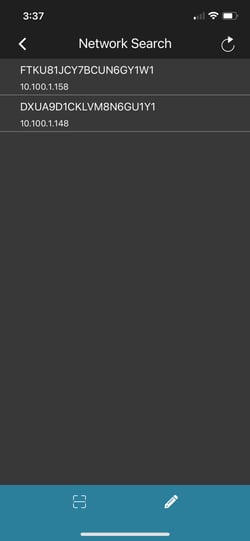
- Tapping on a device brings you to a login screen where you may enter the credentials
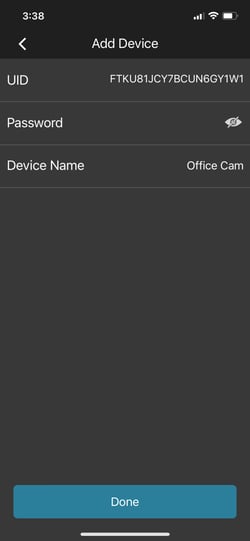
- And DONE!
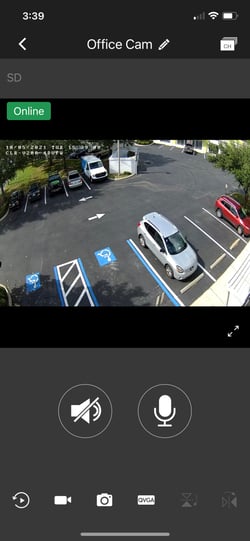
You have just successfully installed, configured and enabled a stand alone ClareVision camera on the ClareVision mobile app. Any push notifications and events that are configured will automatically propagate to your customer’s mobile device.
Getting Started with ClareVision – Standalone Camera Setup
The following is a getting started guide to for ClareVision cameras…it is the basics.
Overview
The following article provide the following information:
- The basic functions of an NVR
- The basic functions of an IP camera
- Best practices for setting up a stand alone camera
NVR’s
The NVR provides two basic functions: it network attaches the cameras and provides storage. In fact, the NVR does very little else.
- Network services: the NVR provides a central place to access IP cameras. You can attach IP cameras directly to the ports of the NVR or leave the cameras on the LAN. The NVR can be configured attach to those cameras for purposes of centralized access and recording. Centralized access can be viewing on the web console or providing access to integrated solutions such as the ClareOne Panel or a home automation system such as Control4
- Recording services: the NVR also provides recording services. You may record full time video or motion events, smart events, alarm events or any combination.
Note:
The NVR does NOT create events. The camera creates all events and the NVR simply records them. Why are the settings in the NVR for motion events, smart events and alarm events? Convenience. The NVR is simply configuring the camera so you do not have to log into each camera to configure an event. Check it out: configure an event in the NVR and log into the camera. You will see the exact settings you configured in the NVR in the camera settings web console.
Tip:
Since many ClareVision cameras come with SD cards installed, when should I use an NVR?
- Full time recording: the SD Cards are not useful for full time recording. A 4MP camera will overwrite in less than one day on full time record
- Storing multiple event types: the camera will store motion OR smart events OR alarm events. Use the NVR if you need multiple event types stored
- Camera count: if you are getting above 2 to 3 cameras, it is probably time for an NVR. Centralized access and storage flexibility will be very useful in those use cases.
IP Cameras
The IP camera is where almost everything interesting happens. The IP camera collects, analyzes and forwards video streams and snapshots to one or more clients. The camera can provide service to a mobile app, the NVR and an integrated control system simultaneously. It also provides multiple streams of video in different resolutions and frame rates so the client device can select the stream it can process. The following provides a high level reference highlighting the differences between the Value Series and Performance Series ClareVision IP cameras:
| Feature | Value Series | Performance Series |
| Motion | ✔️ | ✔️ |
| Advanced Motion | ✔️ | |
| Smart Events | ✔️ | |
| Streams | 2 | 3 |
| Starlight | ✔️ | |
| Available Varifocal | ✔️ | |
| Fixed Lens | 3.6mm | 2.8mm |
| Color at Night | Coming Soon |
In summary, the camera is where everything interesting happens. The NVR simply provides convenient access and storage.
Next, let’s set up a camera, stand alone and attach the ClareVision mobile app….
Setup a Stand-Alone ClareVision Camera, Connect to ClareVision Mobile
What You Need
Learning by doing is far better than reading articles and watching videos. Before you proceed, you will need the following:
- ClareVision IP camera: we will use a Performance series camera in our exercises.
- A computer with internet access
- A mobile phone with ClareVision installed. (Do not install ClareVision Plus – that is our legacy app)
- A PoE switch or a standard ethernet switch with a stand alone PoE injector.
Step One: Install the Camera on Your LAN
The following image shows the connection scheme for a PoE switch connected to a camera.
Tip:
If you are using a PoE switch, most switches have two LED’s on them: power and link. The power LED indicates the switch is powering the camera and the link light indicates data is being transmitted to the camera. Both of these LED’s should be lit. The link light will often flash.
If your link light is flashing on the ethernet switch and the power LED is lit – you have powered up the camera. Success!
Step Two: Find the Camera on Your LAN
All Clarevision cameras ship with DHCP turned on. DHCP simply means the router will assign an IP address to the camera when it boots up using the LAN IP address scheme. Example:
- Router IP Address: 192.168.1.1 (typical)
- IP address range that may be available: 192.168.1.2 through 192.168.1.255
- Router will assign an address like this: 192.168.1.x, where x can be any number between 2 and 255.
Tip:
While you can simply launch the mobile app, discover the camera and configure the password change, we DO NOT recommend this as a best practice. Many configuration parameters and all Smart Events are configurable from the web console only. Take the time to tune the camera to the installation, it will pay dividends in customer satisfaction!
How do you find your camera so you can login and configure? Download the IP search tool here.
Install and Launch IP Search and select “Search”
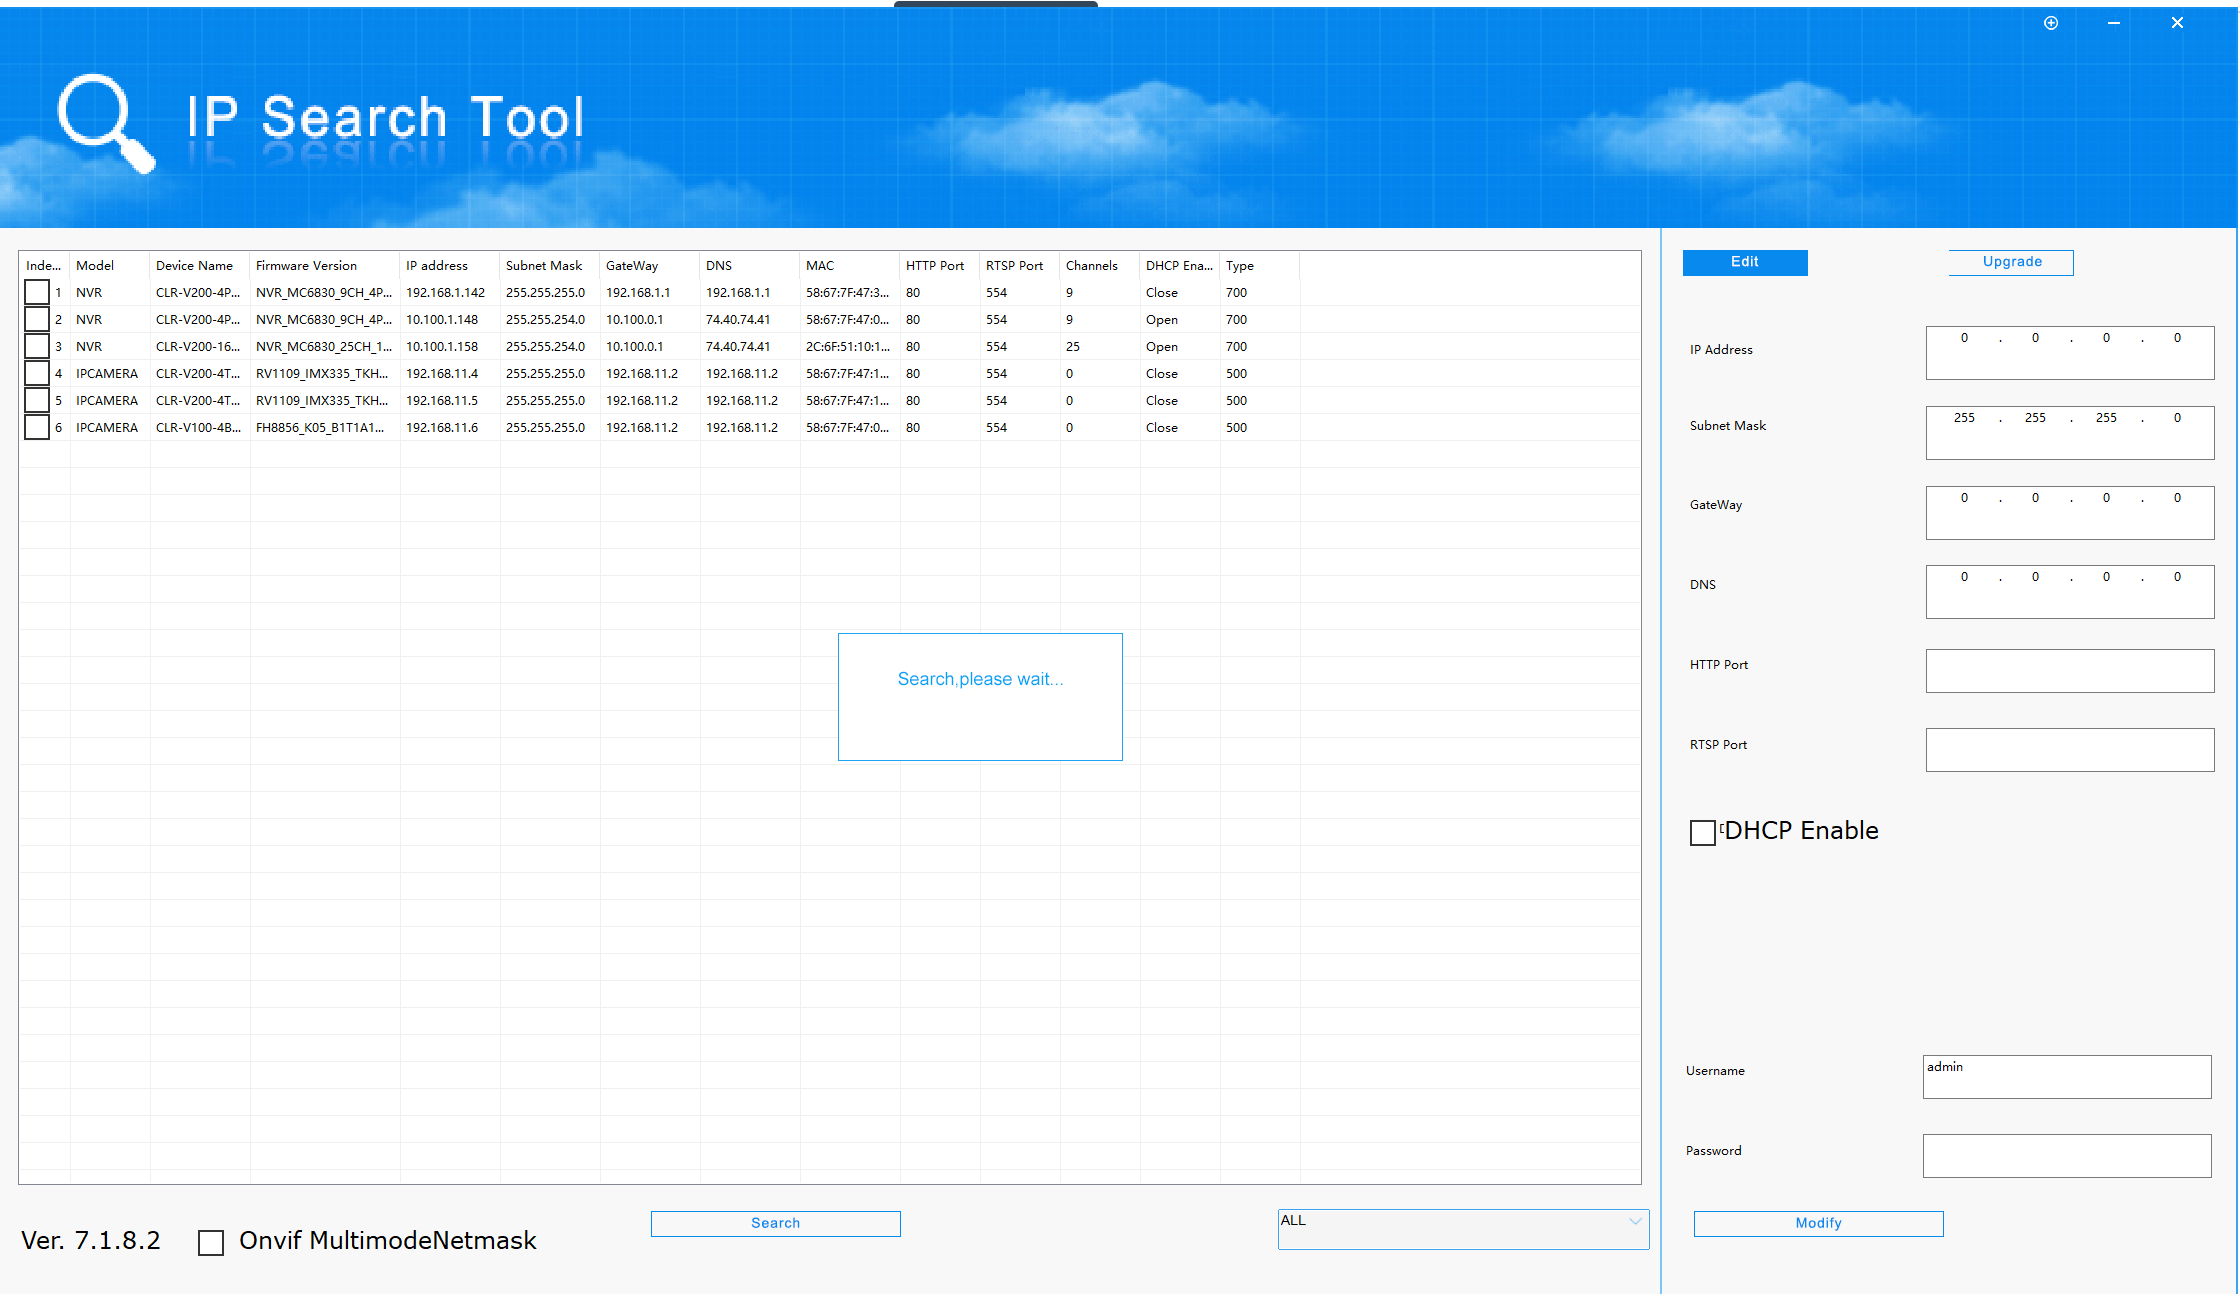
All IP cameras and NVR’s regardless of their IP address will appear in the results window.
Next launch a web browser (Chrome or Edge) and enter the IP address of the camera you just installed.
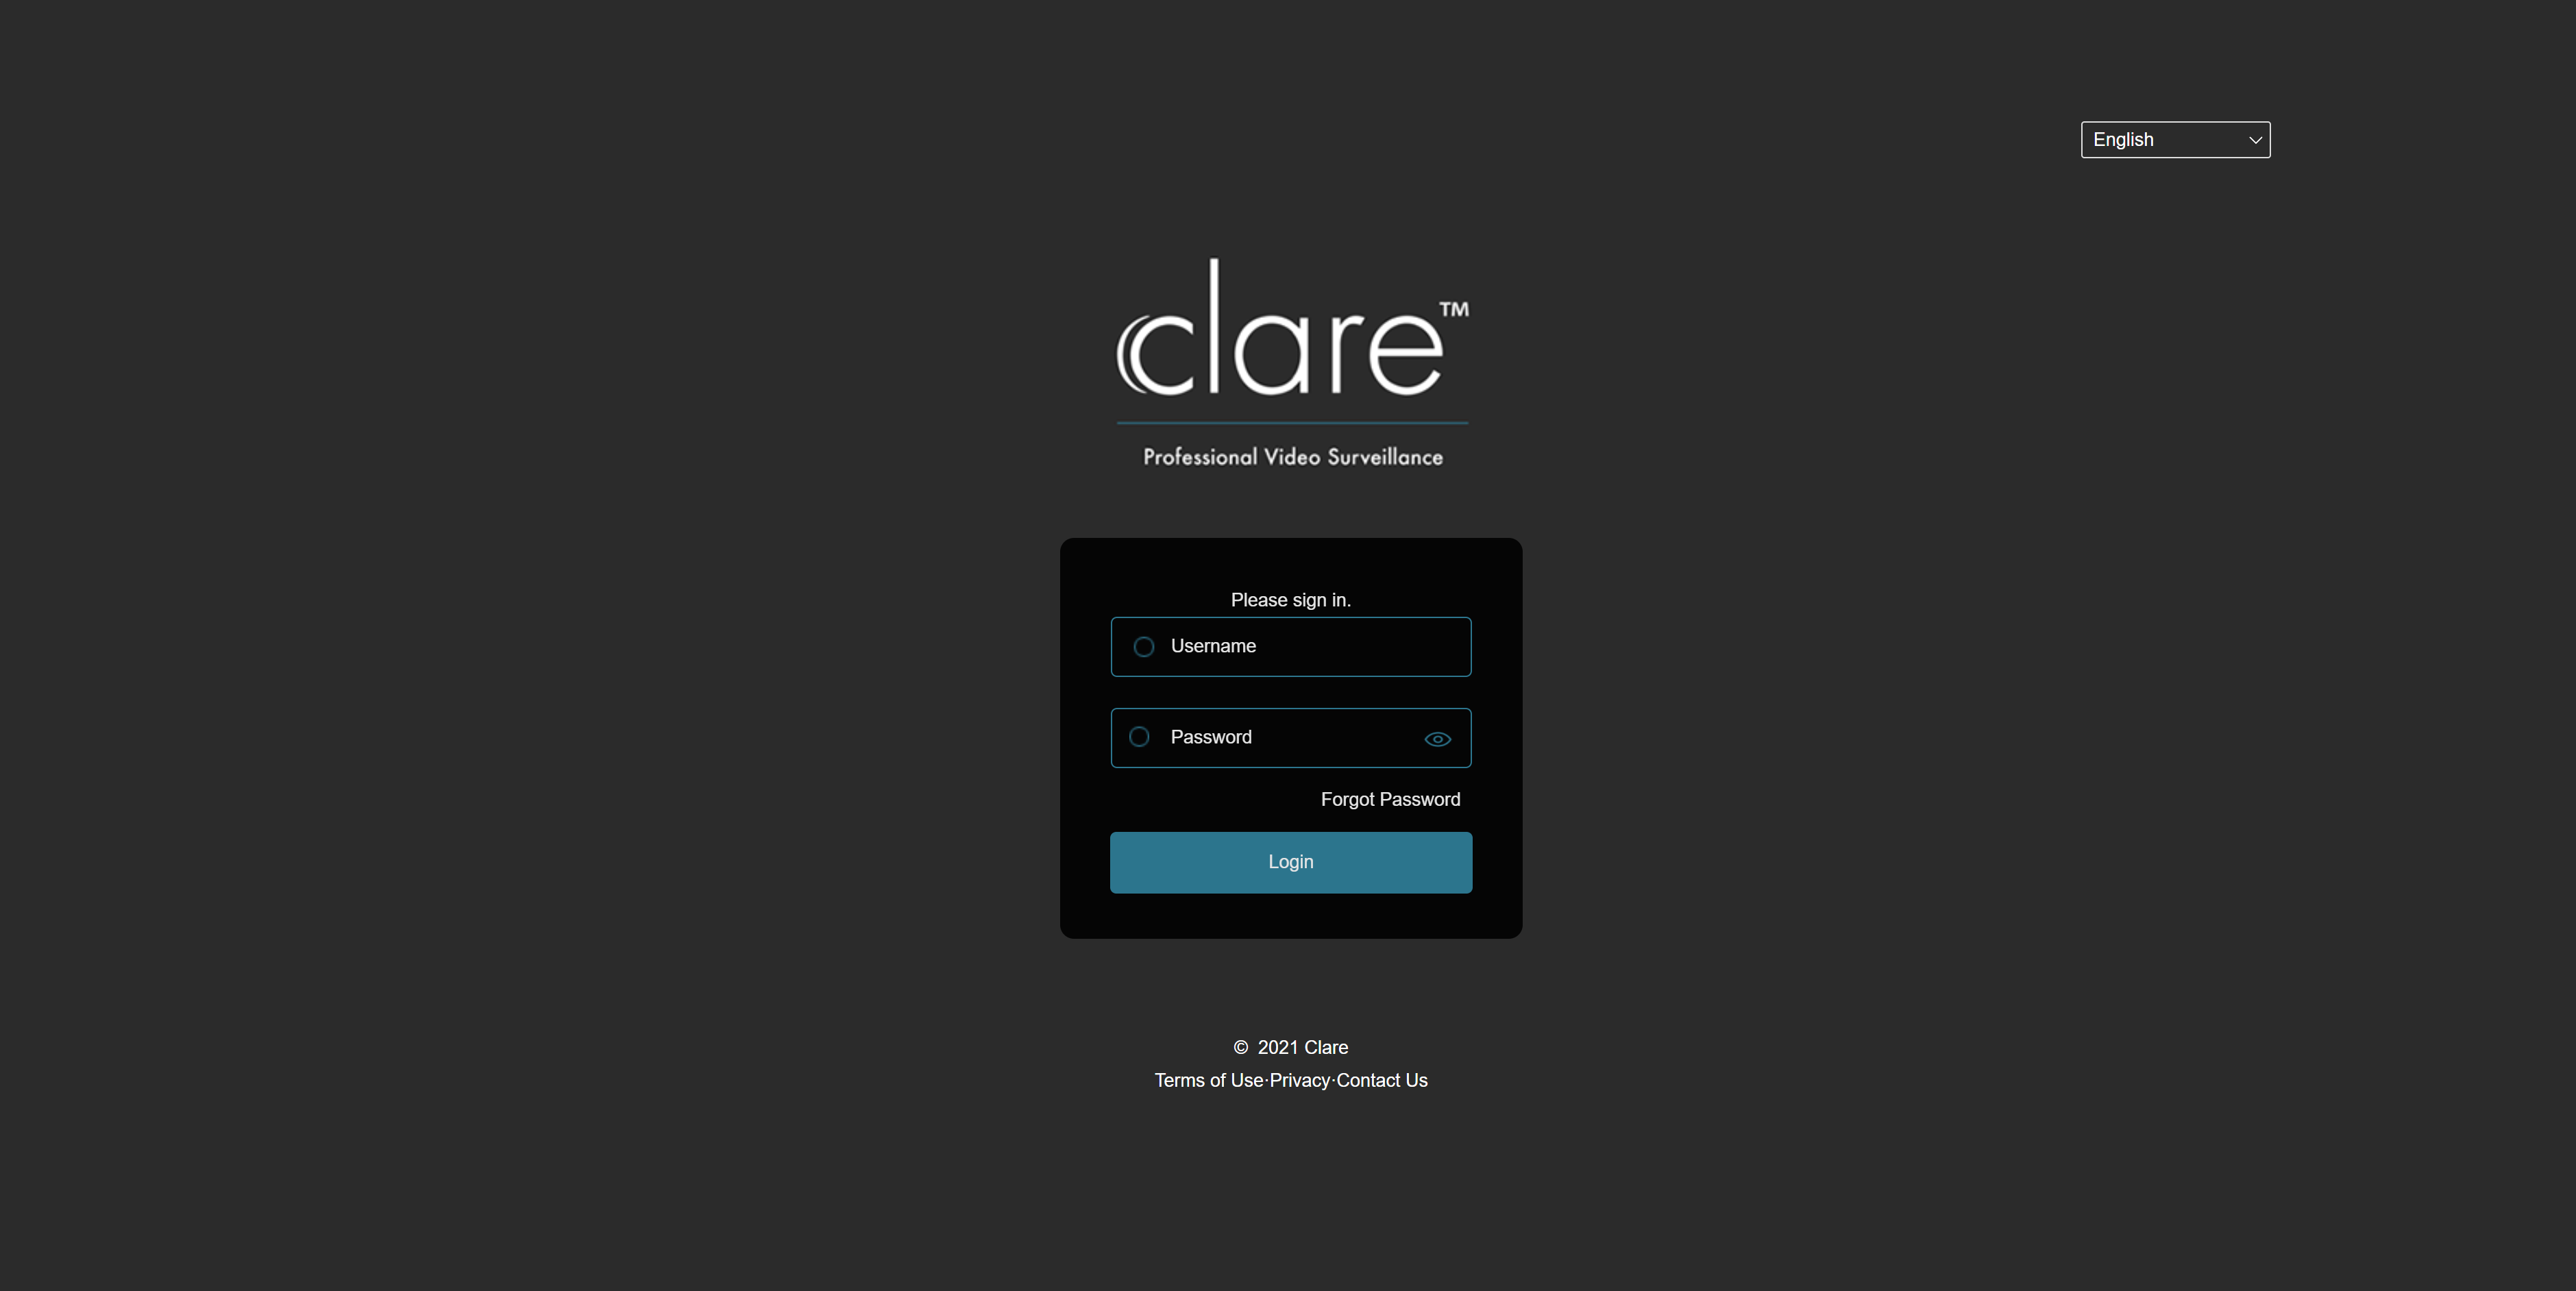
The default USERID is: admin (not case sensitive)
The default password is the first six characters of the UUID. The UUID can be found on the camera label or the quick start guide. If those are not available or inconvenient, you can use one of these methods found HERE to discover the UUID.
Tip:
When you login, you will be asked to change the password and answer security questions. Make sure you configure the security questions and store them. If you do not and you lose the password you will have to go to the camera and physically reset it.
Step Three: Update the Camera to the Latest Firmware Release
Clare Controls releases camera firmware with new features about once every four months. Chances are, your camera will need to be updated when you take out of the box. The camera firmware database is located here.
Log into the camera and go to the Configuration tab and click on System Configuration/Device Information to review the firmware version.
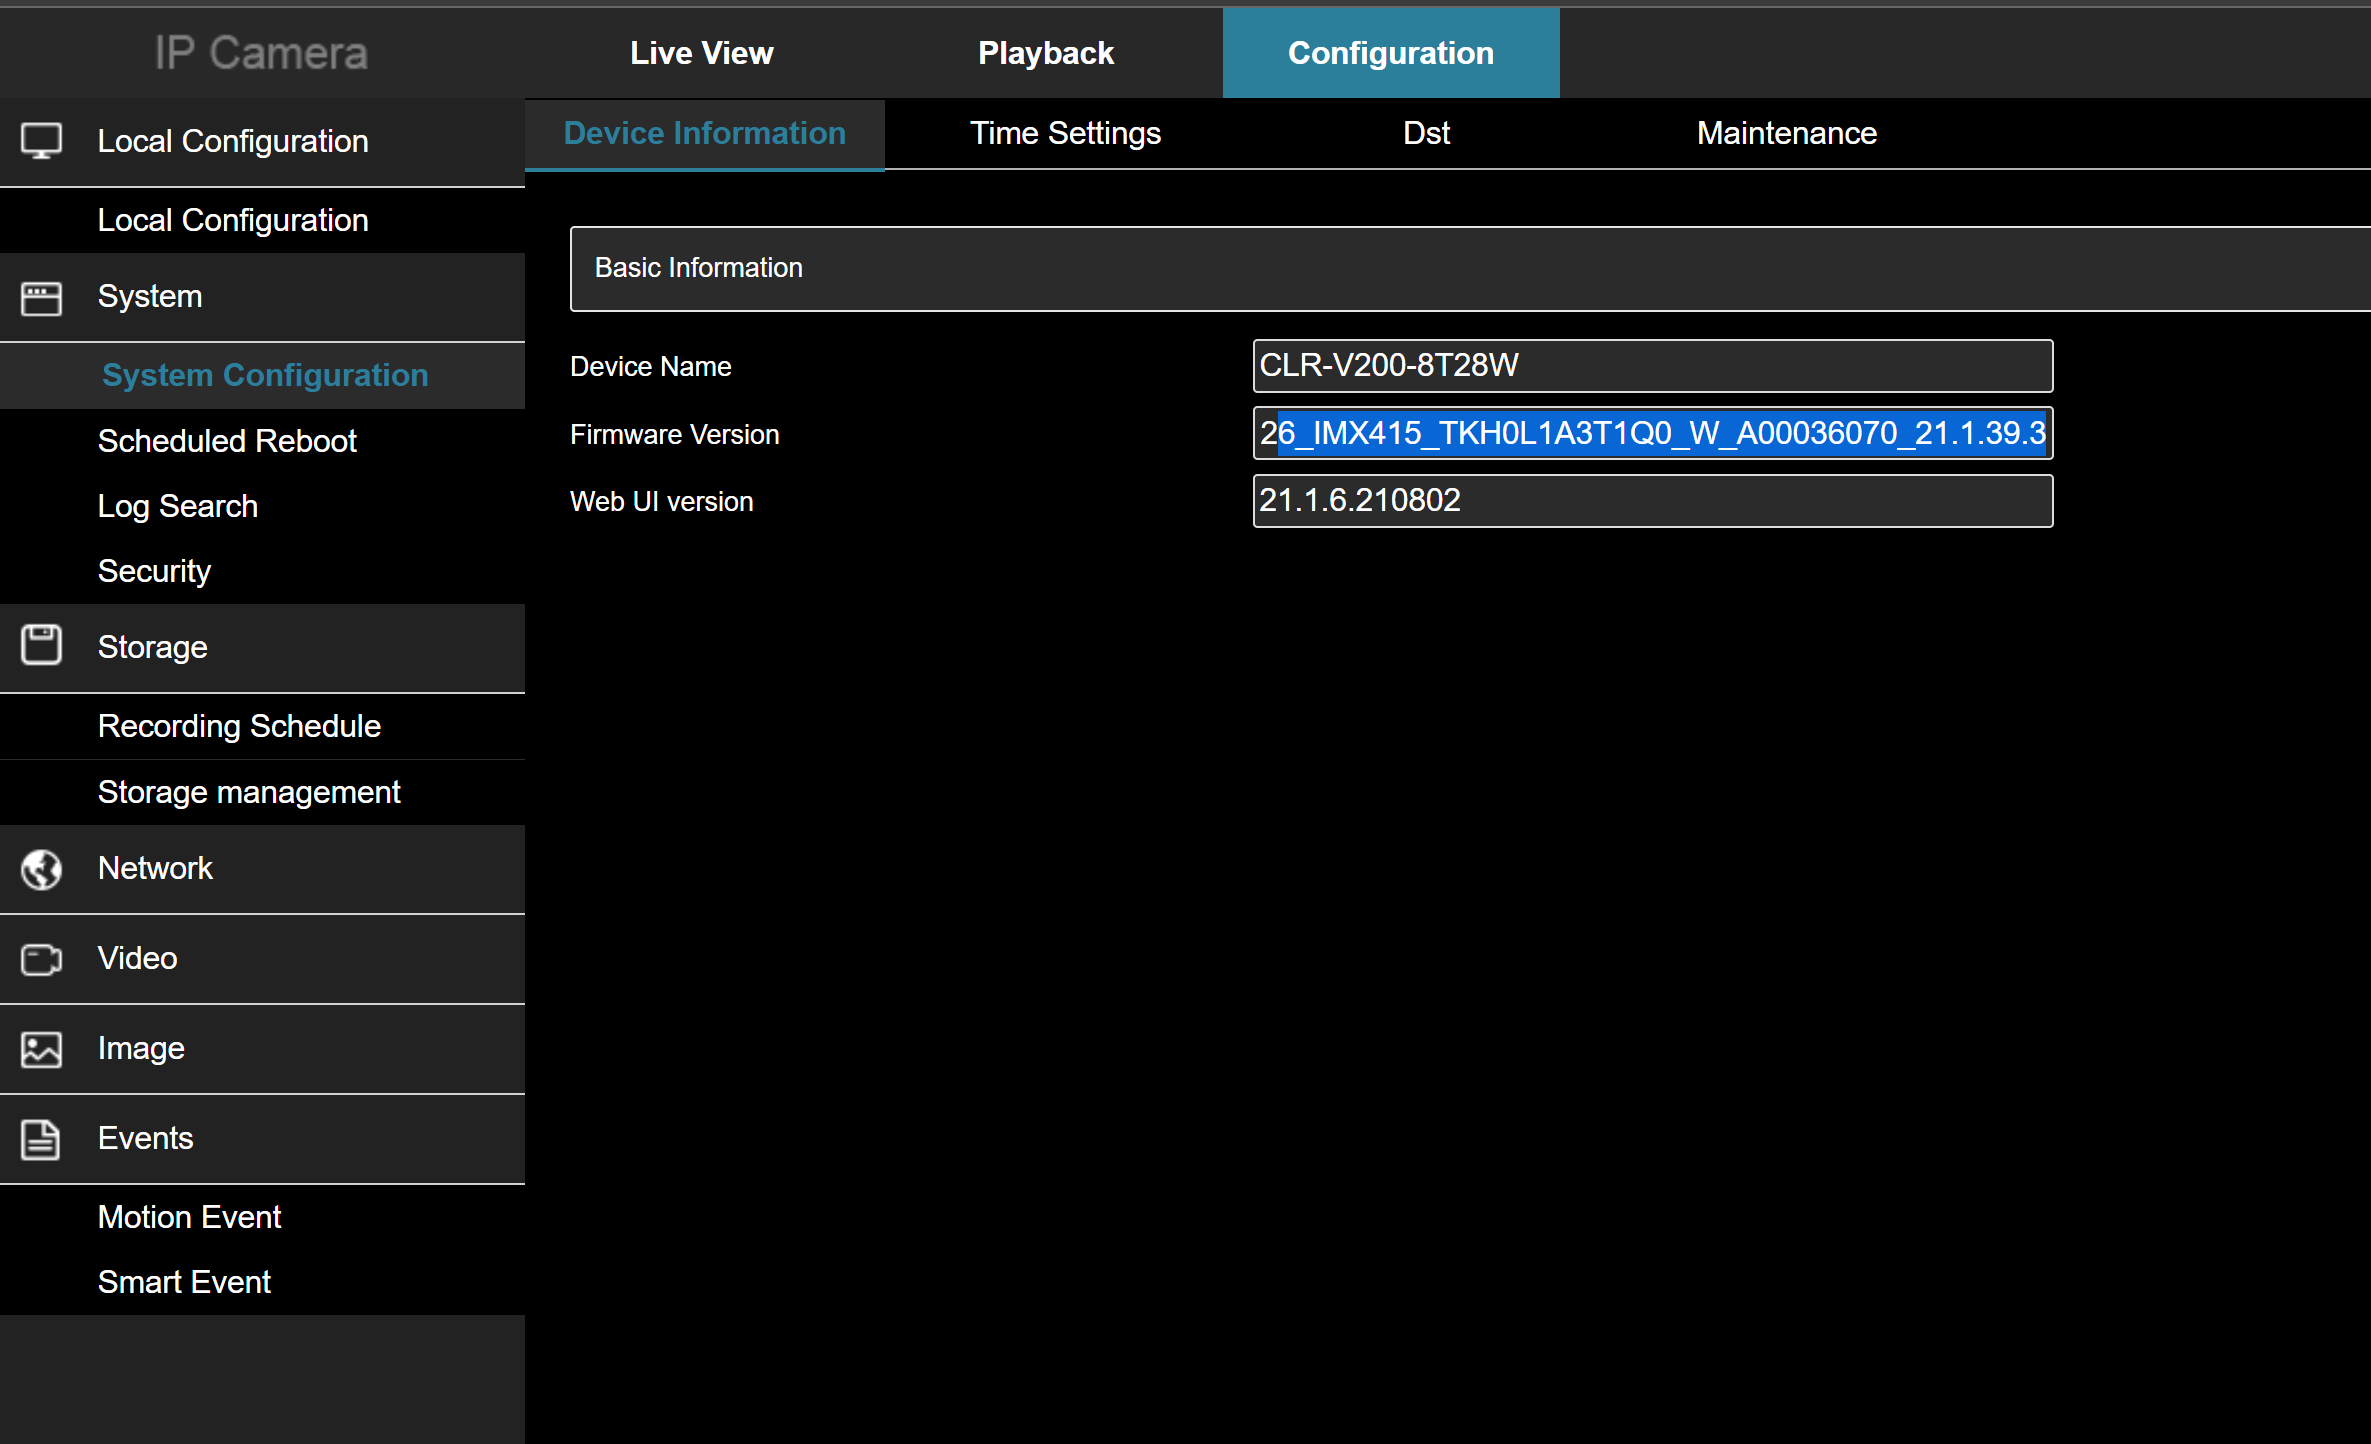
Cameras with version numbers where the last 3 digits are lower than 30.x will require you to to to the maintenance tab and upload the firmware to the camera you retrieved from our website. Cameras with version numbers greater than 30.x will have online update services directly from the web console as shown below:
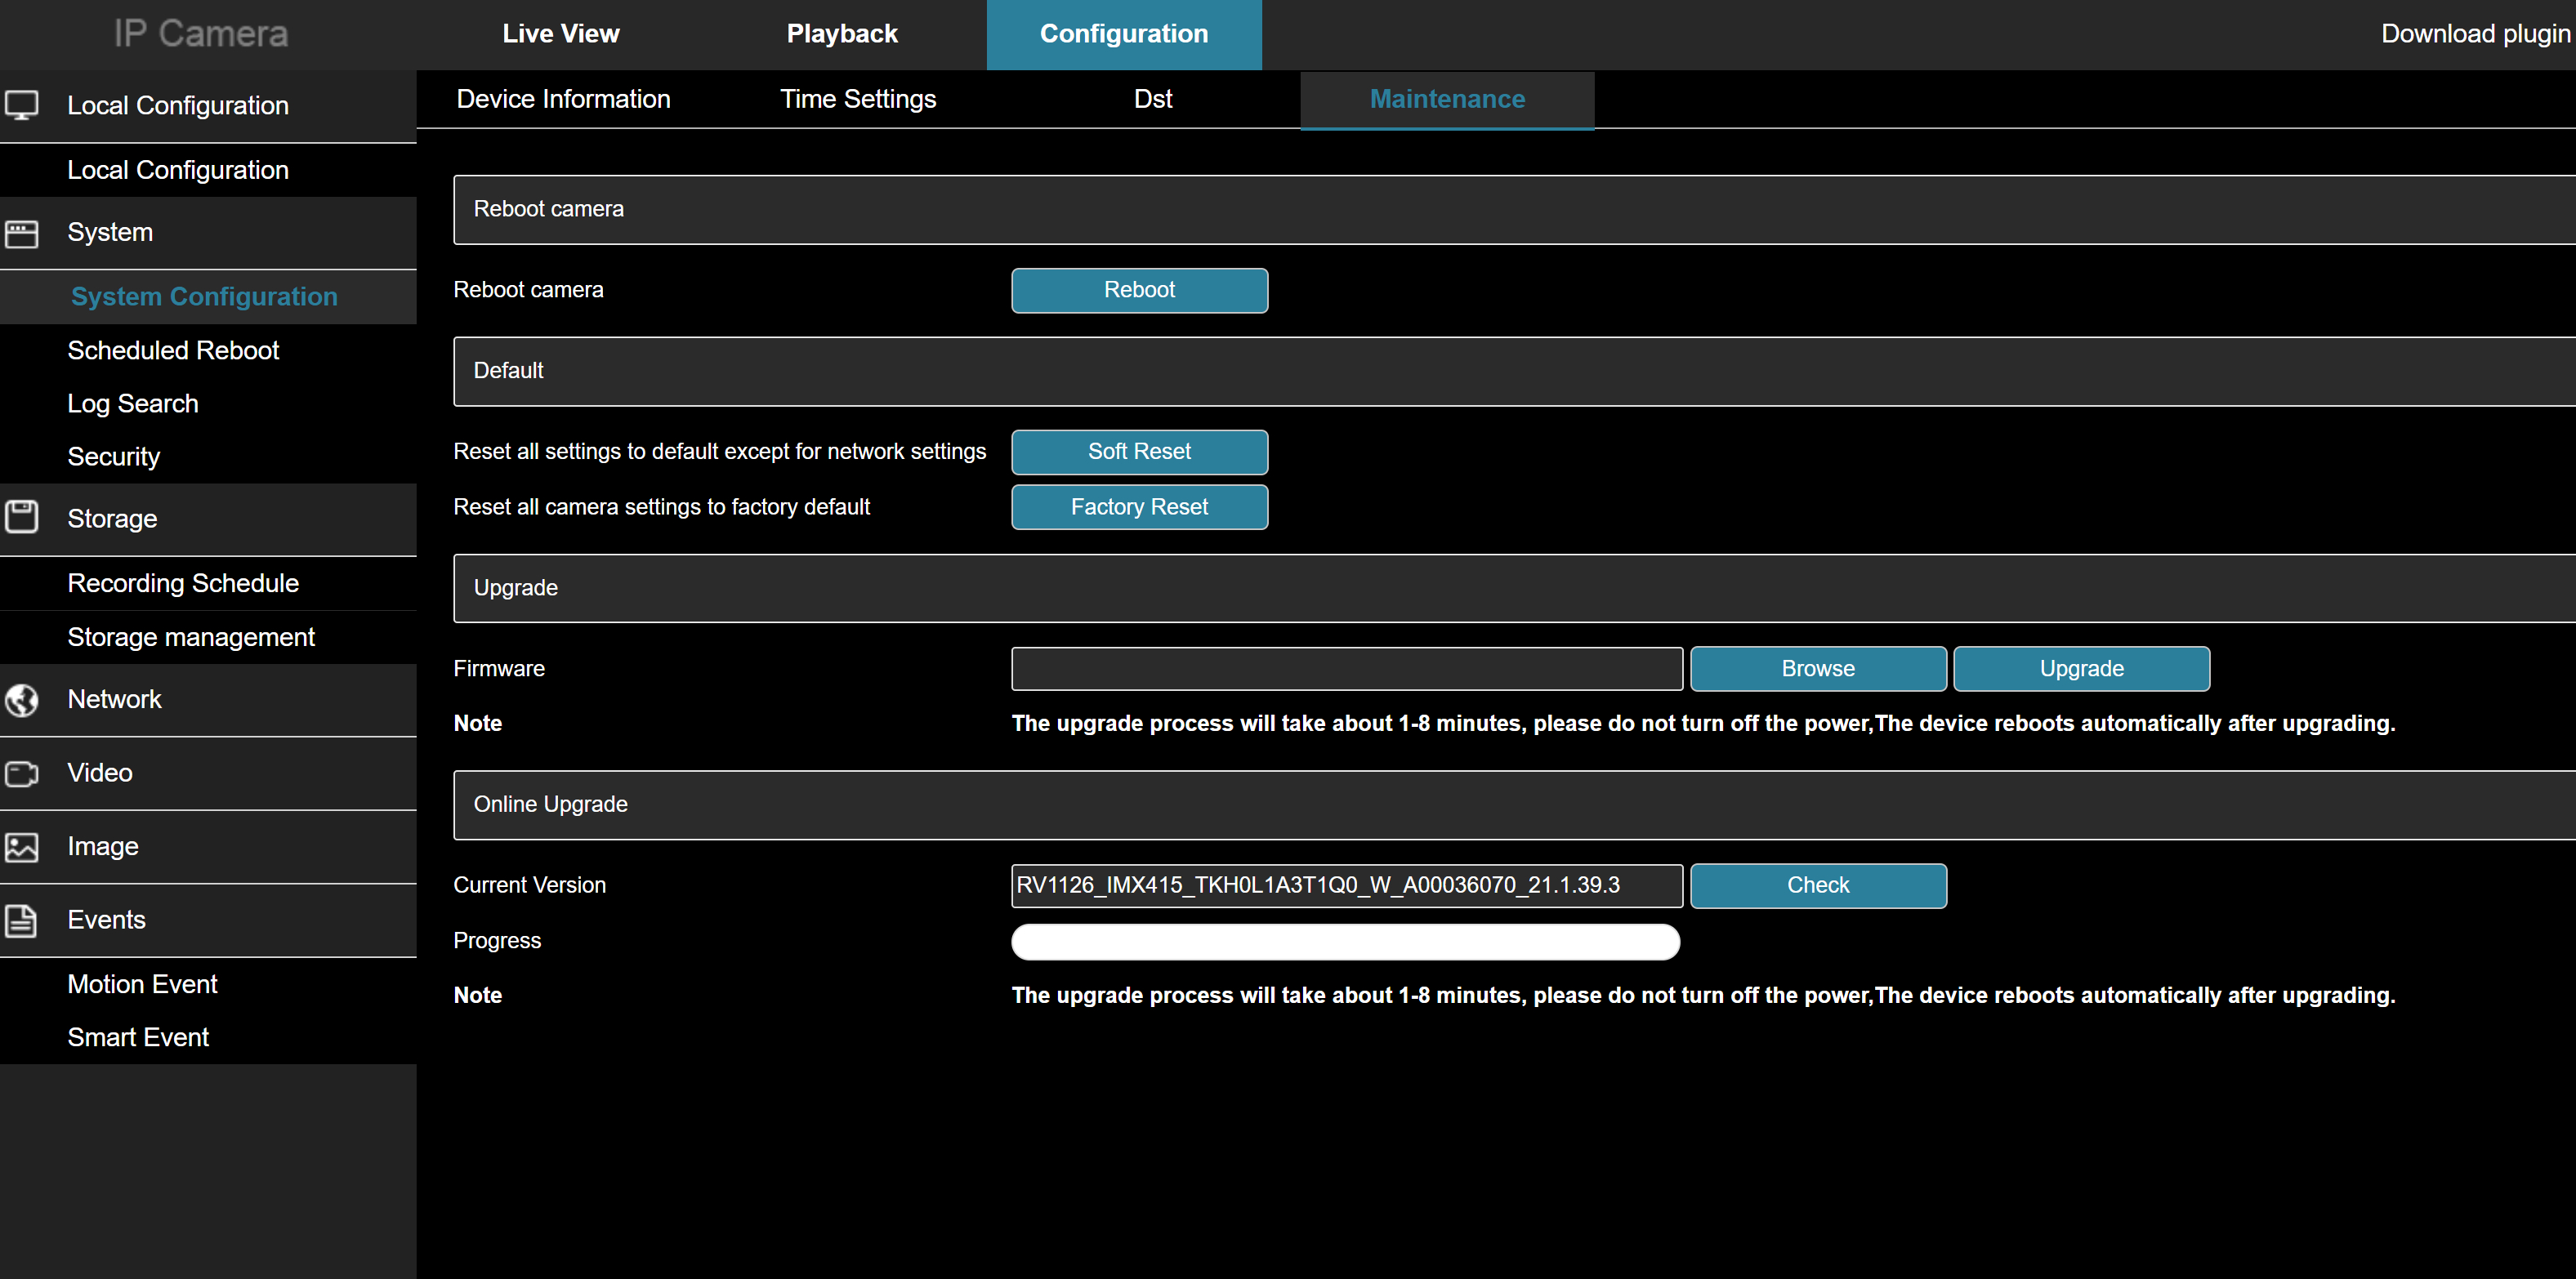
Simply click on the “Check” button and the camera will check our servers for an update and if available ask you if you want the camera updated. Updates take about 3 minutes.
Step Four: Configure the Video Stream
Video stream: the IP Camera streams one or more streams to mobile apps, NVR’s and integrated systems. The video settings control the configuration of those streams. Image settings control the parameters that affect the way the image is captured.
The video stream is configured through two basic menu items: Video and Image.
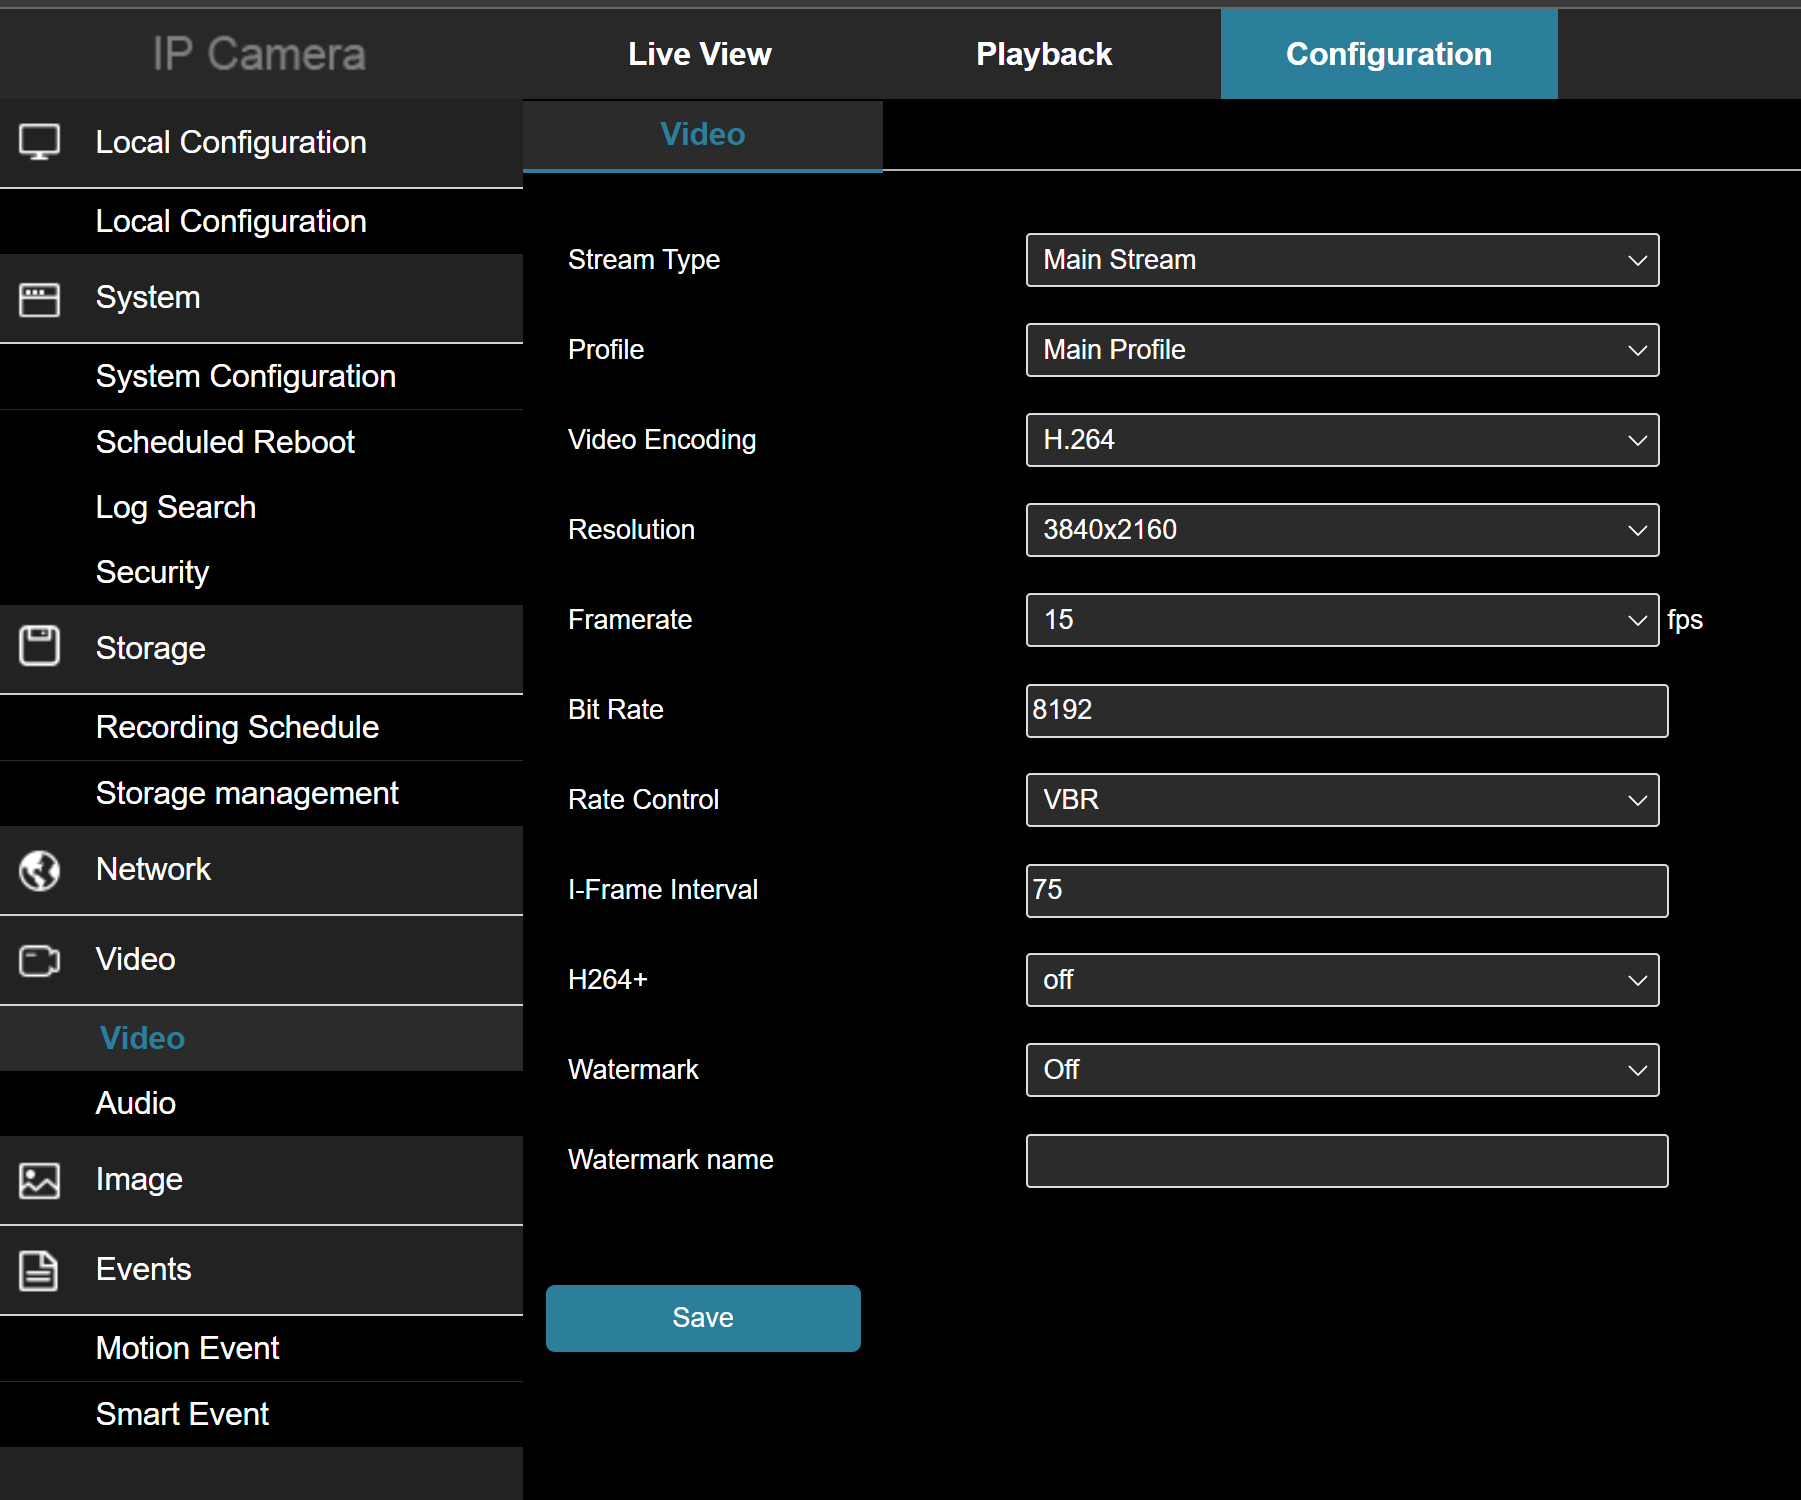
Here’s the good news. You likely will not have to adjust any video settings. We have configured those to allow for seamless integration into the ClareOne system and third party control systems.
Tip:
We have configured the encoder for H.264 encoding on all streams. You may want to encode the main stream (stream 1) using H.265 as it requires about 50% of the network bandwidth and 50% of the HDD storage space vs. H.264. We set the main stream to H.264 because certain control systems and mobile phones do not decode H.265. You can tune this to your application.
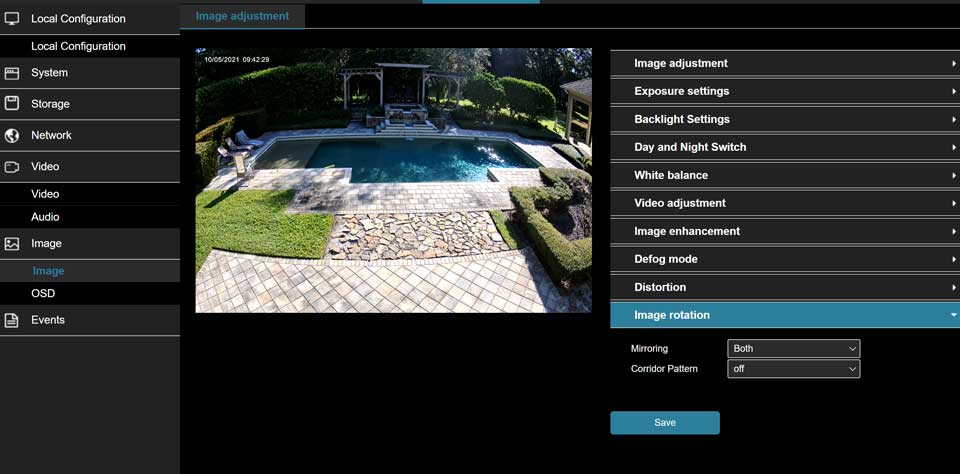
You likely will not touch any image settings except image rotation. Clare put a lot of time into optimizing all settings. We believe you will agree when you see the image quality!
Here is the image rotation setting:
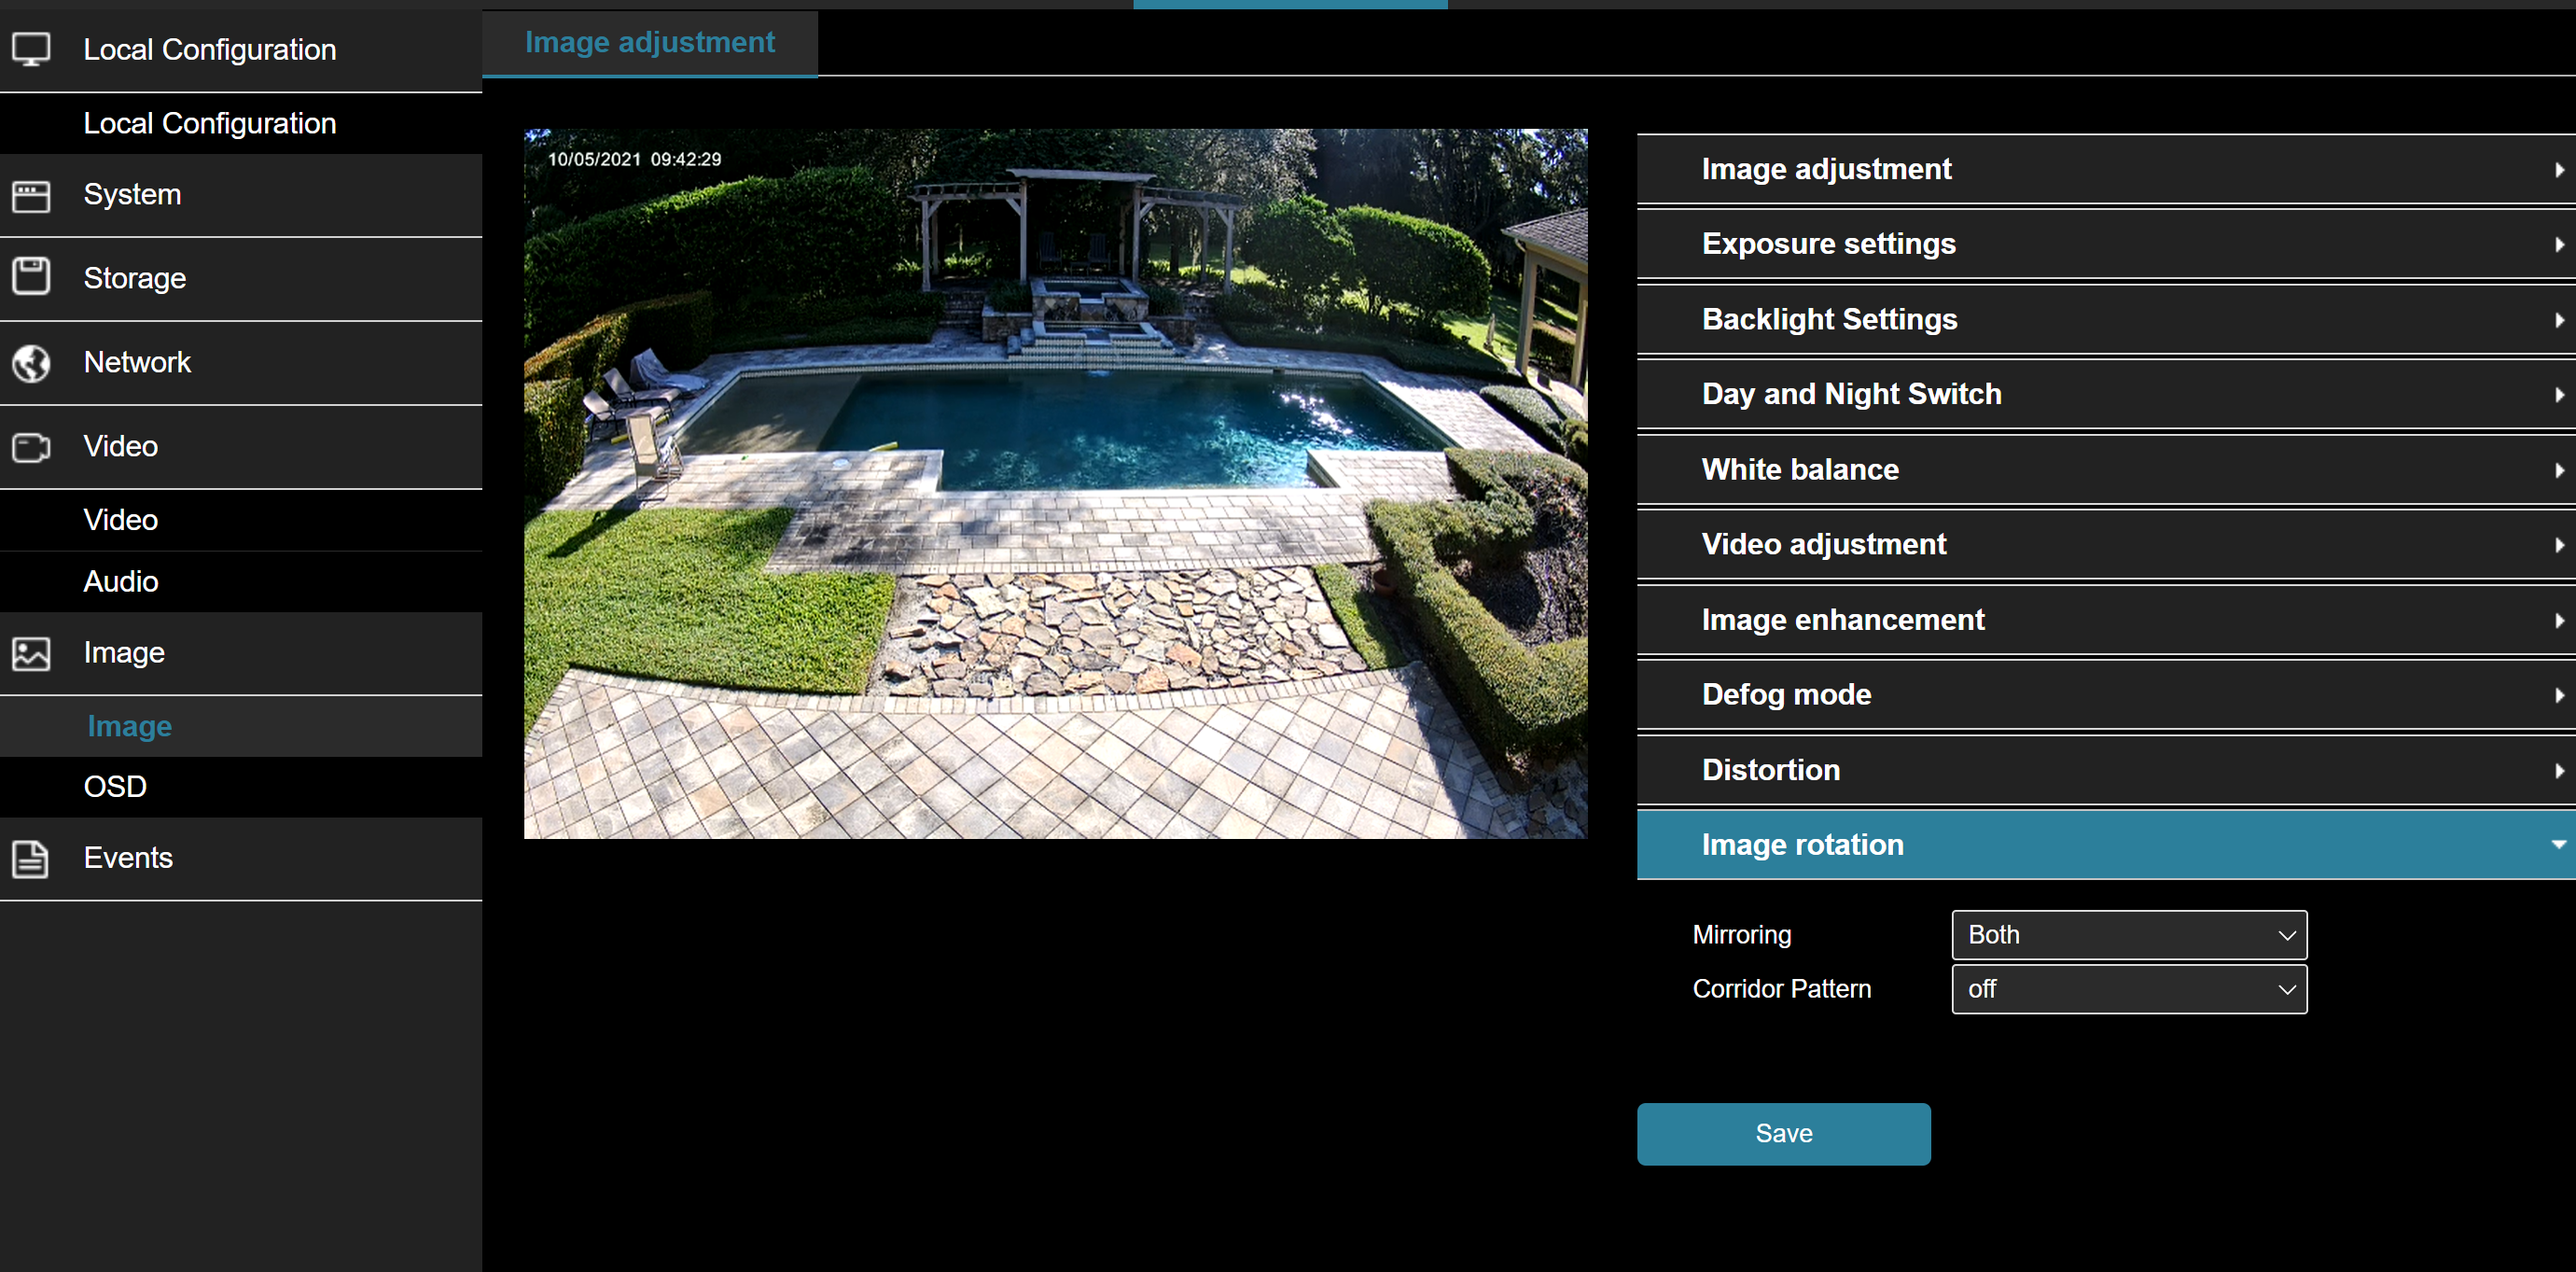
That’s it! You are done with video and image settings!
Step Five: Configure Events
Events are the heart of the intelligent camera. All configuration is found under the Configuration Tab/Events. Events are broken into two categories: motion and smart. (V200 only).
The standard configuration for events from the factory is as follows:
- Motion detection: enabled, full field (entire field of view)
- Motion sensitivity: 5 (medium) – will detect a human about xx feet for Value Series and yy for Performance Series
- Motion record calendar: 7×24
- Motion event arm calendar: 7×24
- Motion record: main stream (except V100 4mp, which is set to sub-stream)
- Smart event: disabled
1. Determine whether you want to use Smart Events or Motion Events:
-
- Smart Events: detects human objects only and is quite accurate. Use this when other objects, like vehicles are not required. Smart events include intrusion zone, line cross detection, loitering and people gathering. False positives with Smart Events are very rare.
- Motion Events: detects motion of any kind (human, package, vehicle, animal)
Tip:
When using the camera stand alone, do not set up more than one event type (motion, smart). It is the event arming action that sends the event to the push notification server and the recording engine inside the camera. The camera will only record ONE event type (motion OR smart). If you arm both, you will get both event types sent to the user as push notifications but only one will record. The user could then receive a push notification for which there is no recording.
2. Go HERE for details on setting up motion events
3. Go HERE for tips on setting up smart events.
Step Six: Configure Storage
While you may store events locally to the SD Card and to an NVR at the same time, in this example, we will discuss the SD Card storage only.
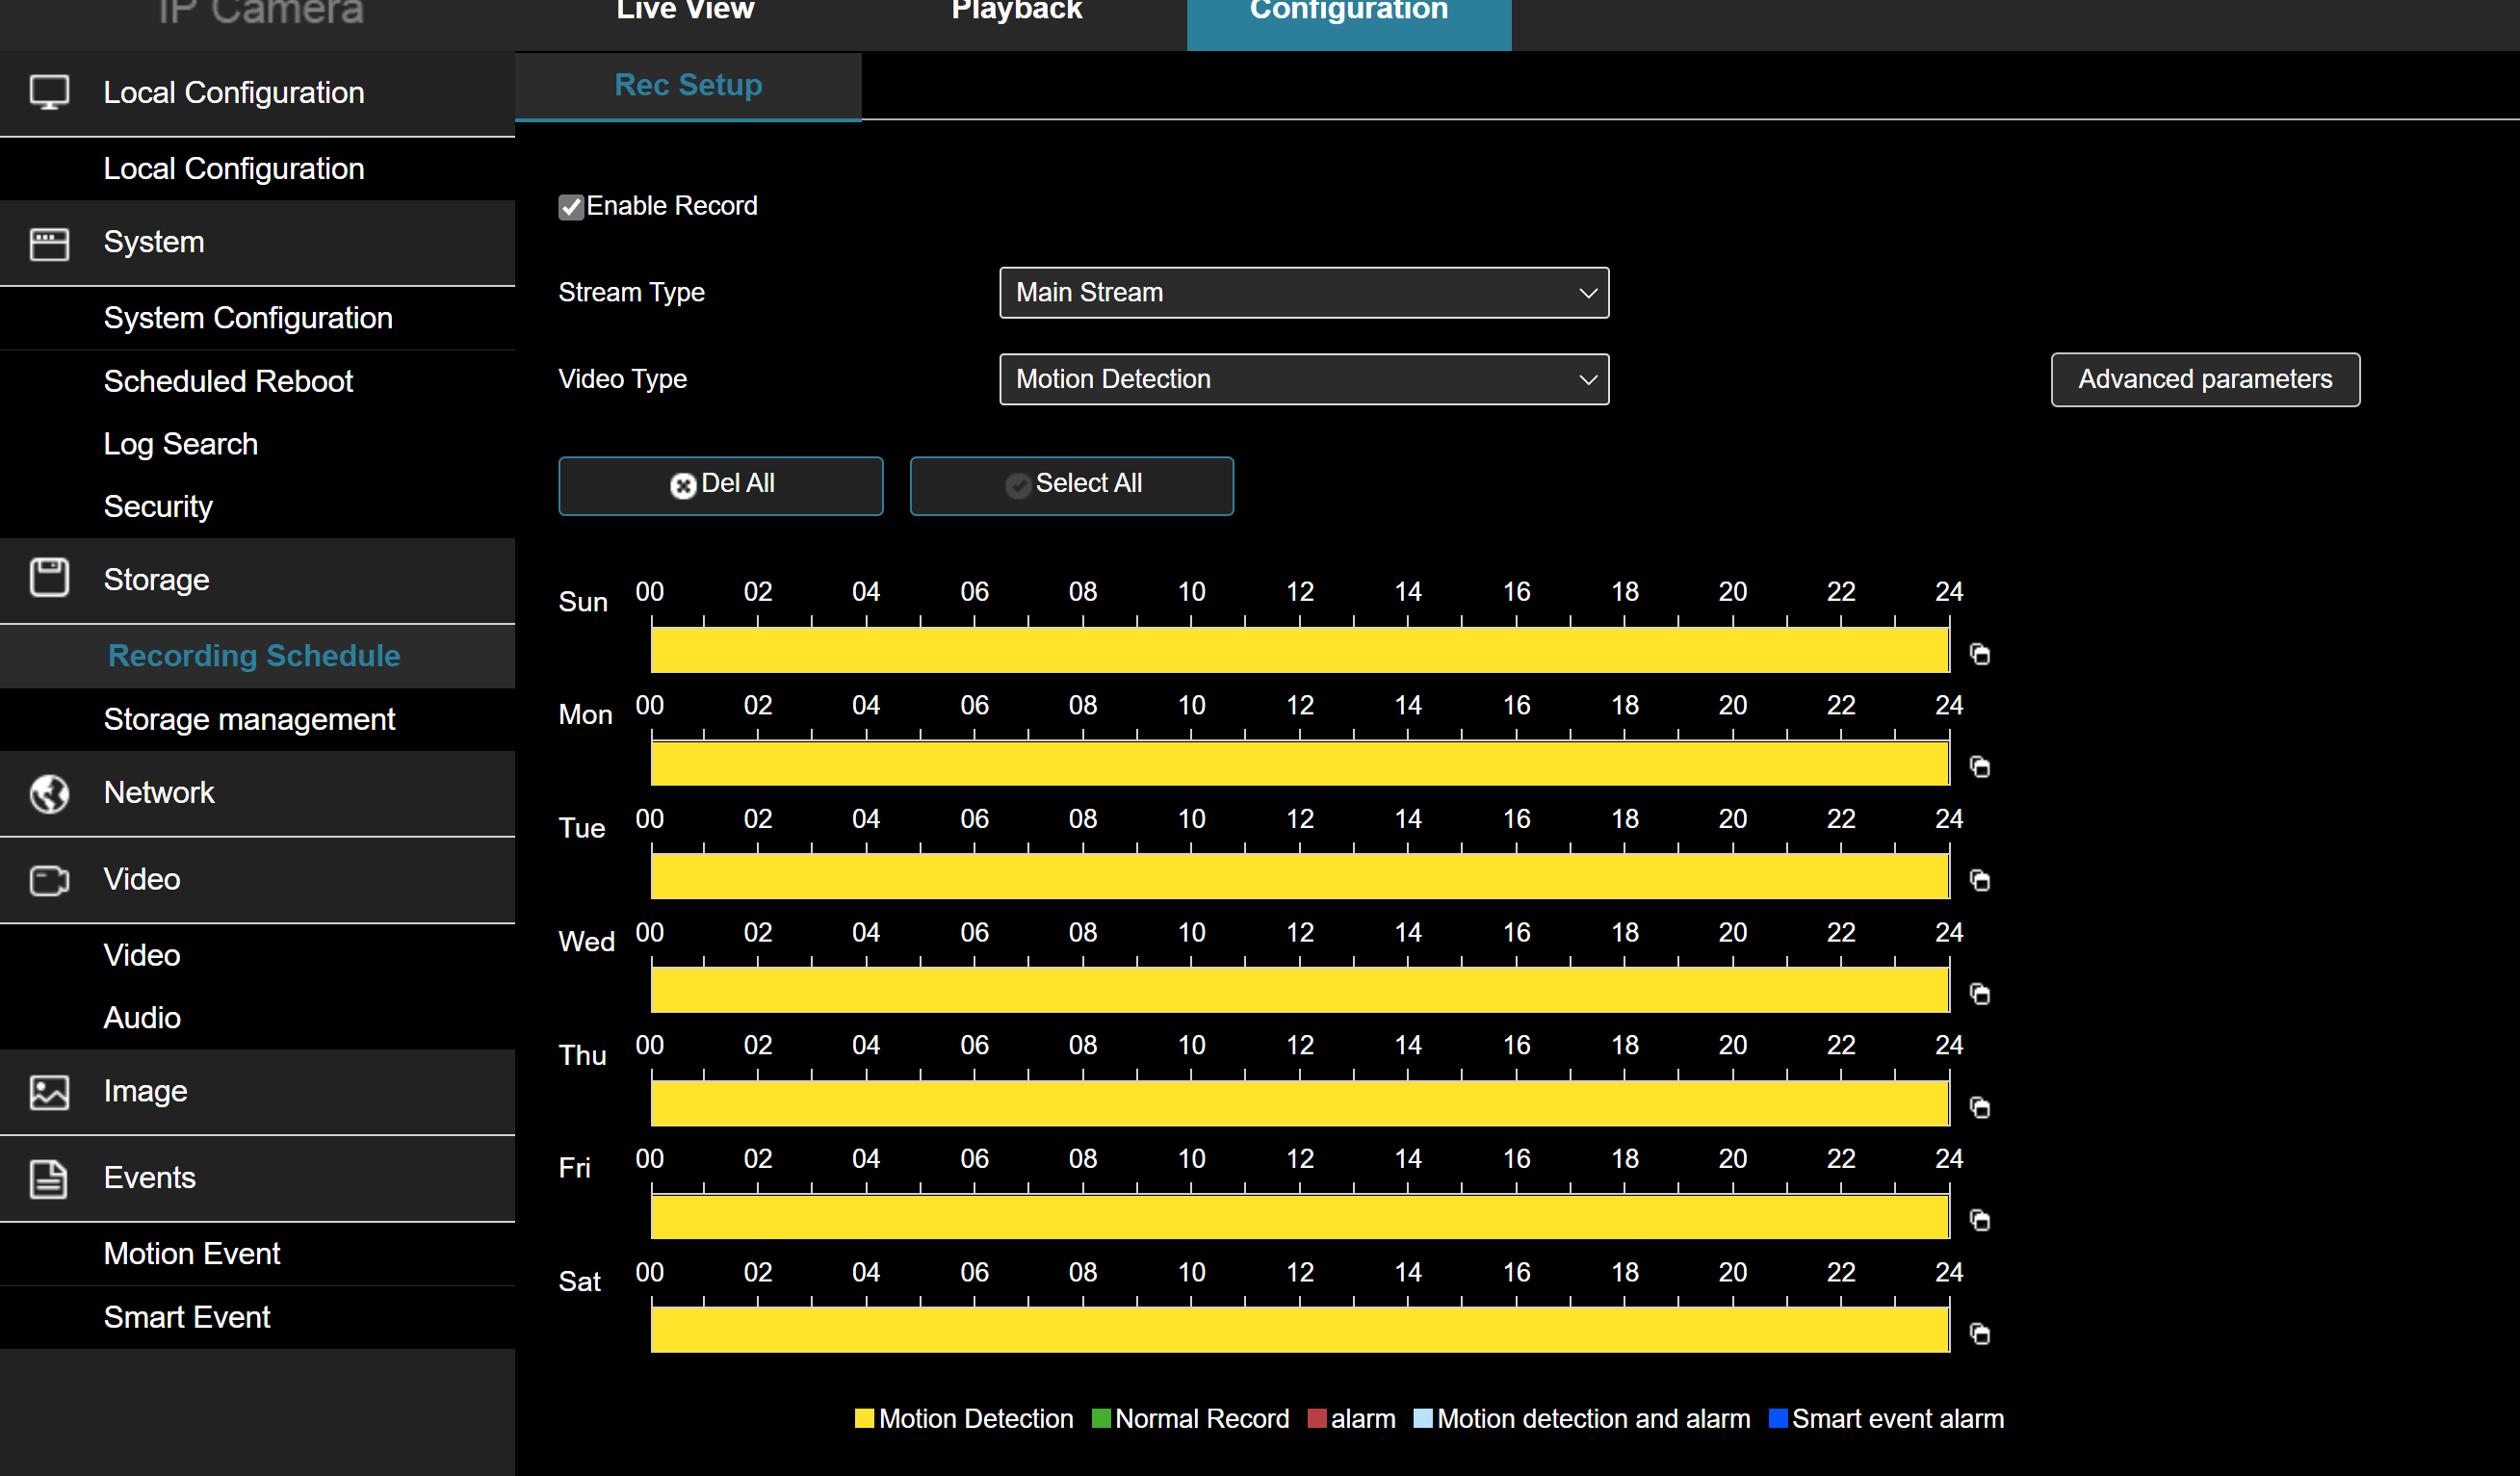
1. Go to Configuration/Storage/Recording Schedule
Set the storage schedule and event type you wish to store
Tip:
It is the COLOR of the bars that indicate the events that are going to be recorded NOT the drop down box above.
Caution:
Always set the recording schedule to 7×24 and use the EVENT ARMING calendar to control when something will actually be detected, recorded and a push notification sent.
2. Click on storage management to see the status of the SD Card. If it needs to be formatted it will indicate that, simply press the FORMAT button. The SD Card overwrites by default.
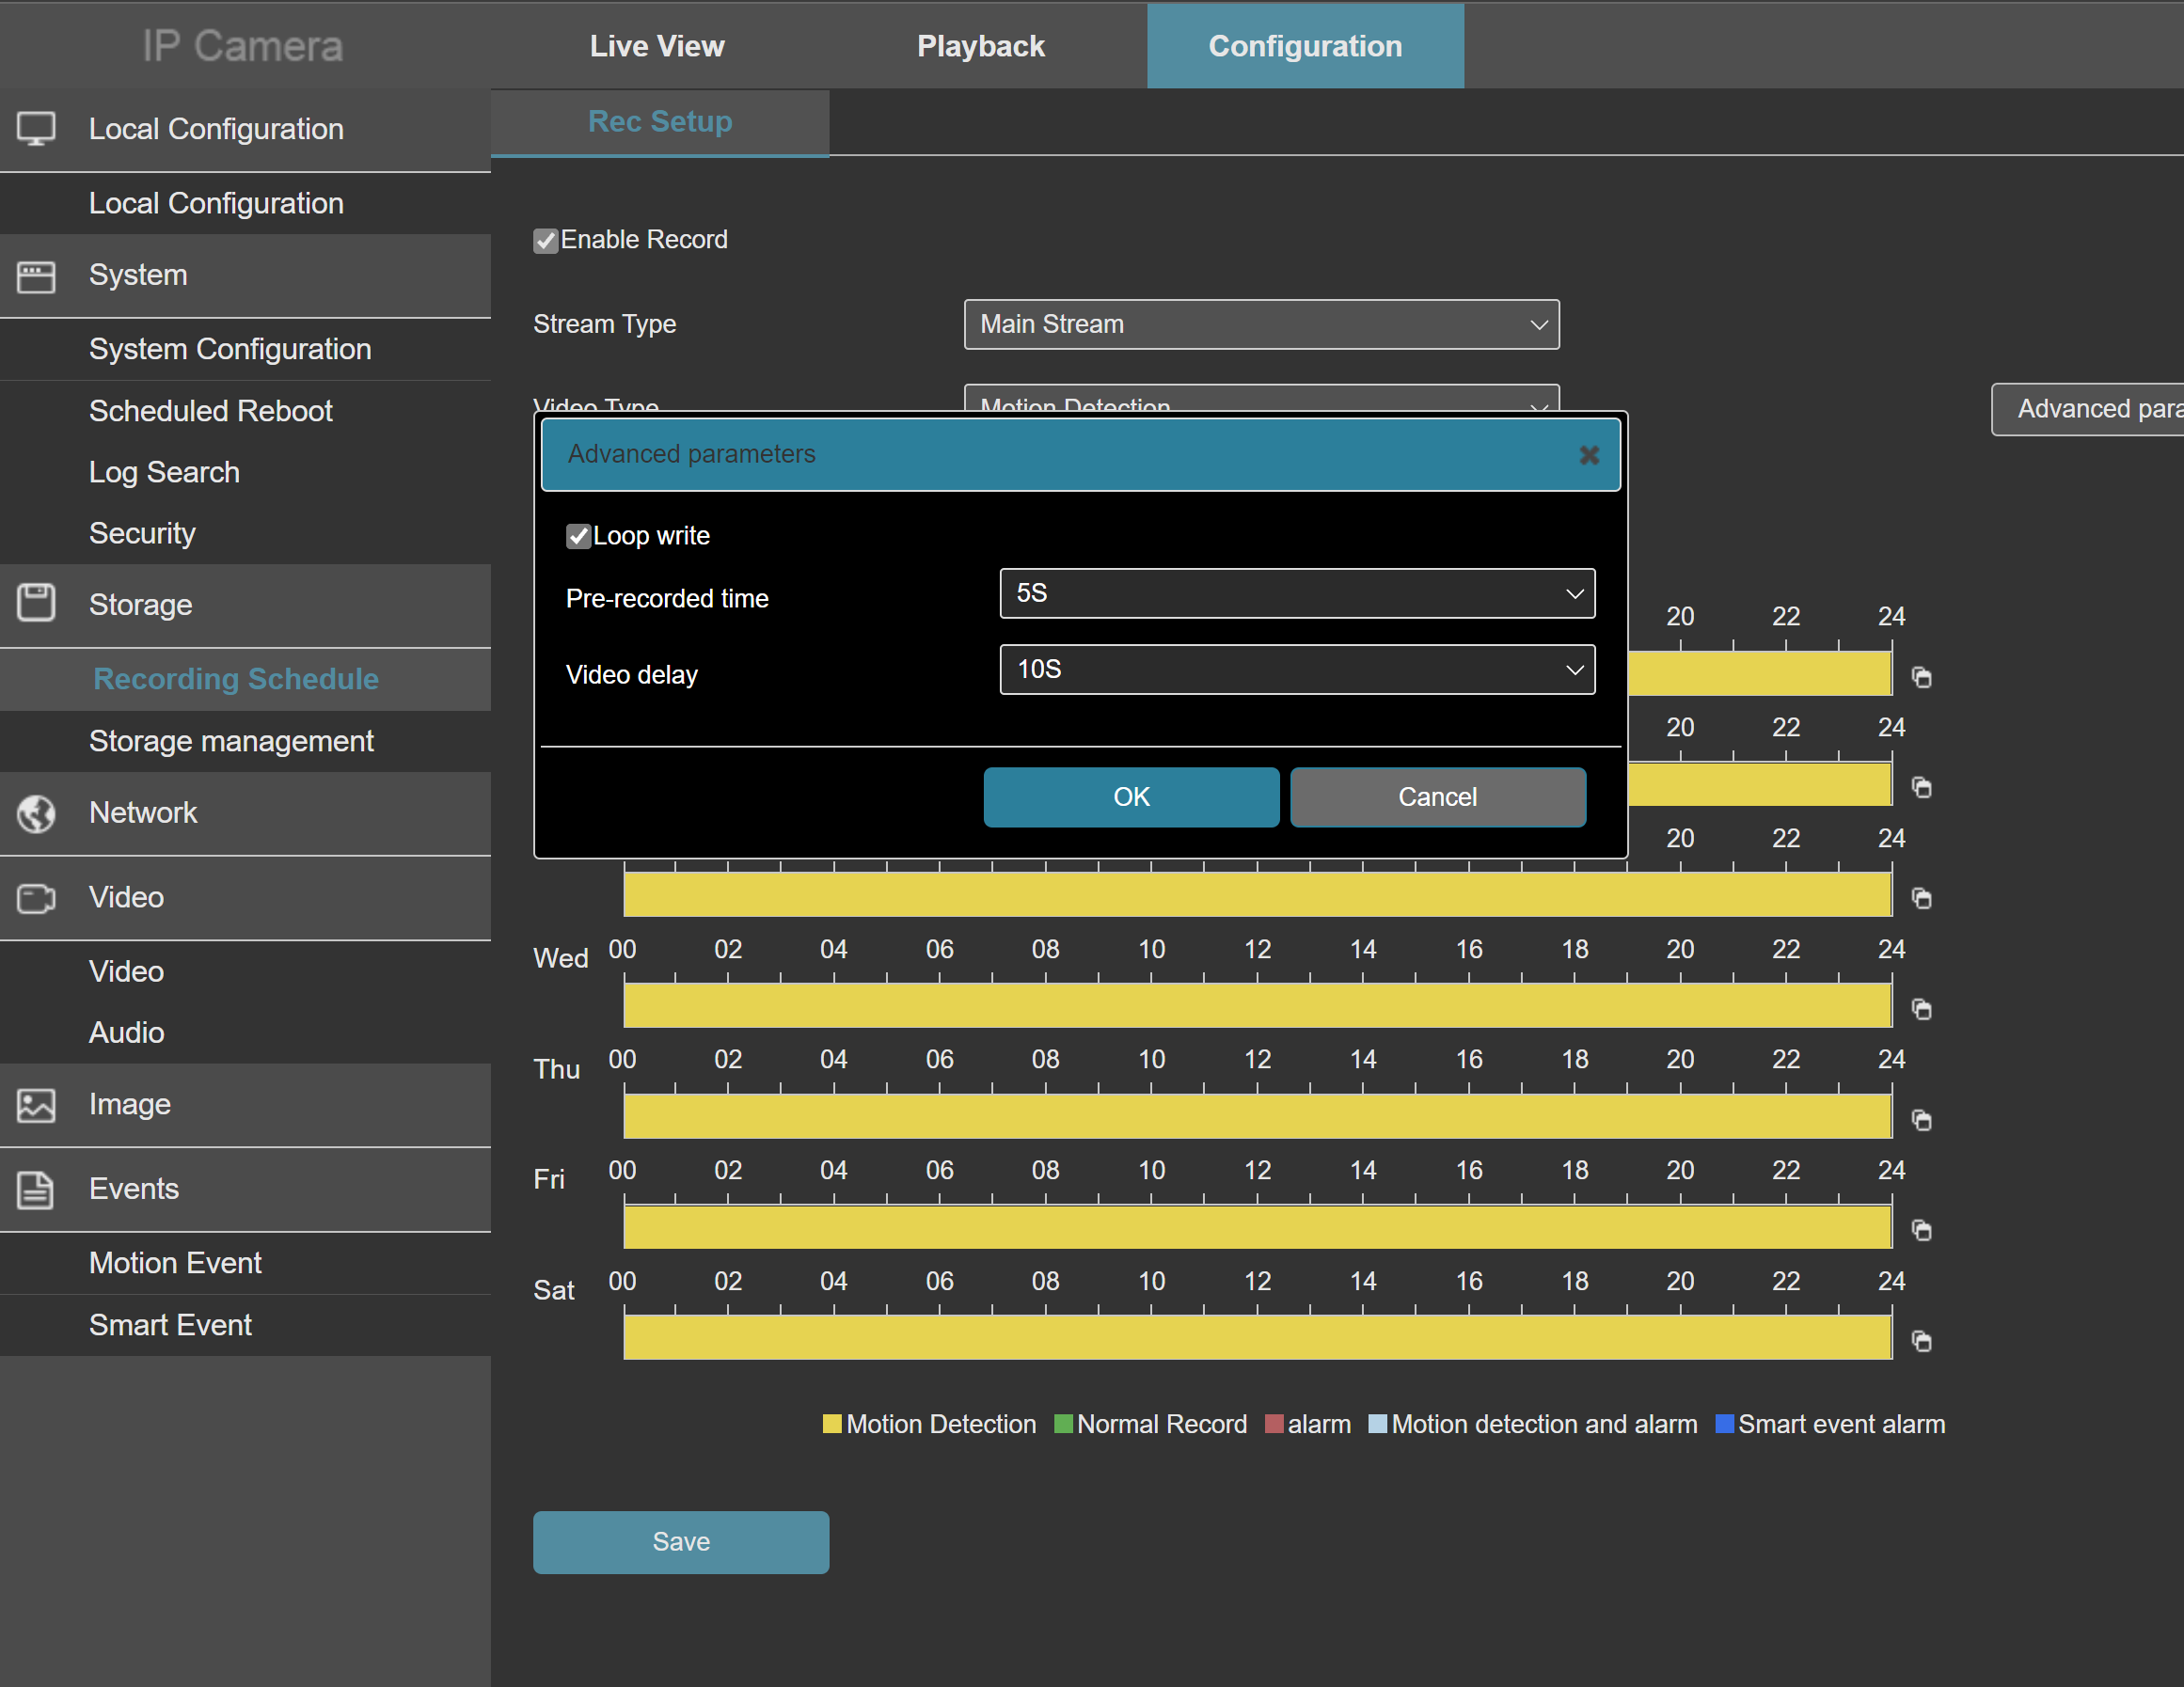
3. Advanced properties allows you to control the pre-record and post record interval. When an event is detected in the example below, the camera will store the 5 seconds leading up to the event and 10 seconds after the event ends.
You have just professionally configured a ClareVision camera!
Step Six: Add the Camera to the Mobile App
Now that you have set up your camera, it is time to add it to the ClareVision app. It is quite simple.
Launch the ClareVision App
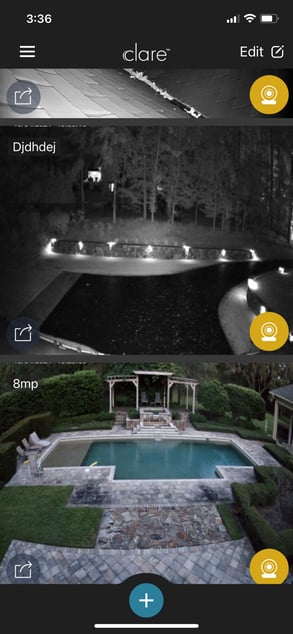
Tap the ‘Plus’ sign and you will be presented with the three options shown below.
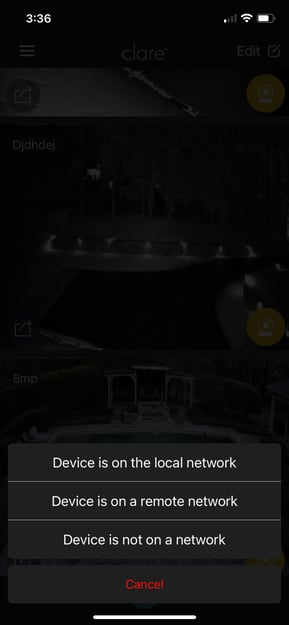
If you tap device is on the network, the app will scan the LAN for any ClareVision cameras and present them in the following screen. Device is on a remote network provides you with the option of scanning a QR code for a camera on a remote network. The system will locate it anywhere in the world and provide you with a login screen to add the remote camera.
In our example, we tapped on “Device is on the local network” and two devices were found.
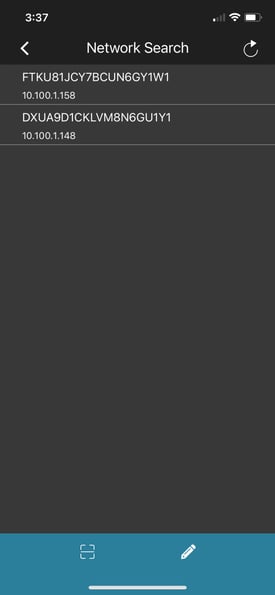
Tapping on a device brings you to a login screen where you may enter the credentials
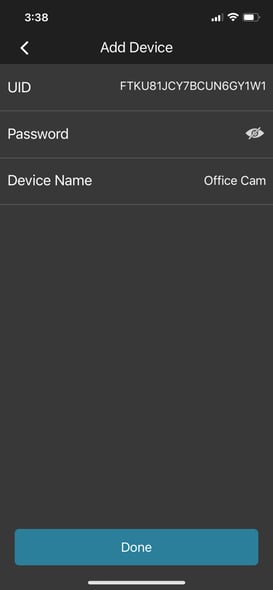
And DONE!
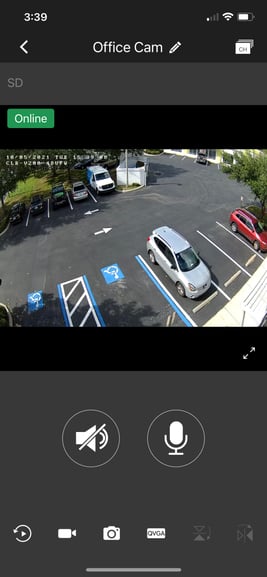
You have just successfully installed, configured and enabled a stand alone ClareVision camera on the ClareVision mobile app. Push notifications and events as configured will automatically propagate to your customer’s mobile device!
Configuring Motion Events in a ClareVision Camera
The following a is a quick guide to setting up motion events in a ClareVision camera.
Motion events are quite simple to set up.
Step One: Go to the configuration tab, Events/Motion Events
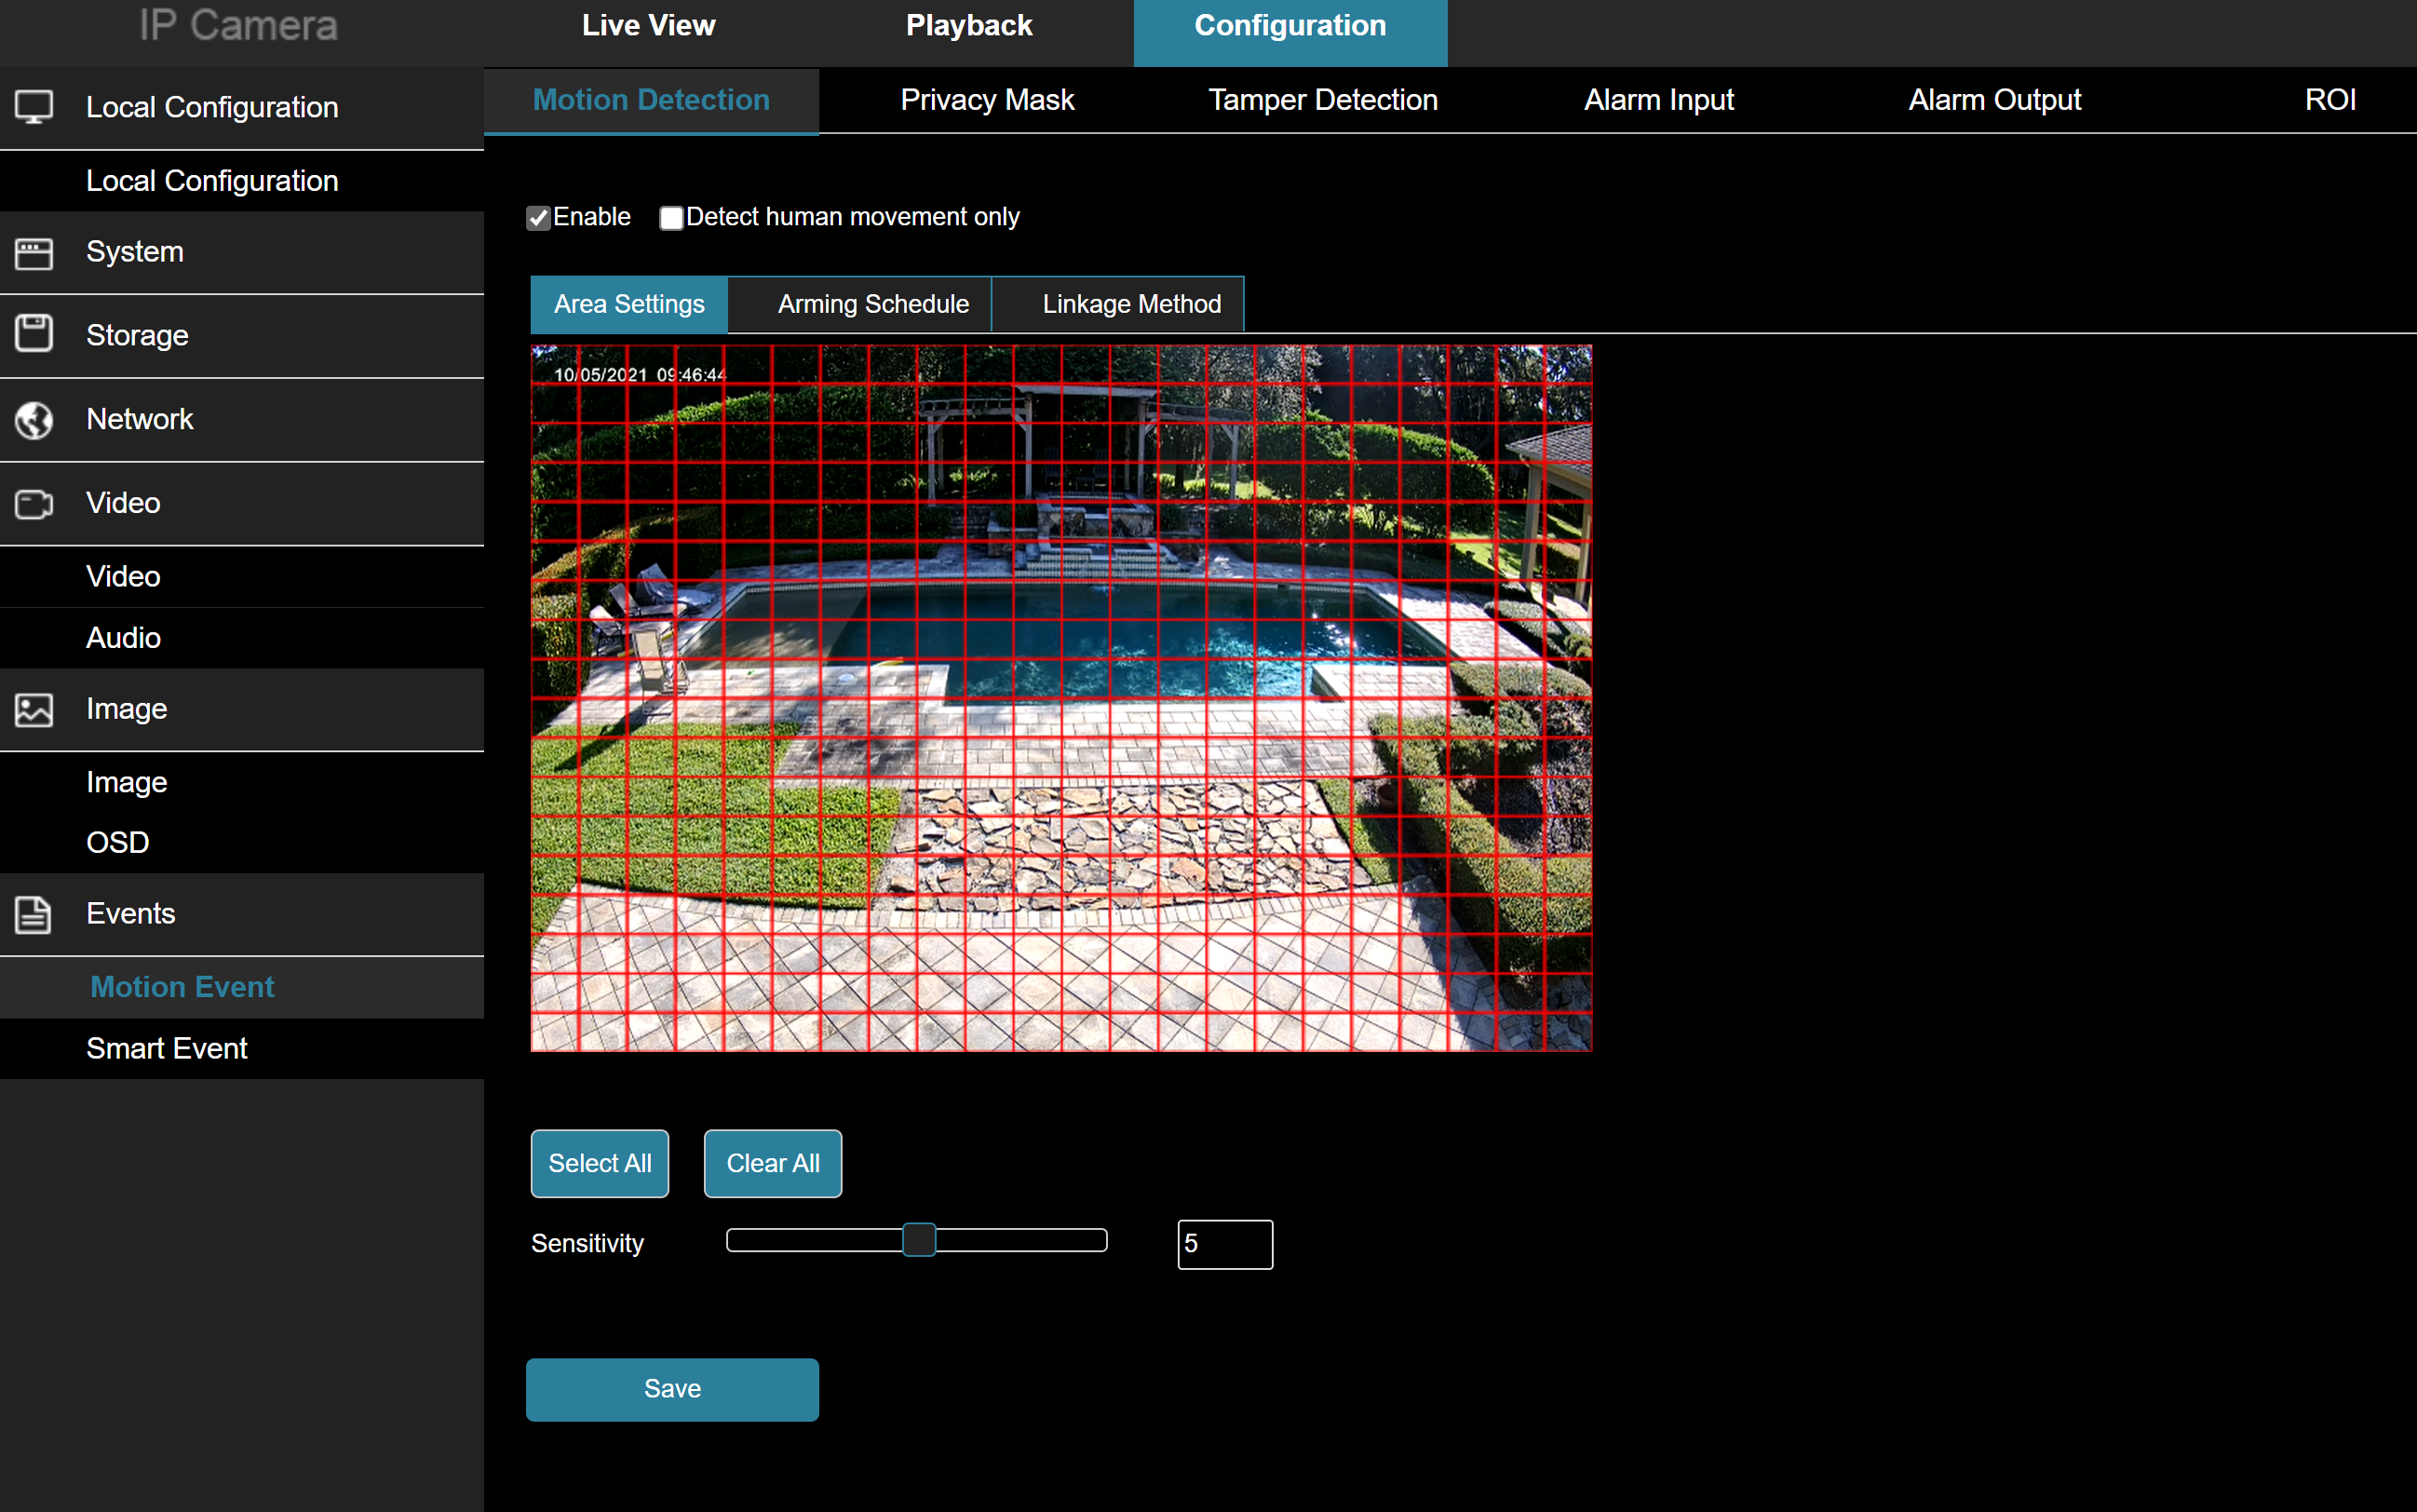
Step Two: Set the motion area.
Set the motion area by dragging your mouse over the grid pattern. The area without grid coverage will not be analyzed for motion. In the image above, the pool surface should be removed from the motion detection area as the spa spillway will create rippling on the surface of the pool which will result in false triggers.
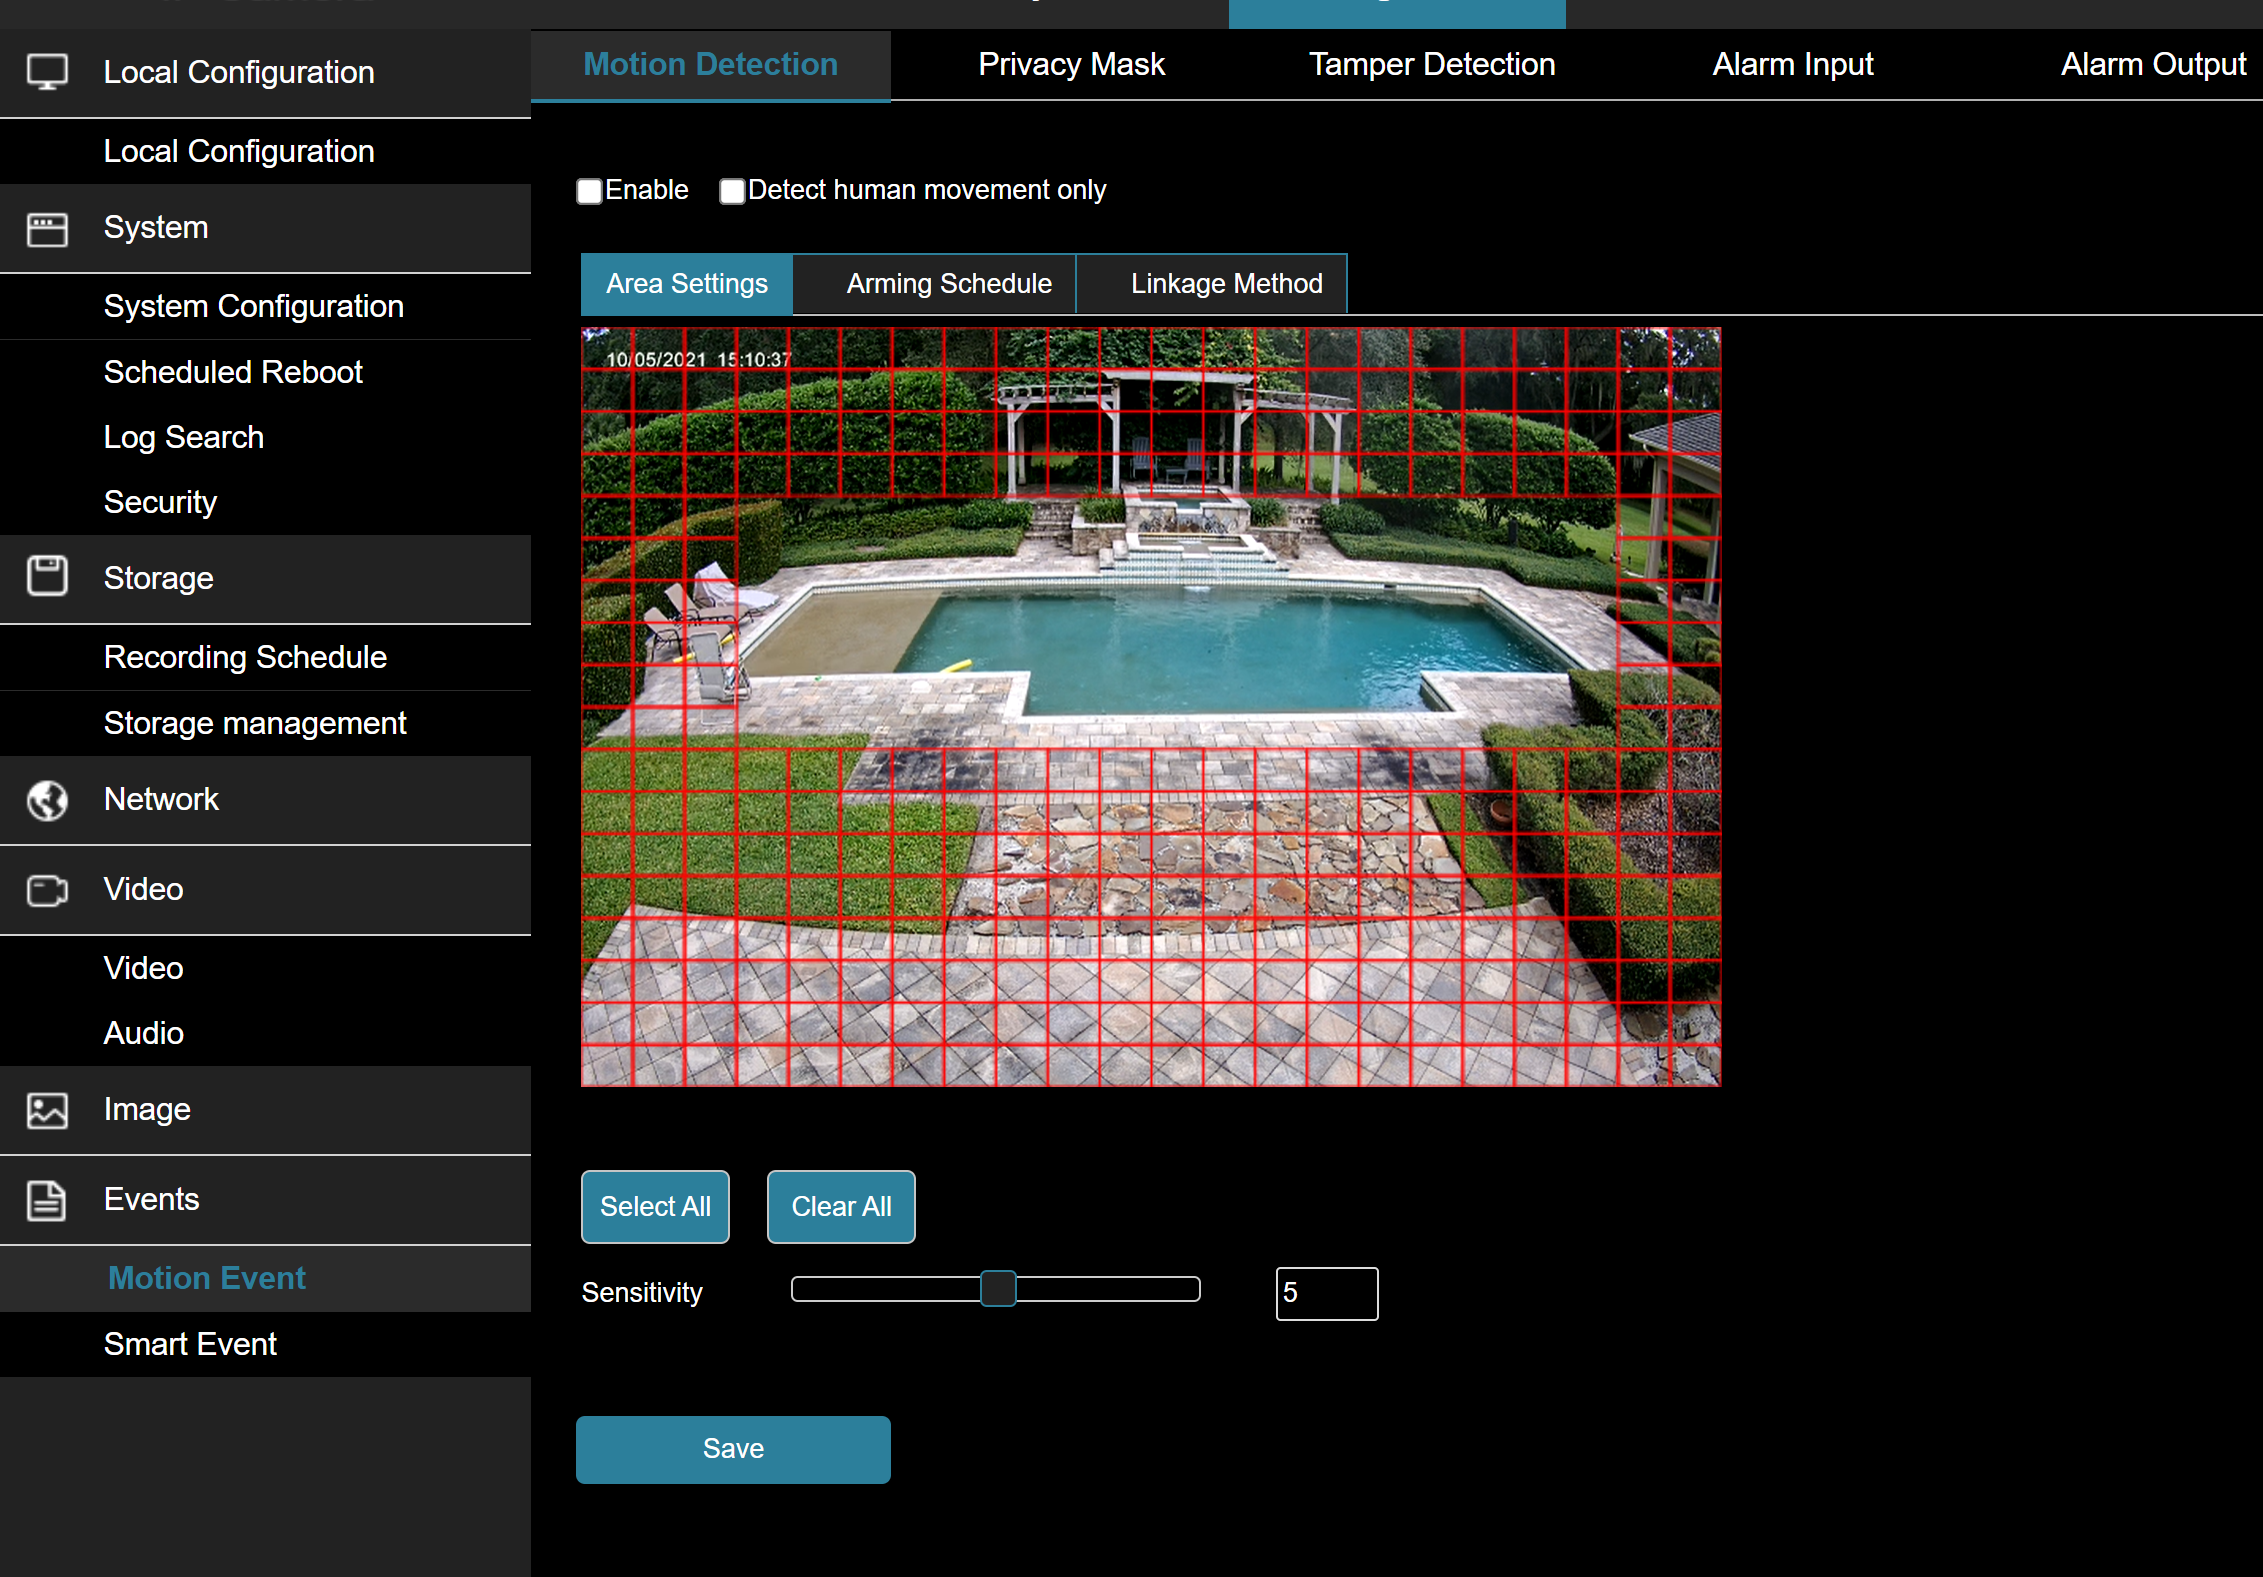
You should also watch for nearby bushes/trees/foliage that may move when the wind is blowing. The motion algorithm in the ClareVision cameras was overhauled in the fall release. As a result, insects, birds and foliage in the distance will rarely cause false triggers.
Step Three: Tune the Sensitivity.
As you lower the sensitivity, the likelihood of false triggers will be reduced, but the camera’s detection zone for a human size object will also be reduced. See the table below:
| V100 2MP Cameras |
V100 4MP Cameras |
V200 4MP Cameras |
V200 8MP Cameras |
| 1 – 13ft | 1 – 13t | 1 – 34ft | 1 – 33ft |
| 2 – 15ft | 2 – 15ft | 2 – 35ft | 2 – 37ft |
| 3 – 16ft | 3 – 16ft | 3 – 35ft | 3 – 33ft |
| 4 – 20ft | 4 – 20ft | 4 – 38ft | 4 -37ft |
| 5 – 23ft | 5 – 23ft | 5 – 40ft | 5 – 38ft |
| 6 – 23ft | 6 – 23ft | 6 – 41ft | 6 – 40ft |
| 7 – 25ft | 7 – 23ft | 7 – 45ft | 7 – 45ft |
| 8 – 27ft | 8 – 27ft | 8 – 45ft | 8 – 46ft |
| 9 – 30ft | 9 – 30ft | 9 – 70ft+ | 9 – 70ft+ |
| 10 – 31ft | 10 – 34ft | 10 – 70ft+ | 10 – 70ft |
Note: the above table is for human sized objects and the fixed lens cameras. Cars, for example, will trigger motion events at greater distances and zoom adjustment on a varifocal camera will allow you to detect human objects at greater distances than those listed above.
Step Four: Set the arming schedule.
The arming schedule is what controls when the camera will process motion events. When a motion event is created, it is automatically sent to the push server (stand alone) or sent to the NVR for processing. Additionally, when a motion event is created, it will be sent to the recording engine in the camera and if configured to record, it will be recorded to the SD Card.
The arming schedule default is 7×24.
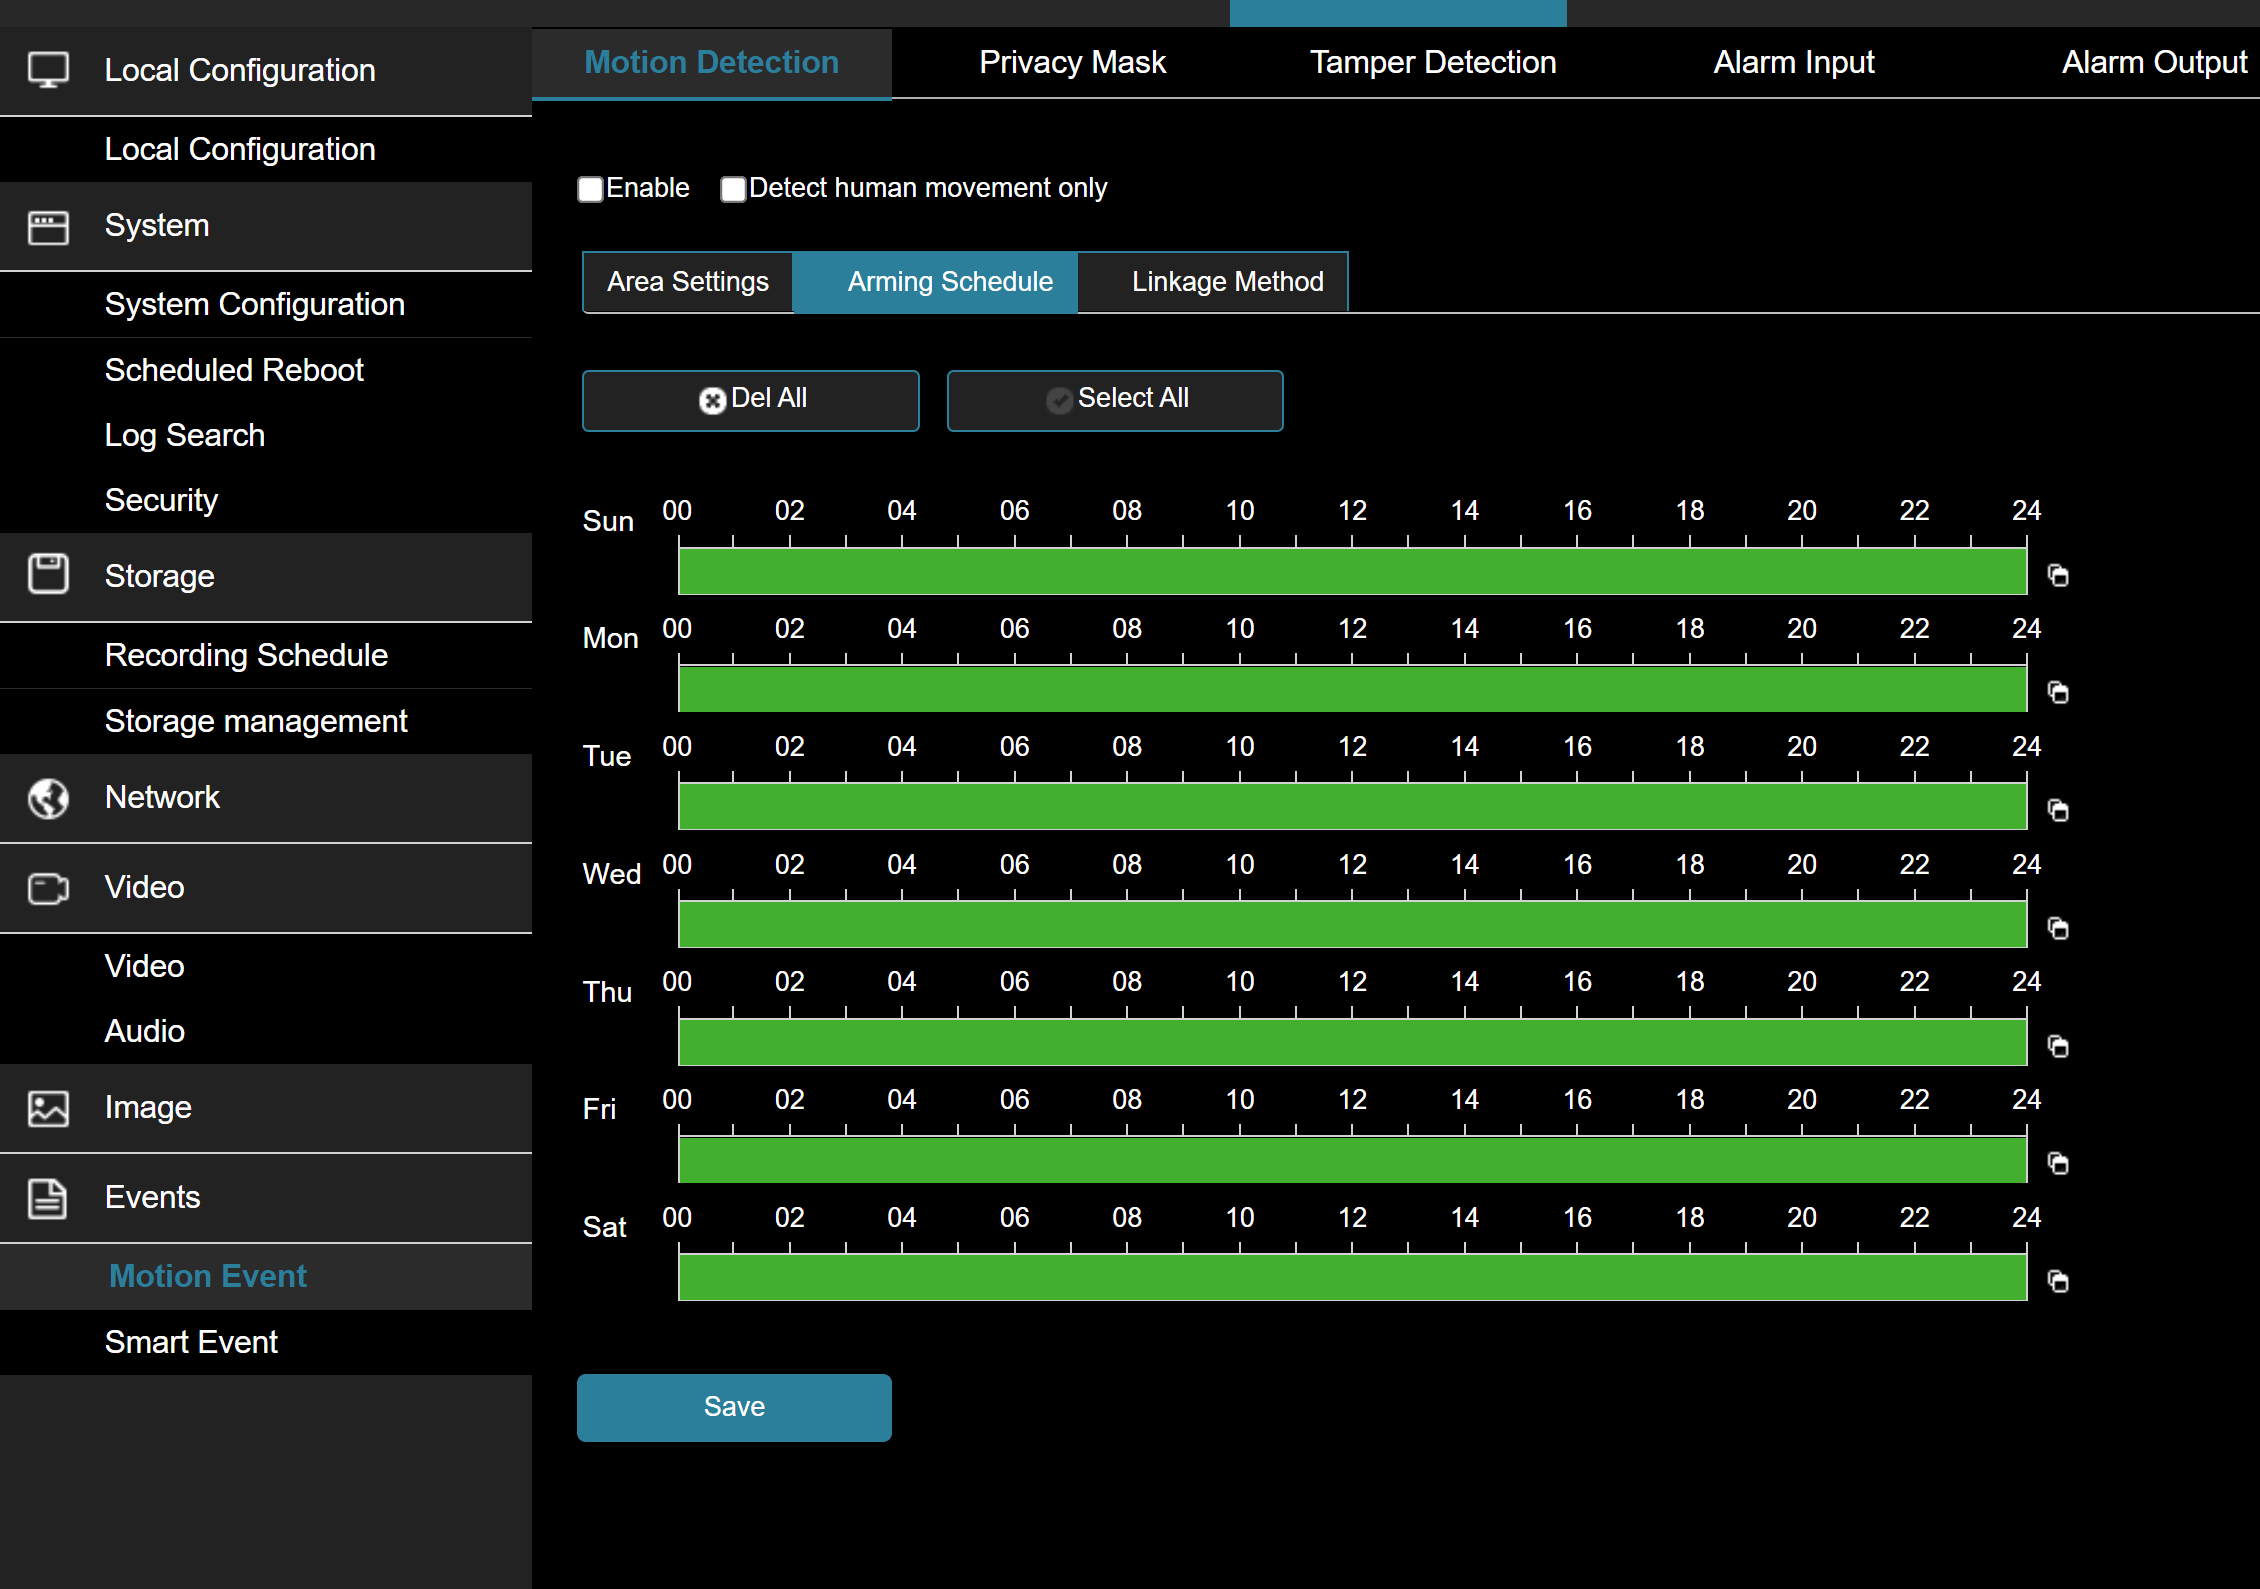
Caution:
It is easy to get confused by the multiple calendars that are in a camera or NVR. The event arming schedule shown above is the primary calendar you need to manage.
If your installation requires events to be disabled during certain hours of the day or days of the week ALWAYS do the following:
1. Use the event arming schedule to control when the event will be analyzed and propagated
2. Leave the record schedule on 7×24 record. DO NOT try to match the two calendars – use the event arm schedule to control when events happen NOT the record schedule.
Step Five: TEST
This is an easy thing to skip – make sure you test your setup! Watch the area of interest and make sure objects moving in that area are captured (go to the Playback tab to view). Equally as important, make sure you have filtered out areas that are prone to create false triggers: nearby foliage, pools, sidewalks, roadways etc.
Configuring Smart Events in Standalone Performance Series ClareVision Cameras
The following a is a quick guide to setting up Smart Events in standalone Performance Series ClareVision cameras.
Step One: Go to the configuration tab, Events/Smart Events
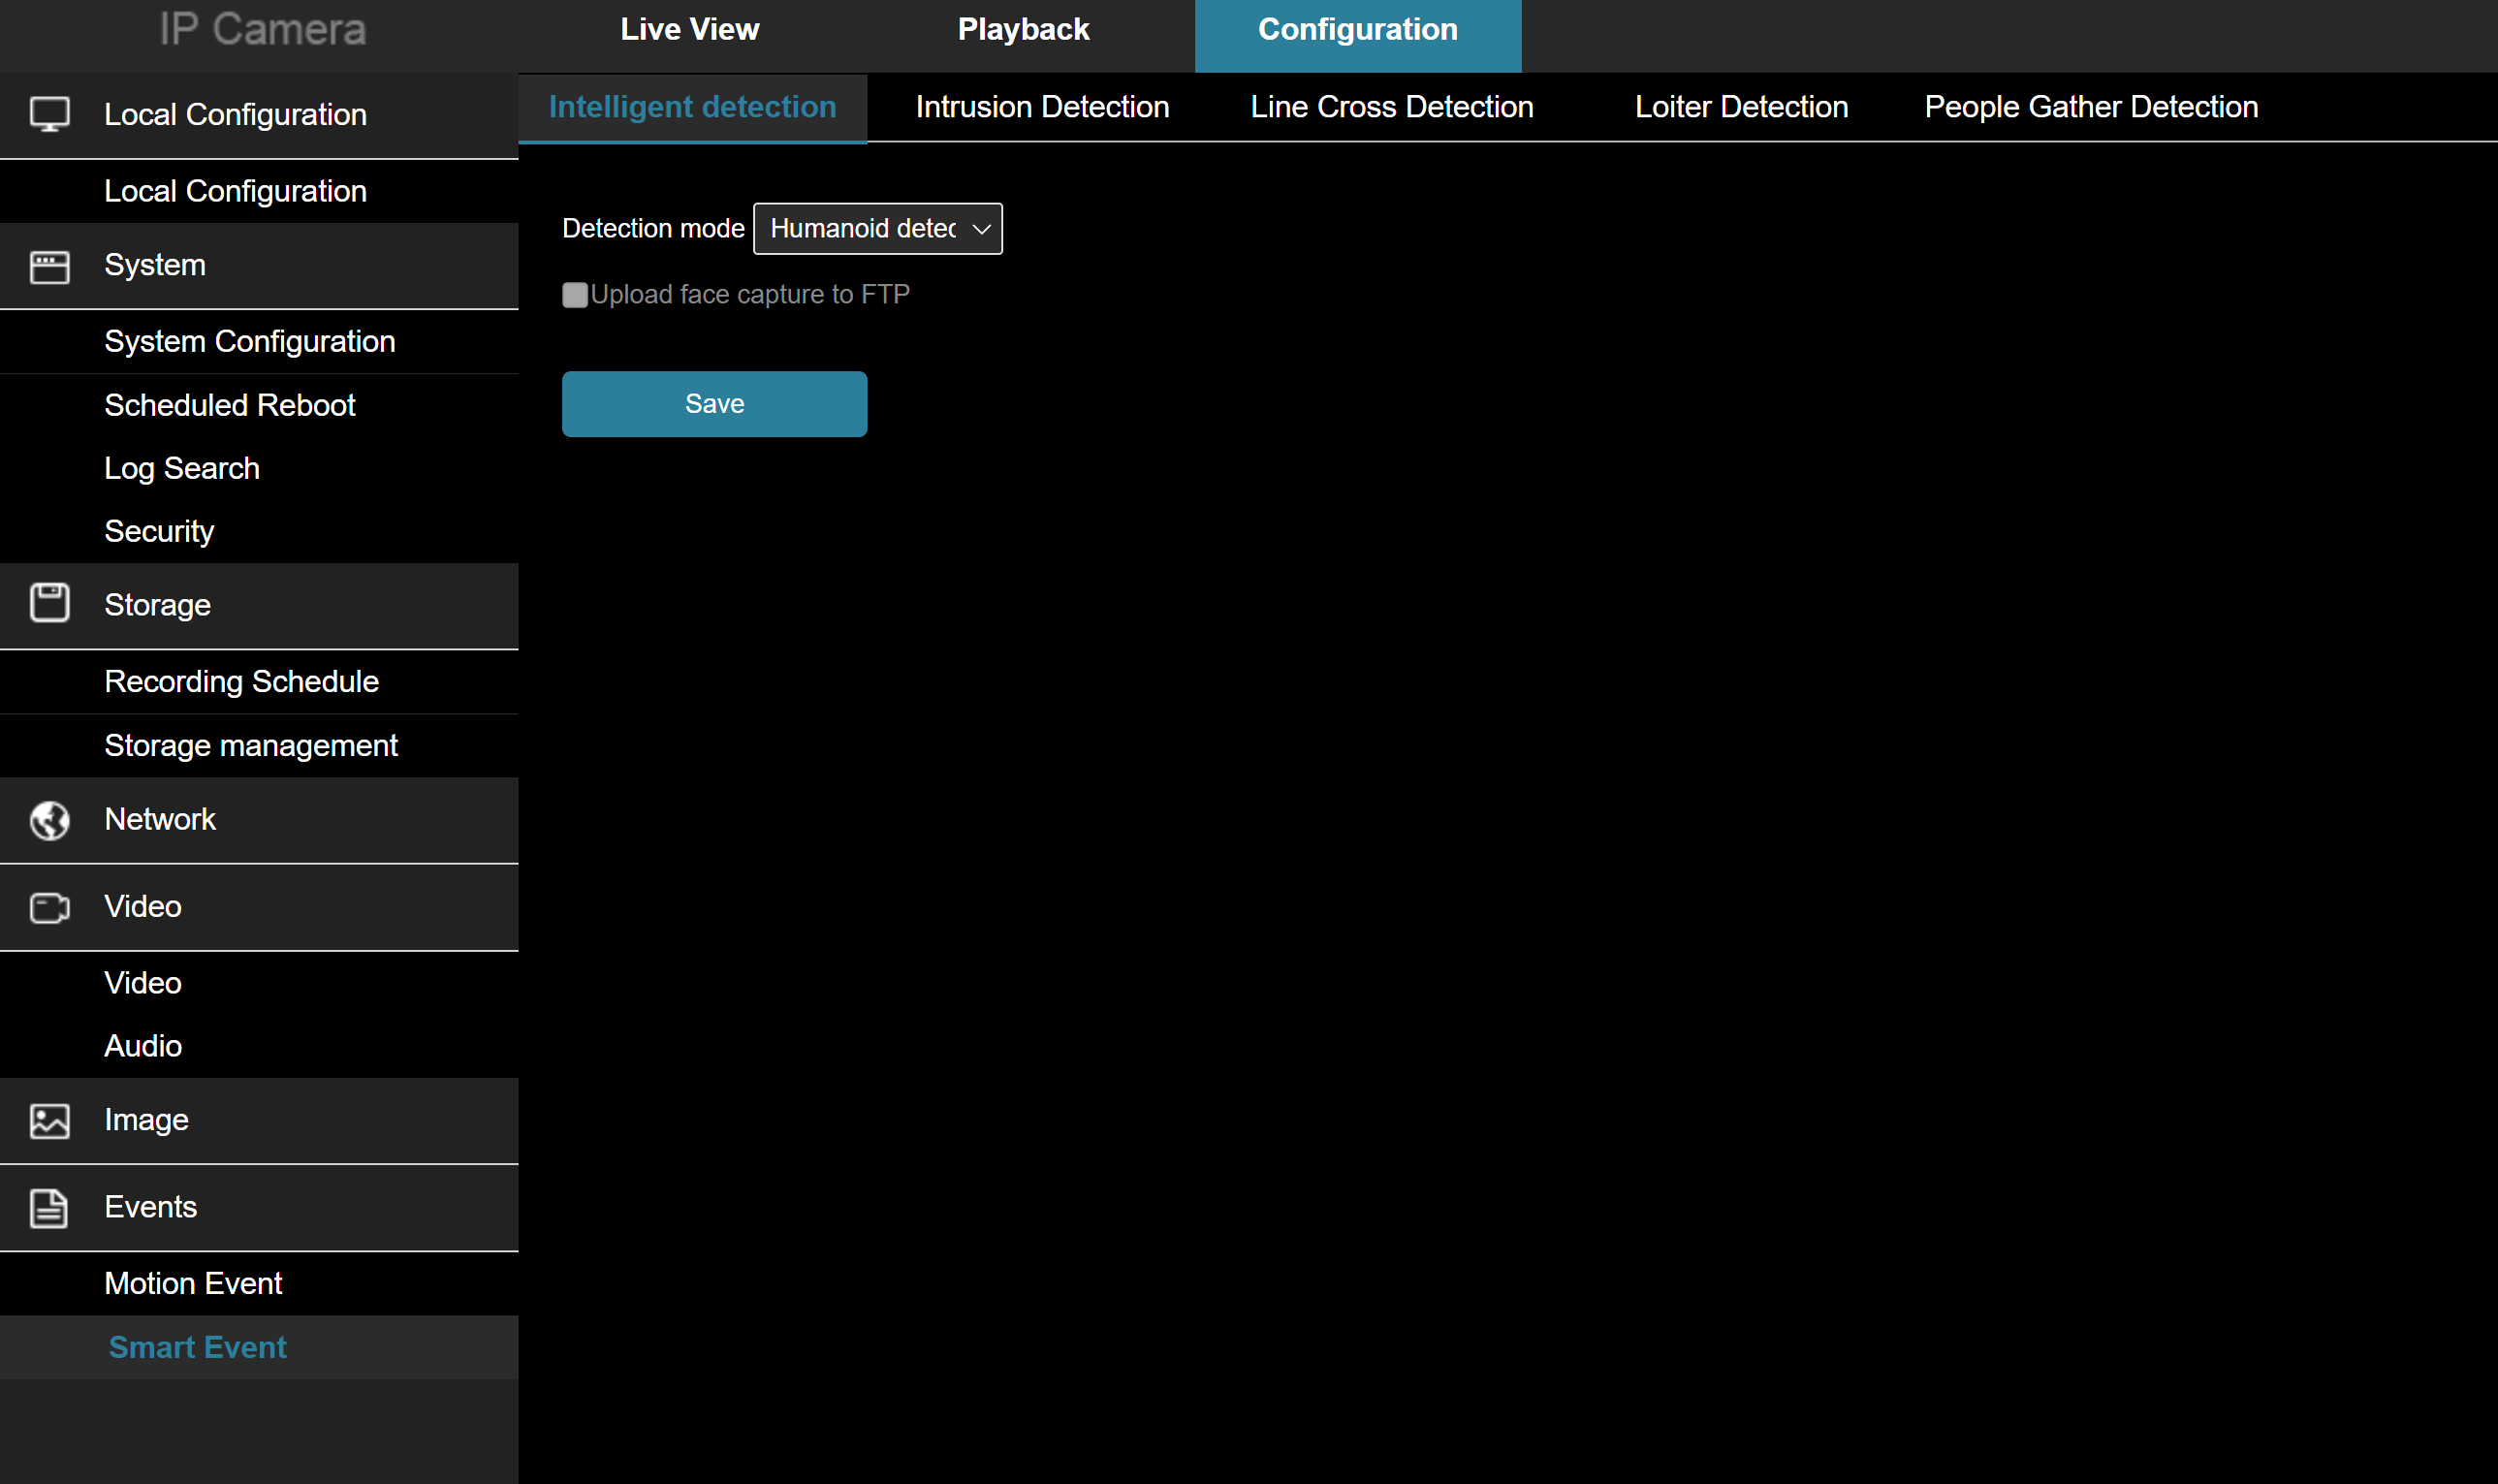
Make sure you ENABLE Intelligent Detection such as Humanoid detection. You must have Intelligent detection enabled to use any of the presents below.
There are four smart event types:
- Intrusion: intrusion events are boundary intrusion events. Intrusion detection can be configured with up to four zones.
- Line Crossing: line crossing detection can be configured as a unidirectional crossing or bidirectional crossing.
- Loiter Detection: detects when people stay in a region of interest for an certain time period.
- People Gather: detects when the density of people in an area exceeds a threshold.
All of these events are human based. Vehicle detection is being worked on at this time and will be in a future firmware release.
Although there are four smart event types, they all are stored and propagated to the mobile app as ‘Smart Events’. There is meta-data that indicates the smart event type in the event log in the mobile app and in the push notification. You can configure more than one smart event type.
Step Two: Intrusion
Intrusion is the most commonly used smart event type. It is similar to motion detection in concept but is restricted to human detection. False positives are very rare with smart intrusion events.
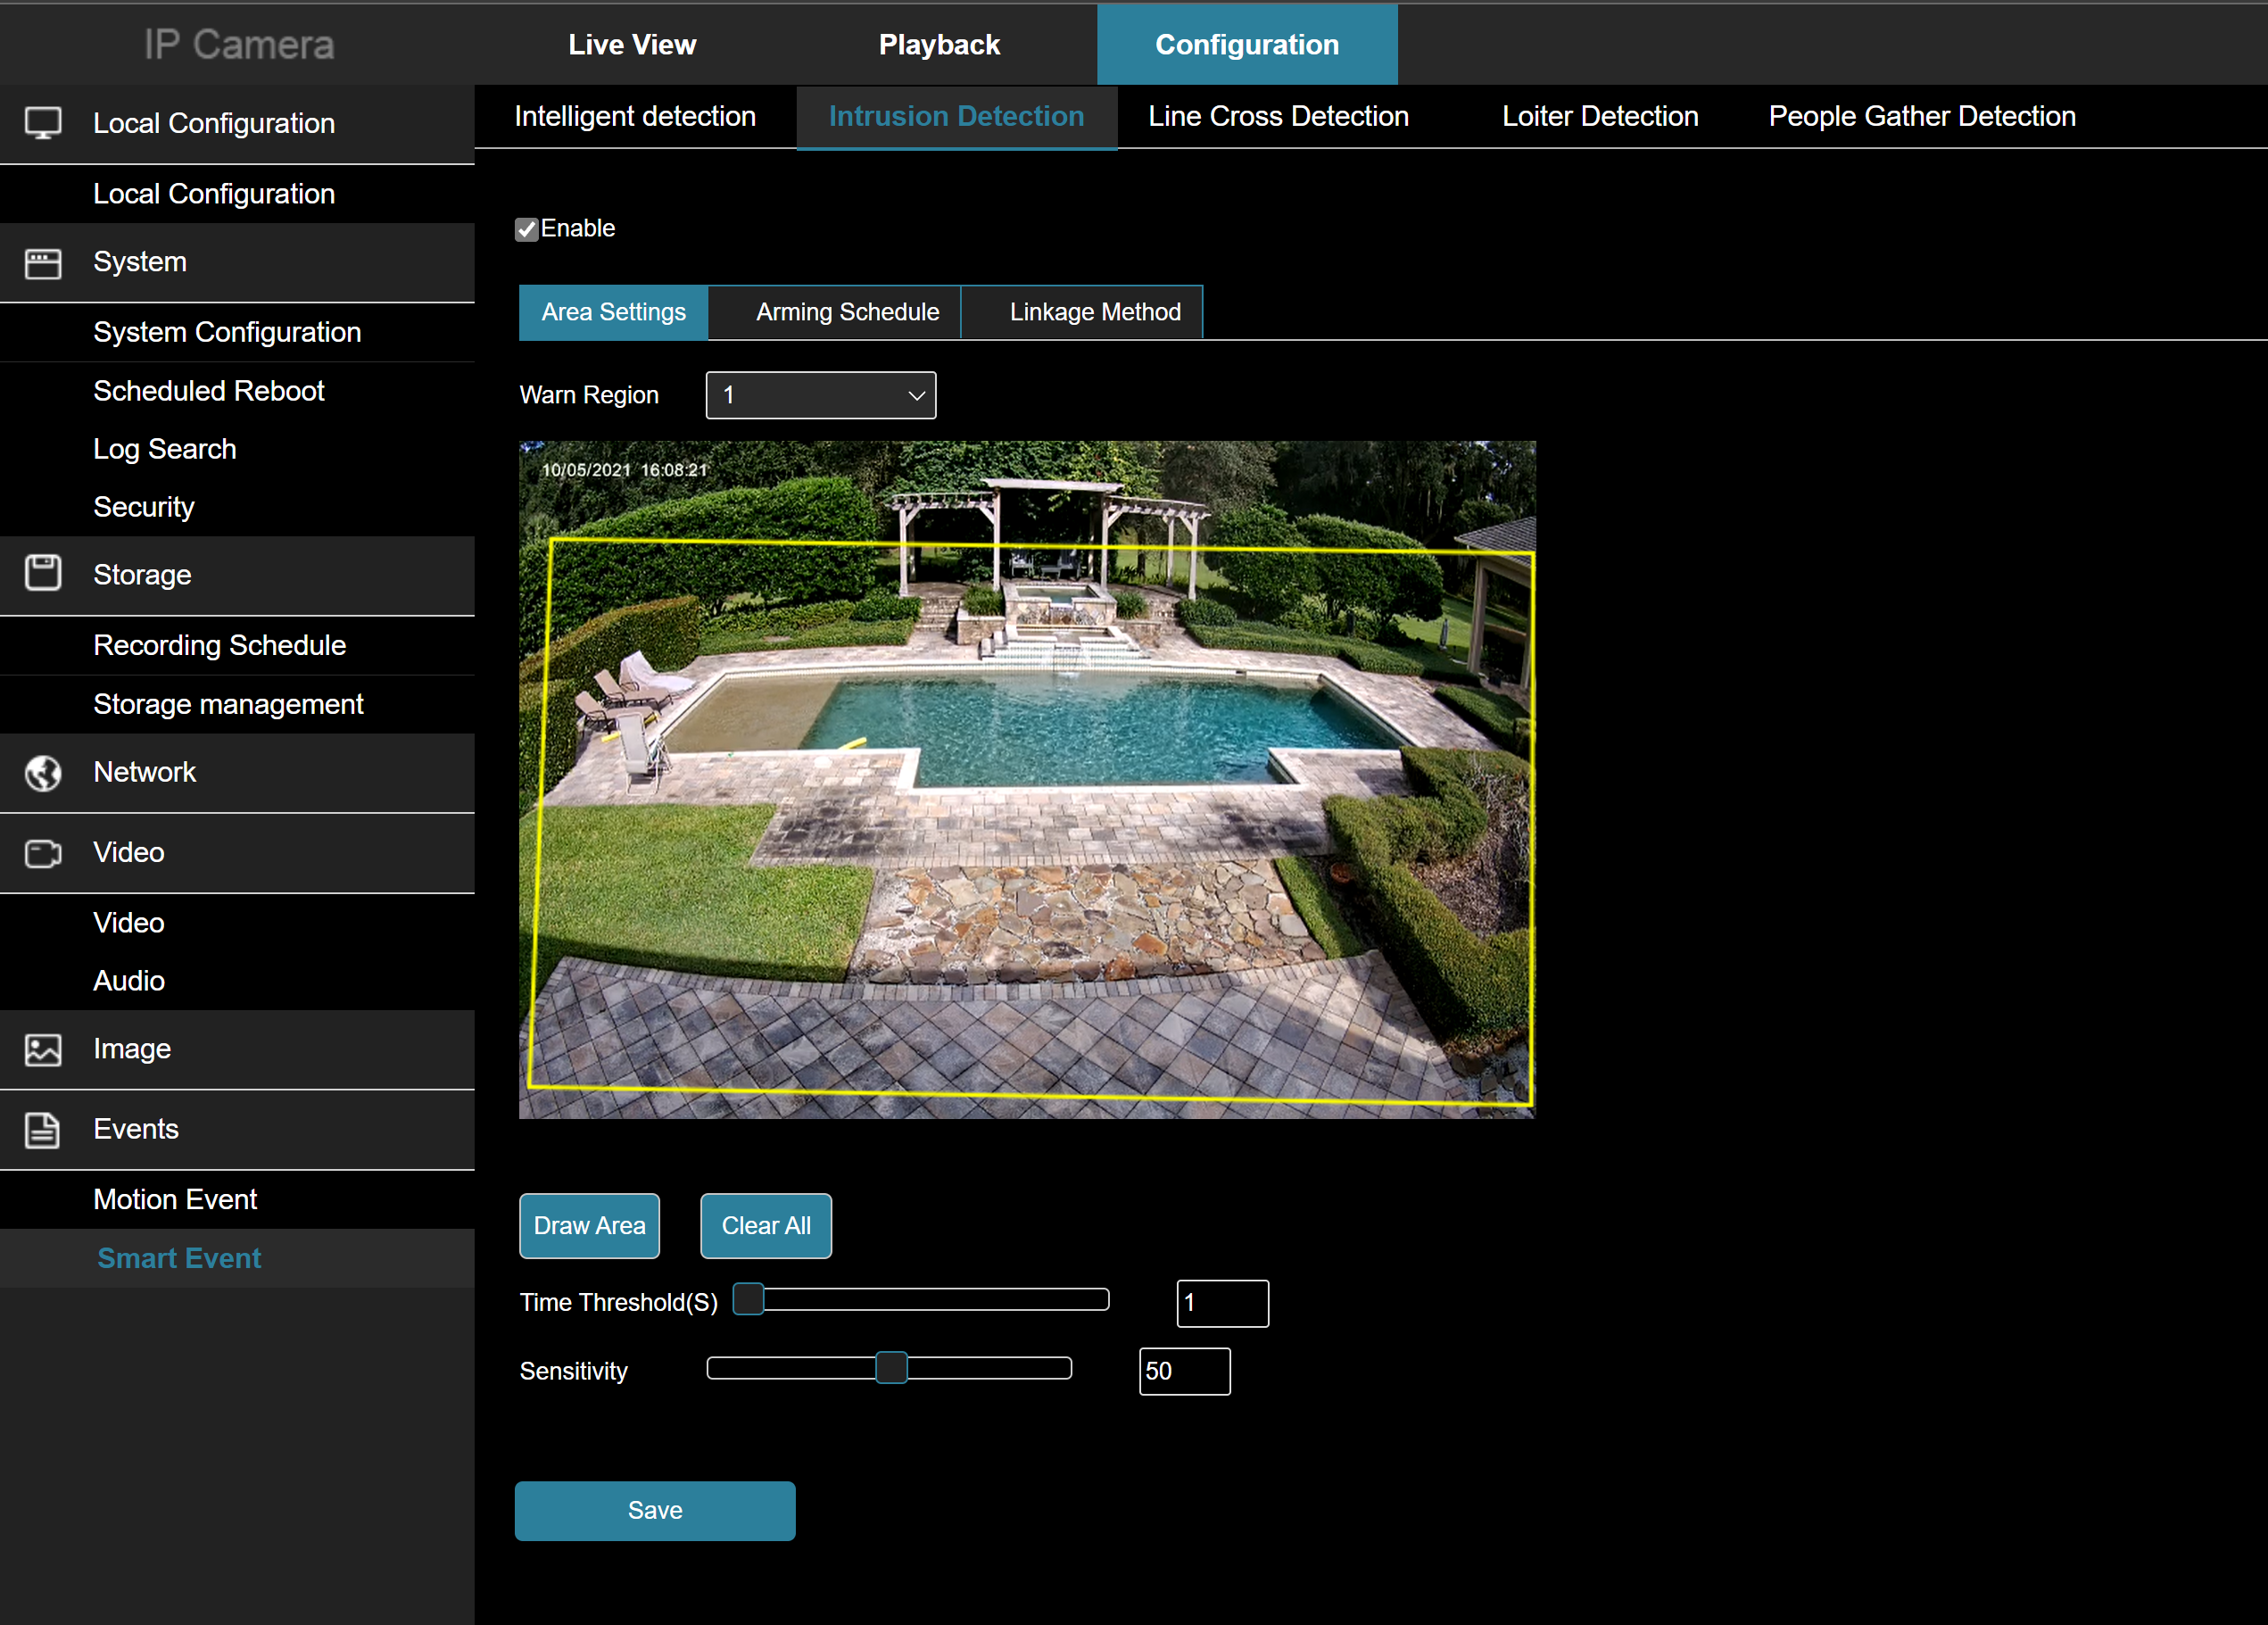
First – check the ‘enable’ box. Without the event enabled, nothing will happen.
Click “Draw Area”. You can draw a quadrilateral anywhere on the screen. If the region of interest does not fit nicely within a quadrilateral, you can draw a second quadrilateral by using the “Warn Region” dropdown box. You can have up to four regions of interest.
Any intrusion in any of the up to four regions will trigger the intrusion event.
The “Time Threshold” is the duration the person needs to be in the region for the event to trigger. The time is in seconds.
“Sensitivity” is the human detection sensitivity setting. A higher number will detect humans further away from the camera, but may be prone to more false detections. Lower sensitivity has the reverse effect.
Step 3: Line Crossing
Line crossing is used when you want to know when someone has entered or exited a specific threshold or doorway as opposed to simply knowing if someone is in a region
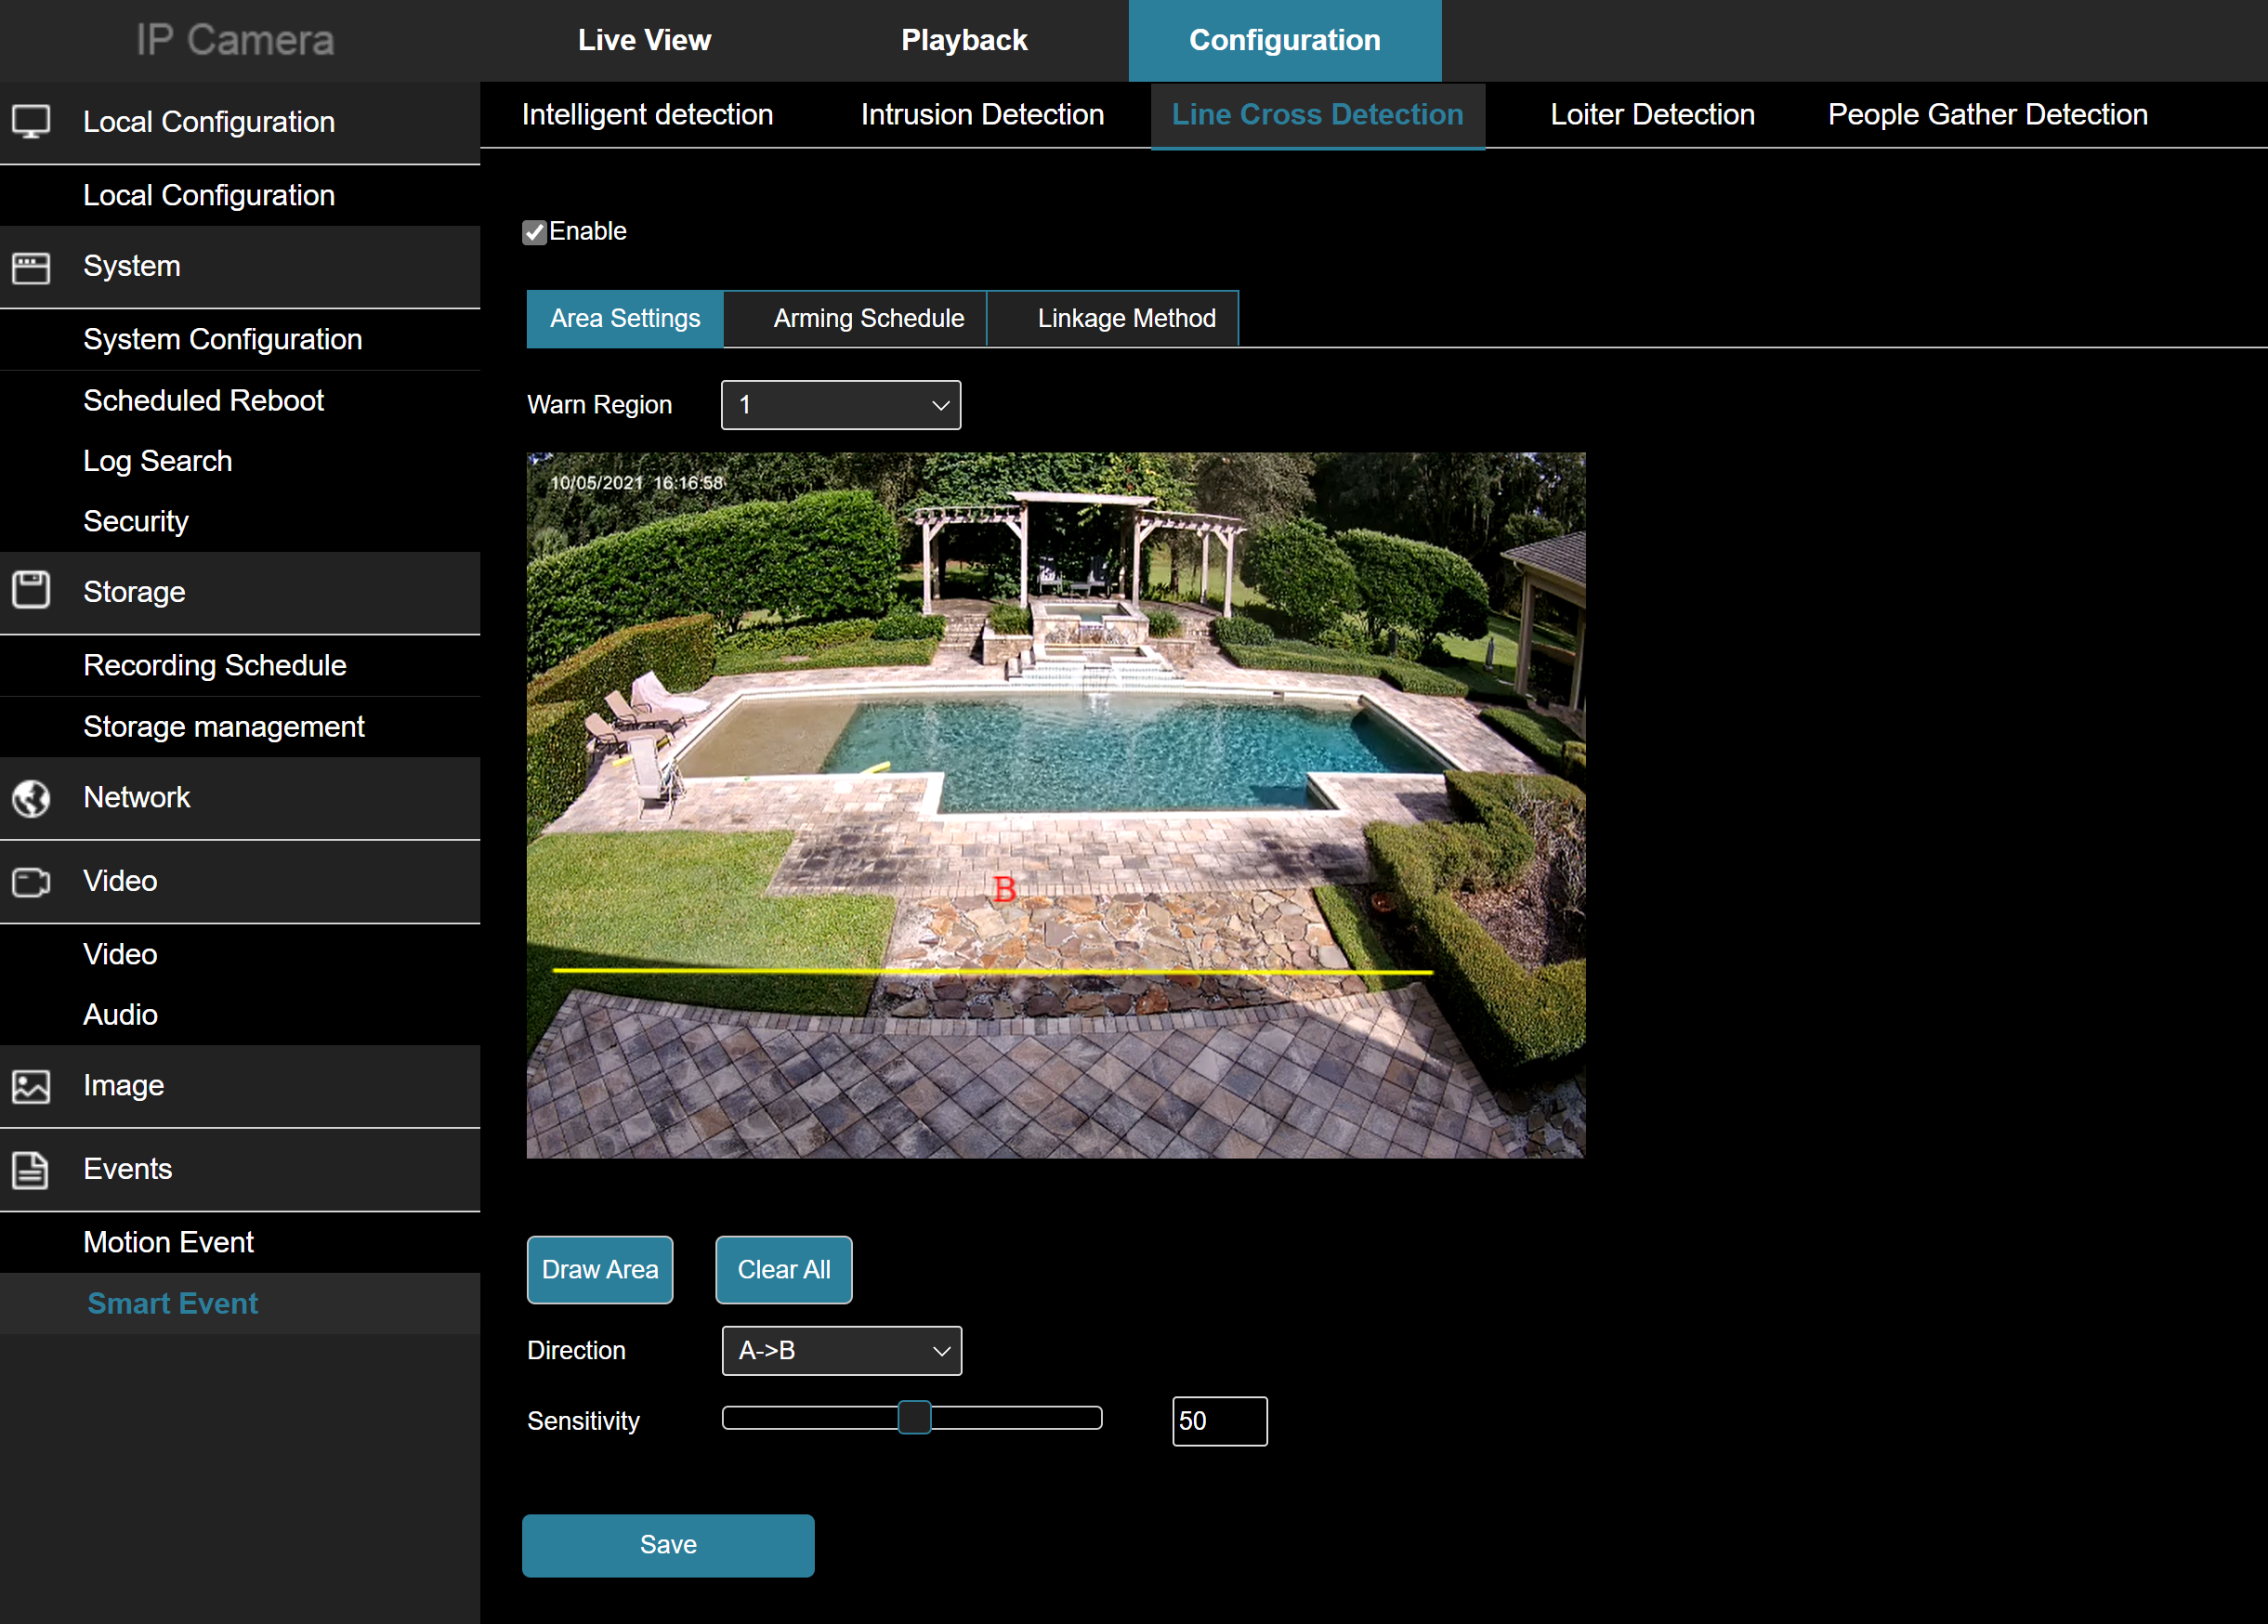
In this example, the camera will trigger when someone walks from the house to the pool, but not the reverse.
Step Four: set the arming schedule.
The arming schedule is what controls when the camera will process smart events. Each smart event type can have its own arming schedule. When a smart event is created, it is automatically sent to the push server (stand alone) or sent to the NVR for processing. Additionally, when a motion event is created, it will be sent to the recording engine in the camera and if configured to record, it will be recorded to the SD Card.
The arming schedule default is 7×24.
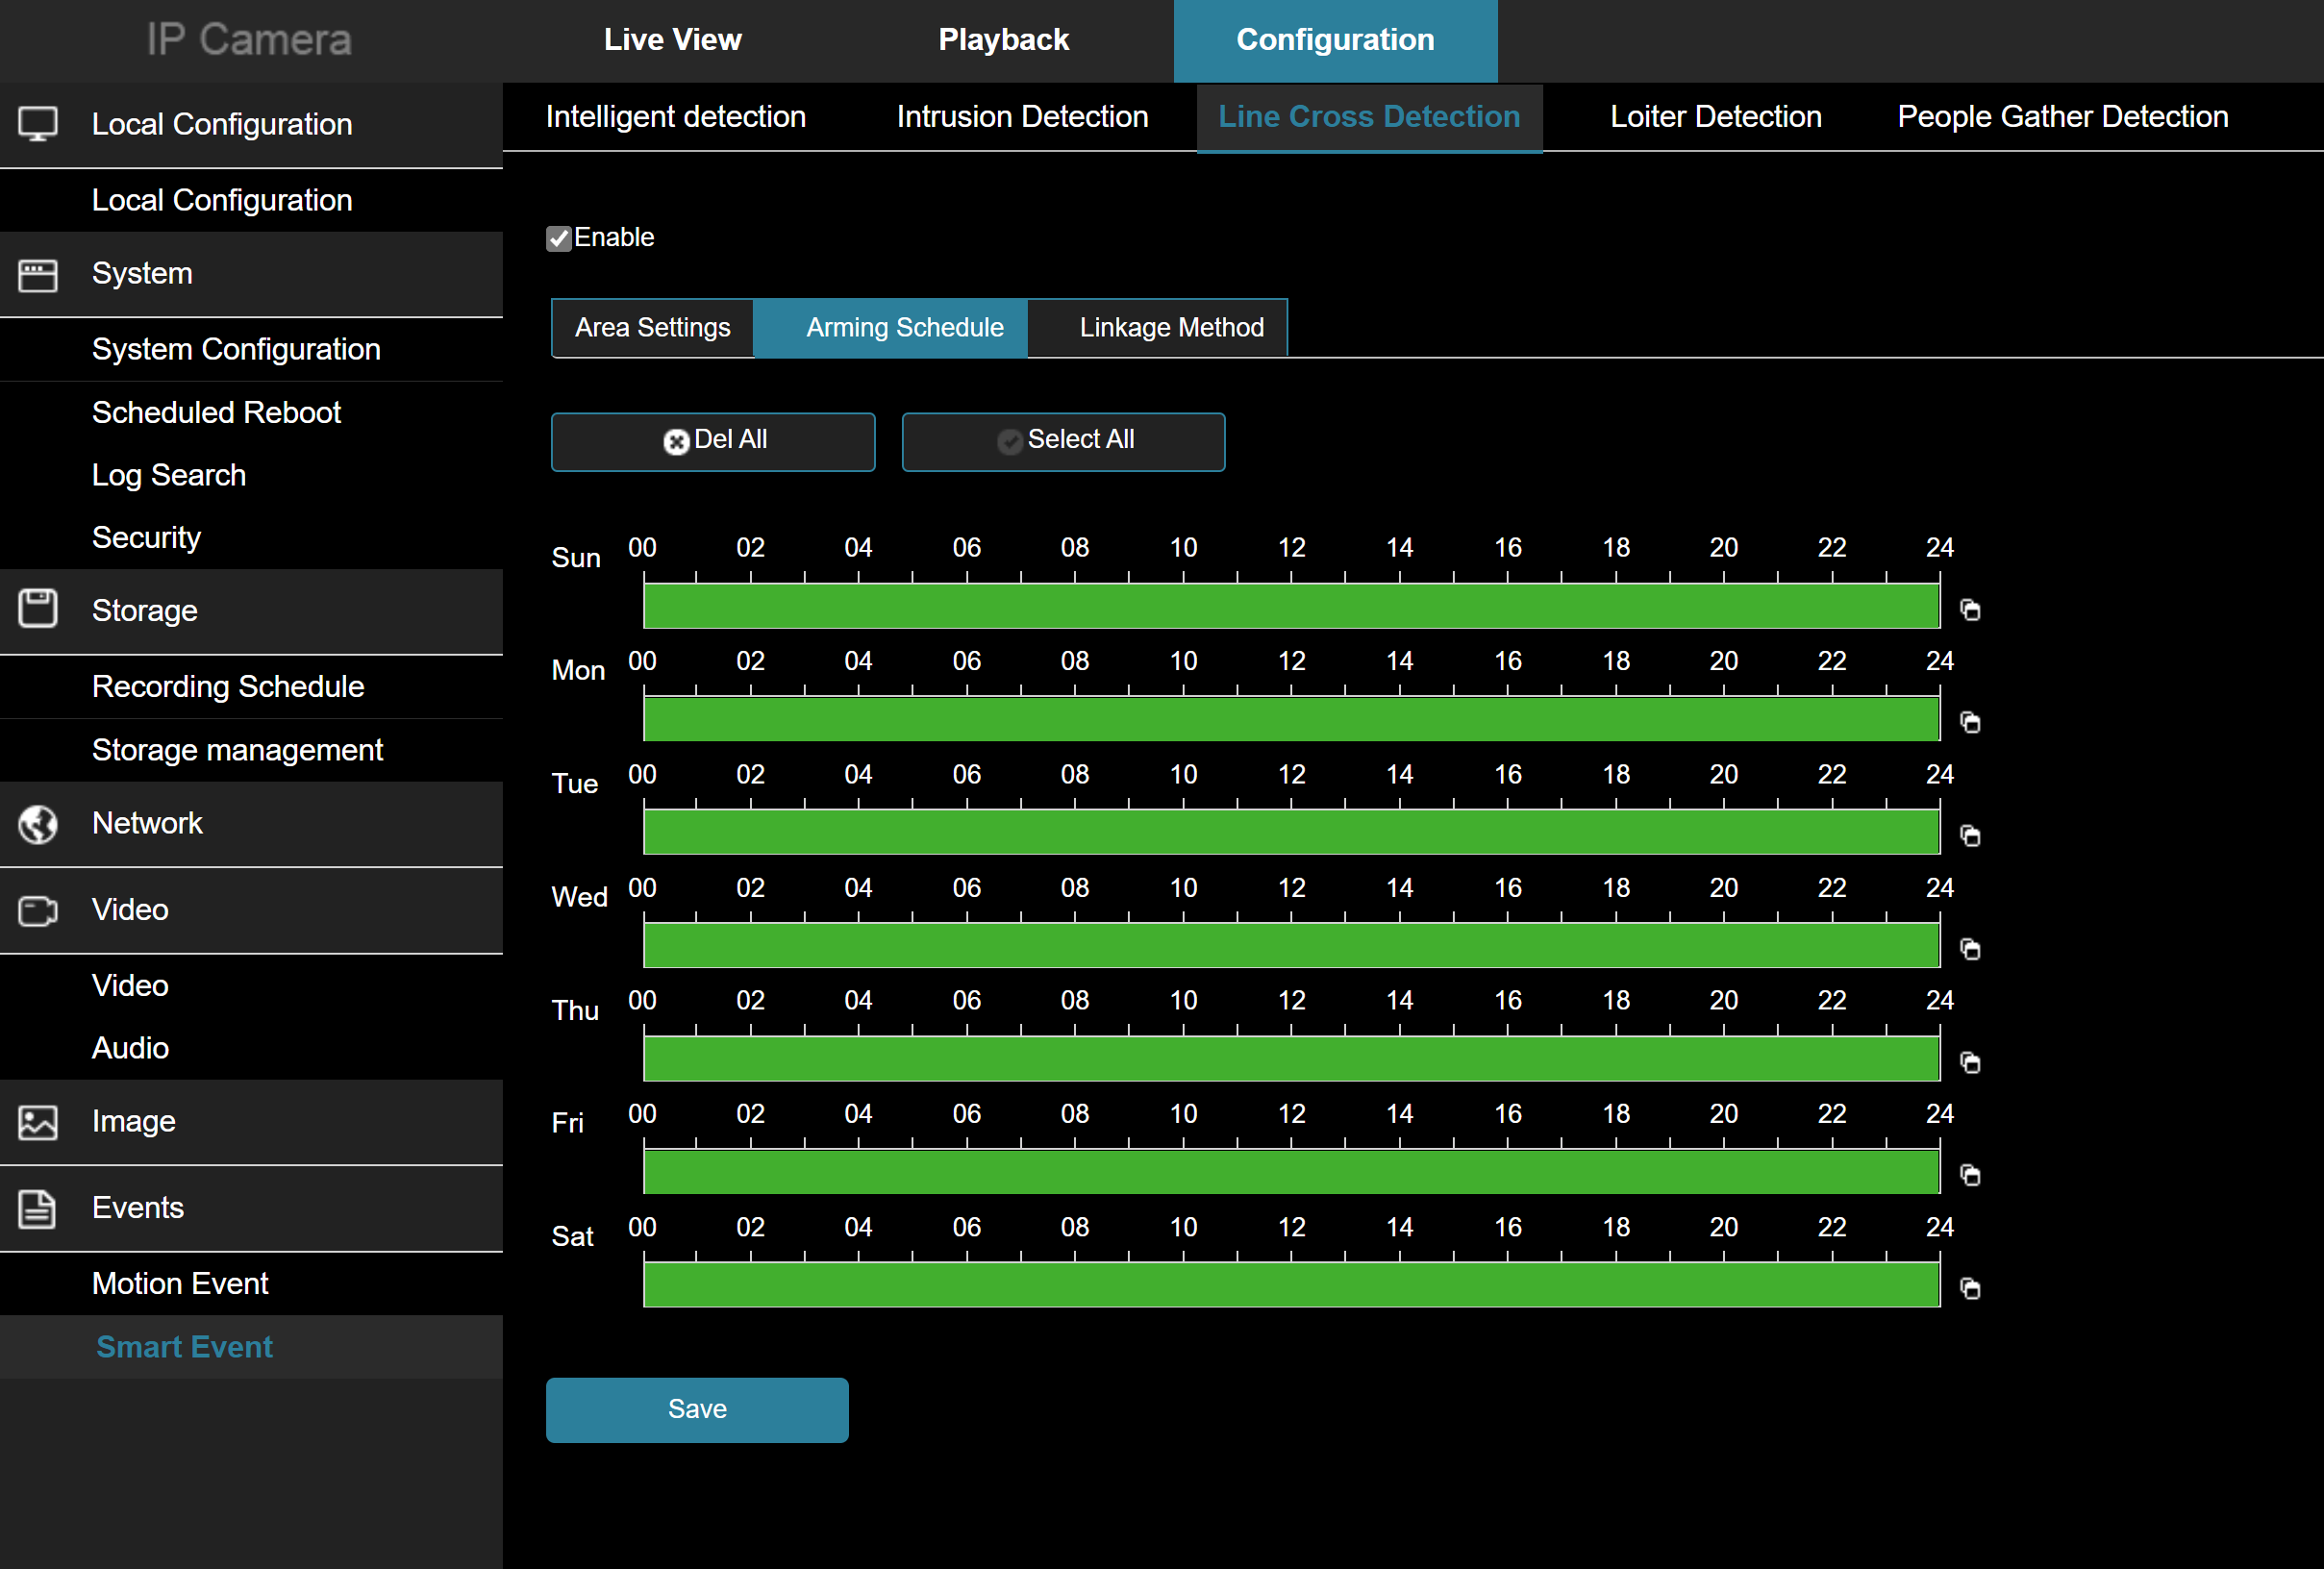
Caution:
It is easy to get confused by the multiple calendars that are in a camera or NVR. The event arming schedule shown above is the primary calendar you need to manage.
If your installation requires events to be disabled during certain hours of the day or days of the week ALWAYS do the following:
1. Use the event arming schedule to control when the event will be analyzed and propagated
2. Leave the record schedule on 7×24 record. DO NOT try to match the two calendars – use the event arm schedule to control when events happen NOT the record schedule.
Step Five: TEST
This is an easy thing to skip – make sure you test your Smart event! Watch the area of interest and make sure objects moving in that area are captured (go to the Playback tab to view). You can use the sensitivity setting to adjust the distance the camera will pick up a human event.
Where to find the default password for ClareVision Cameras and NVRs
The default password for all ClareVision cameras and NVRs is the FIRST SIX CHARACTERS of the UUID which can be found on:
- Back of the installation manual
- Label on the camera box
- Label on the back of the physical camera
IMPORTANT NOTE: The password is case sensitive.
You will be prompted to change the password when initially setting up the camera in both the camera web console and ClareVision App.
How to use the SD Card in a ClareVision Camera as Backup to Your NVR.
Want to be sure events are available for your customer in the event of an NVR failure or NVR theft? Use the SD Card on the Camera as a backup.
Overview
The SD Card in the camera (included in all 4MP and 2MP fixed lens ClareVision cameras) is a useful tool when you want to install one or two cameras and keep the job low cost and simple. The user experience is similar to an NVR with event playback and the storage is reliable. What about an installation with an NVR? Use the SD Card as a back up for events.
NVR Setup
The NVR setup is not changed in any way to accomplish the goal of using the SD Card as a backup for events. Read this article to learn more about setting up a ClareVision NVR. Once you have completed setting up the NVR to record motion or smart events, you are ready to configure the camera to record events.
Camera Setup
By setting up the NVR to record events in the motion or smart event setup, you have already configured the camera’s motion or smart events.
Here is the NVR with smart events configured using Intrusion Detection
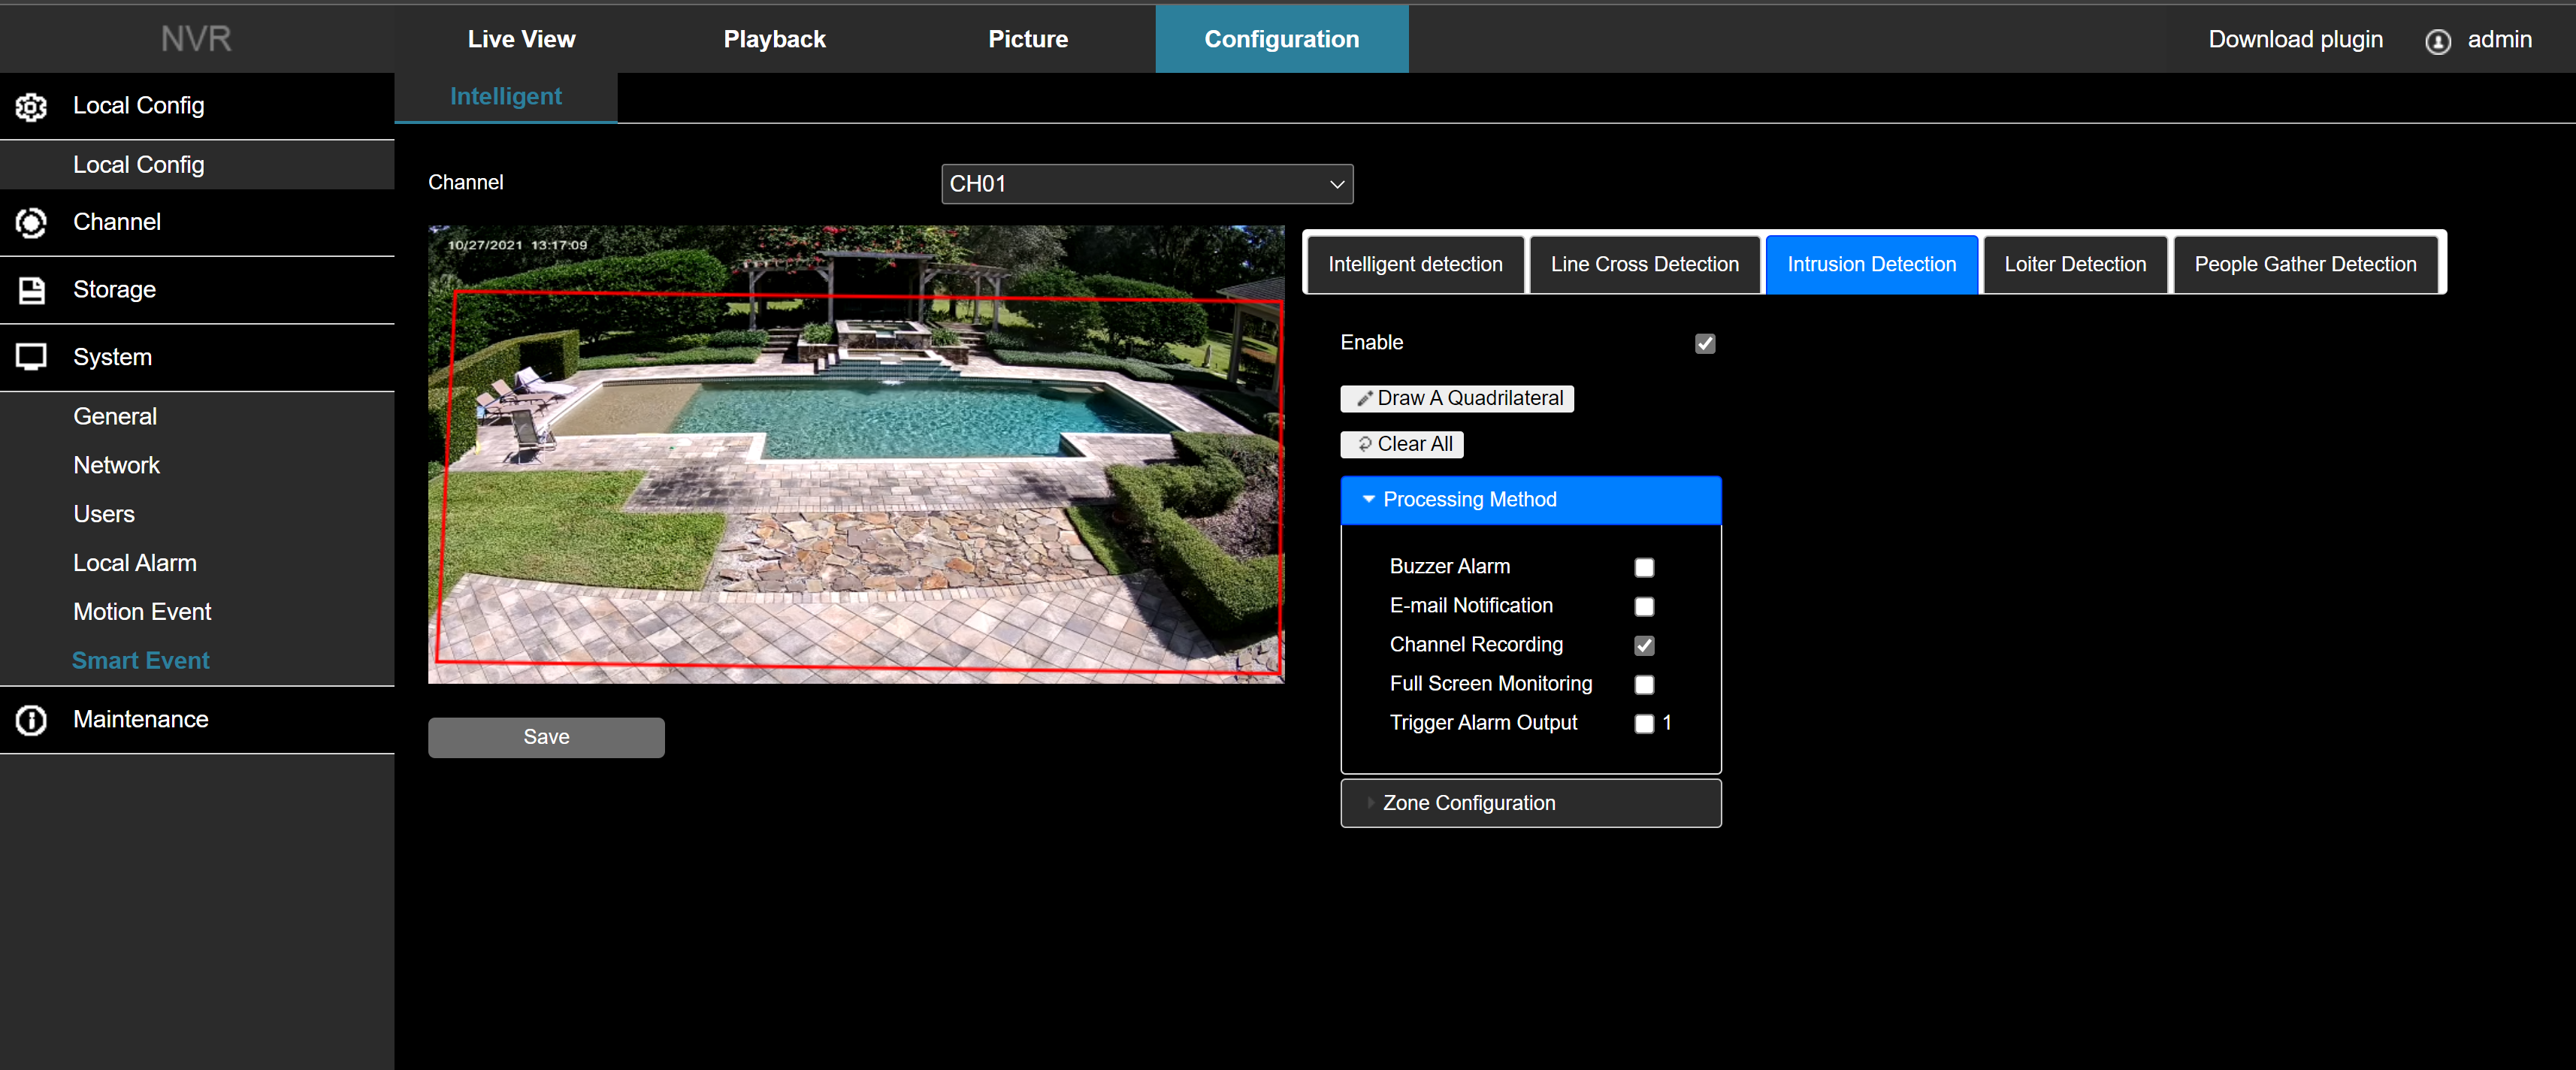
By configuring the Intrusion Detection in the NVR as above, the camera Intrusion Detection is configured as shown below (the NVR simply ‘programs’ the camera)
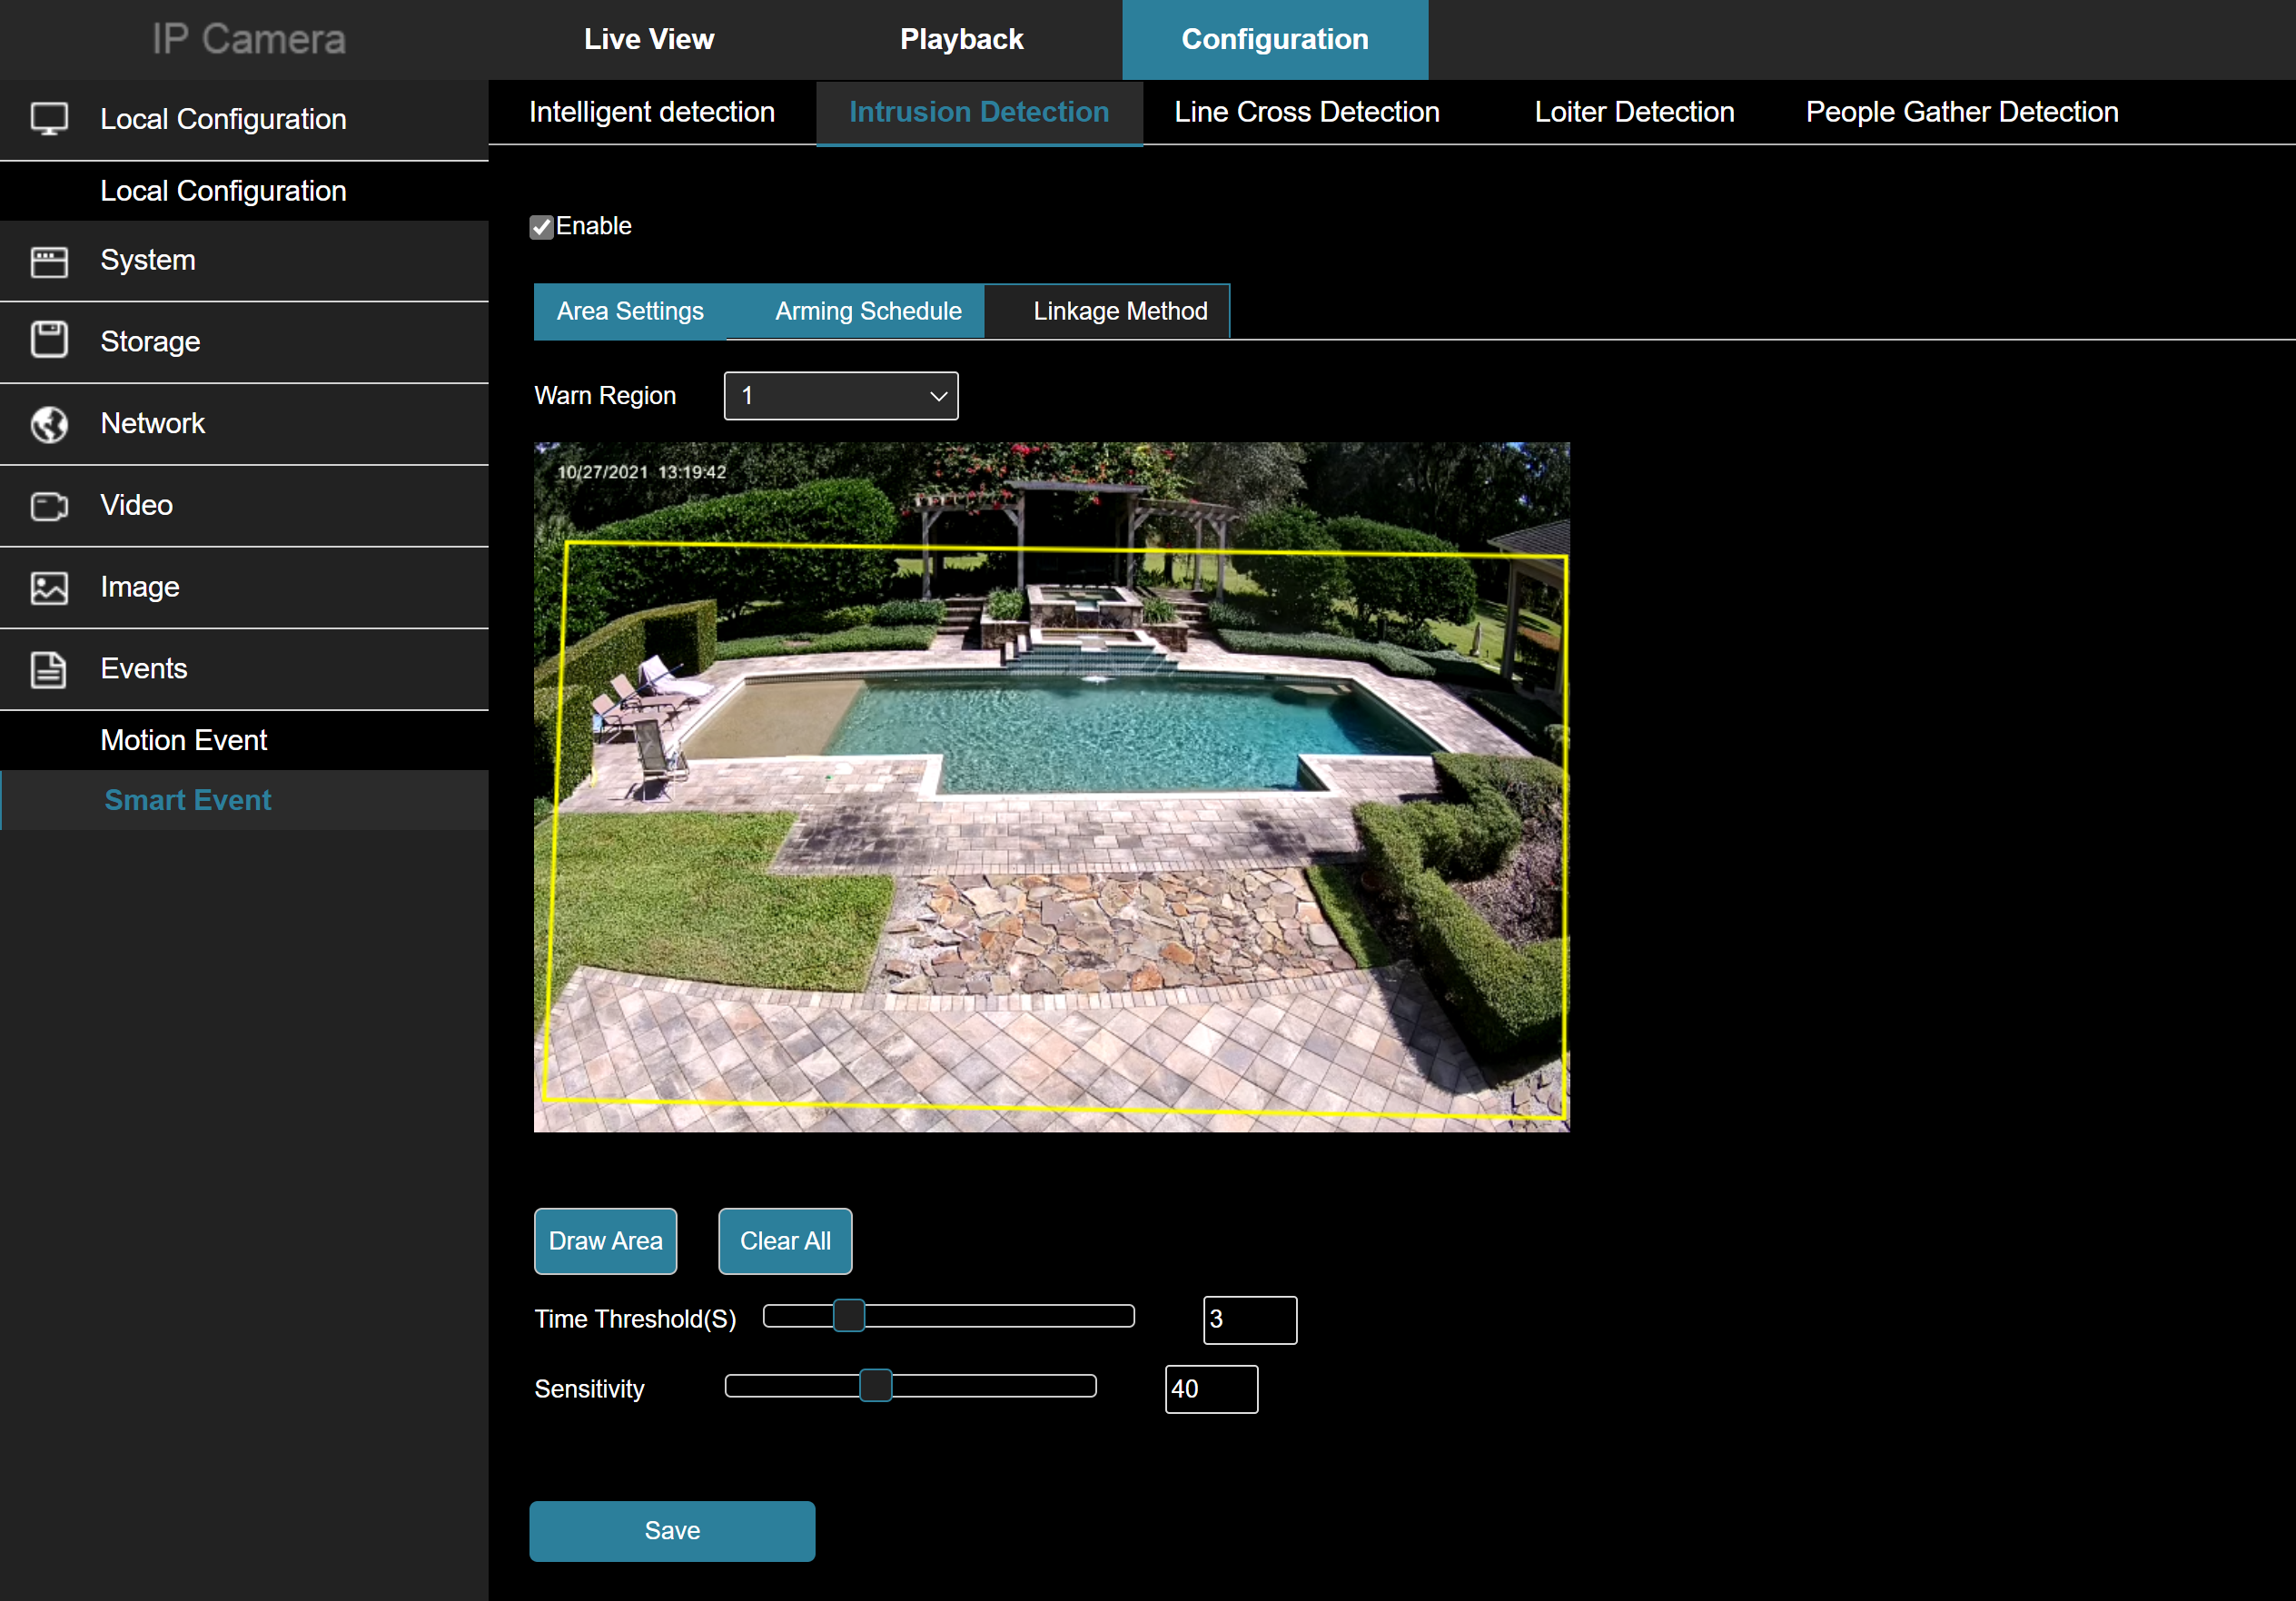
The recording schedule you setup in the NVR is the recording schedule for the NVR, not the camera. To use the camera SD card as a backup to the NVR for events, we need to set the recording schedule up in the camera.
The image below shows the camera recording schedule. It is set to record all Smart Events, 7 days/week, 24 hours/day.
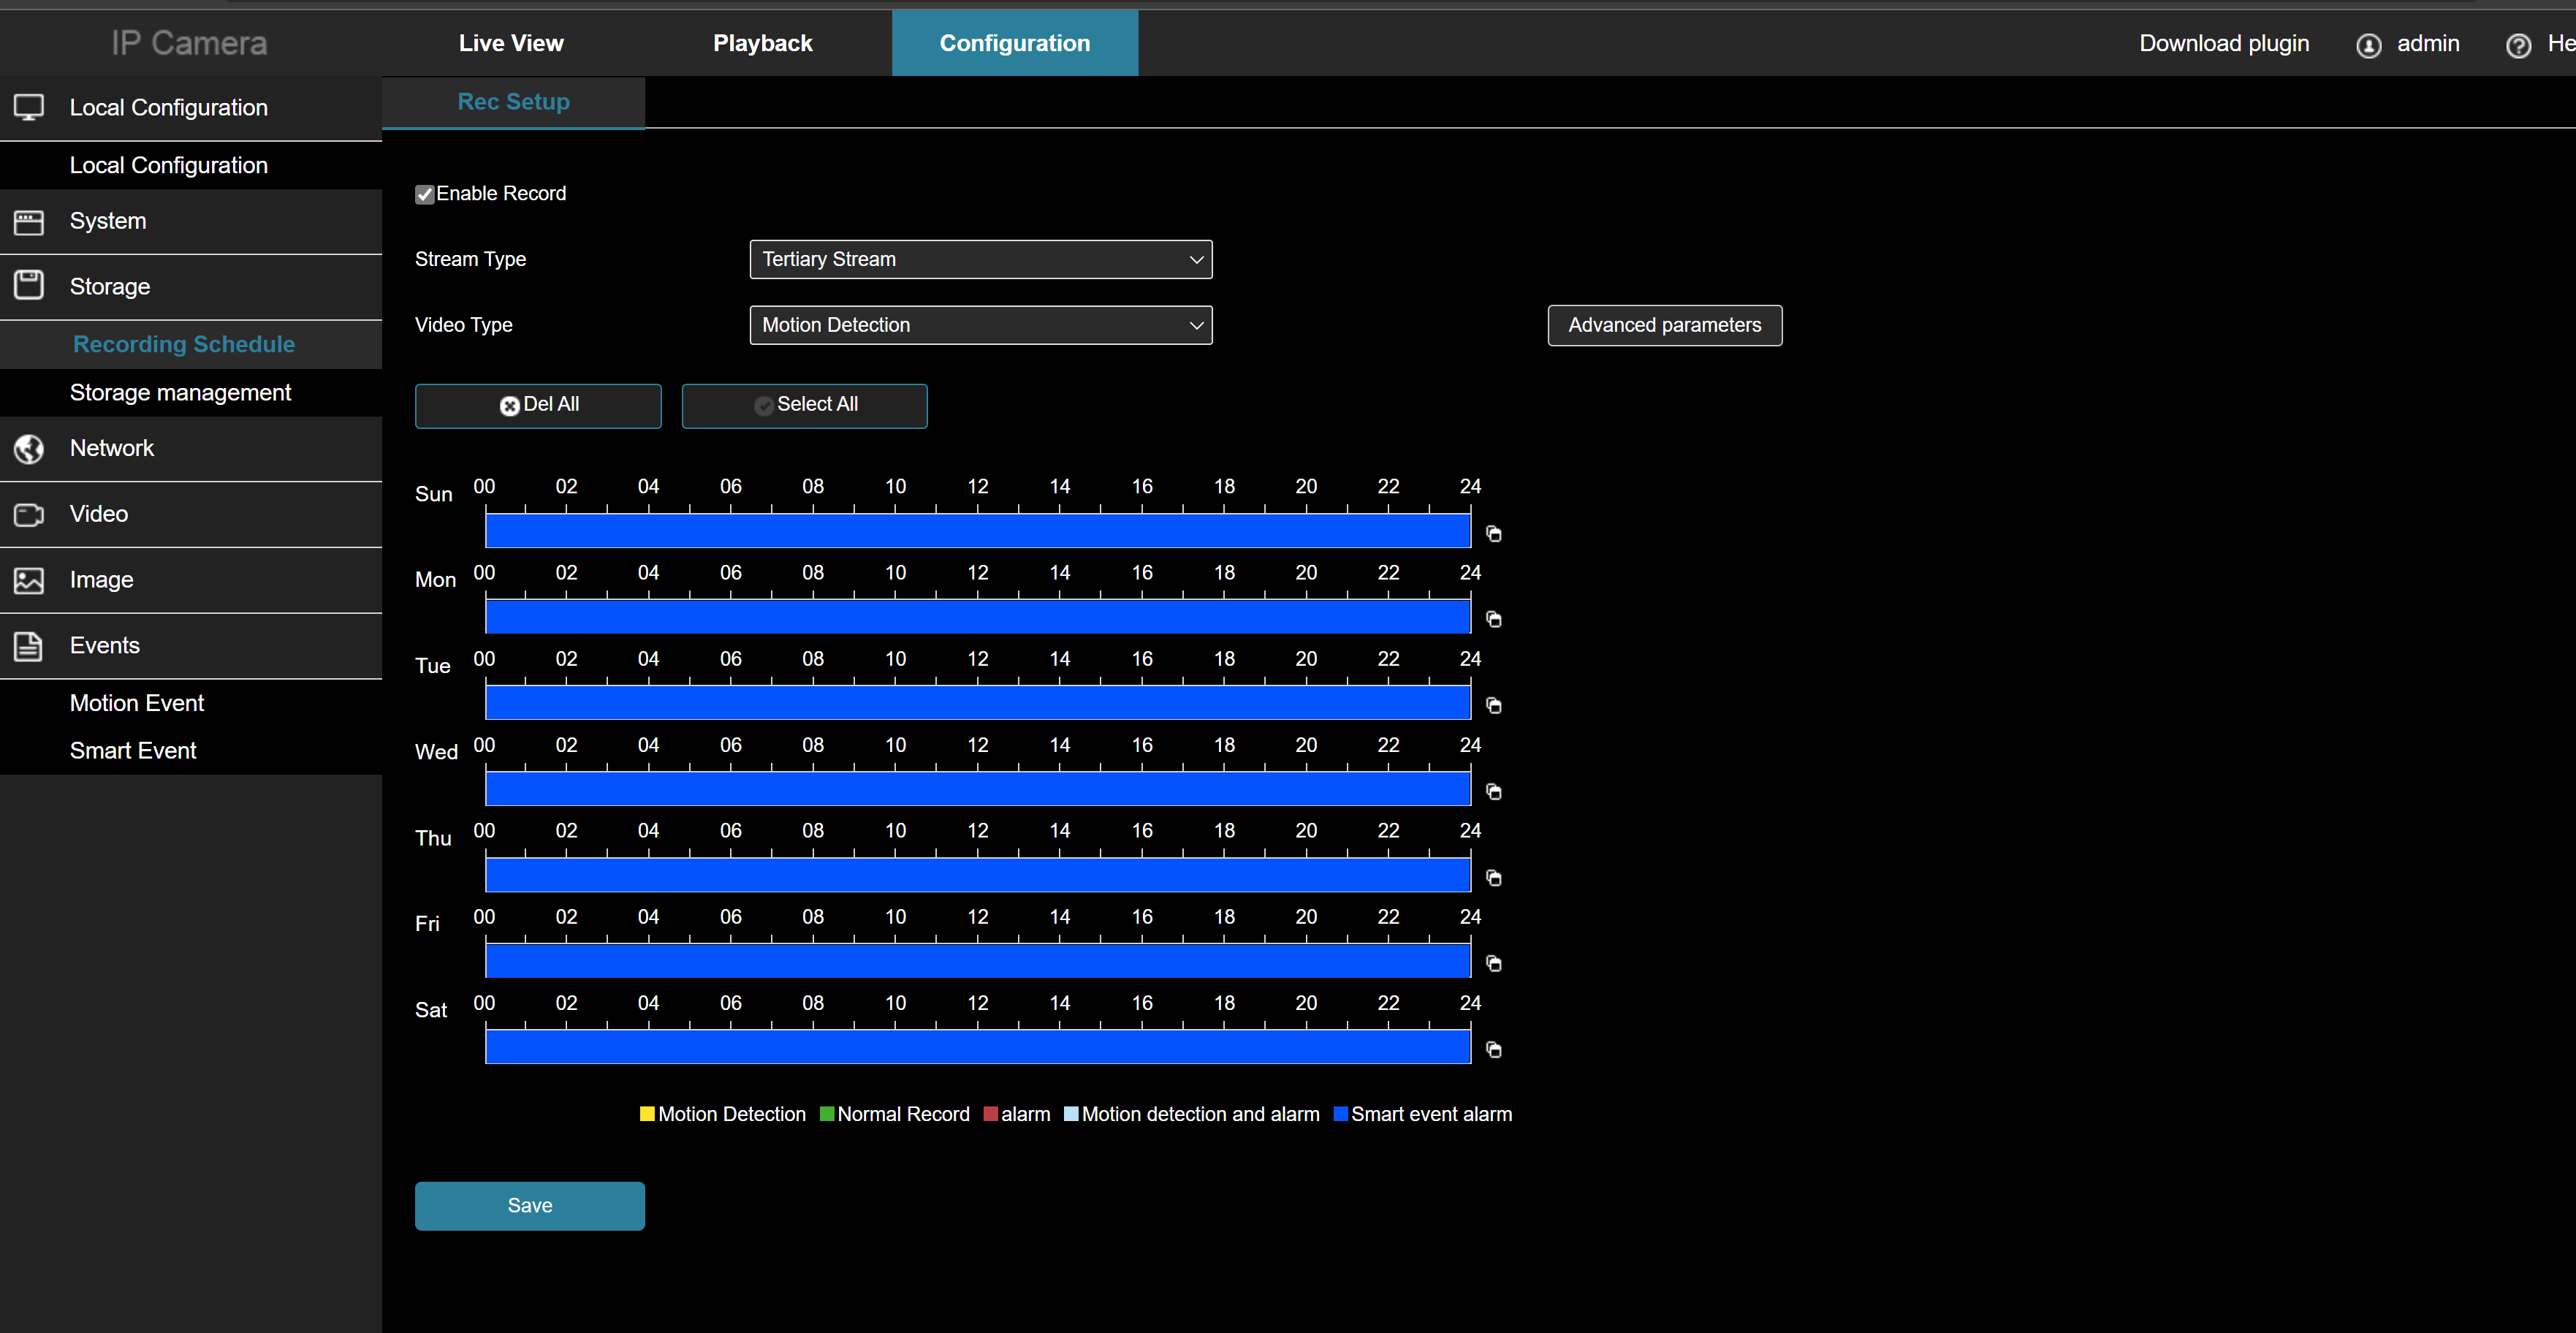
Save the schedule and you are done. The camera will both, send the event to the NVR for storage and record the event locally.
Points to Remember:
- You cannot access SD Card events from the mobile app when it is behind an NVR (i.e. on the PoE ports). If the camera is connected to the NVR on the general network, you can add the camera to the mobile app as a separate device and access the events directly from the camera tile on the home page. We only recommend doing this for troubleshooting and access to SD Card events as it will get confusing for your customer if the camera is visible on the home page and the NVR screen.
- You can only back up ONE event type: motion OR smart and not both. The camera will only record a single event type.
- Accessing the stored events on the camera itself involves the following steps assuming the camera is on an NVR PoE port:
- Log into the NVR
- Go to Configuration/Channel/Camera
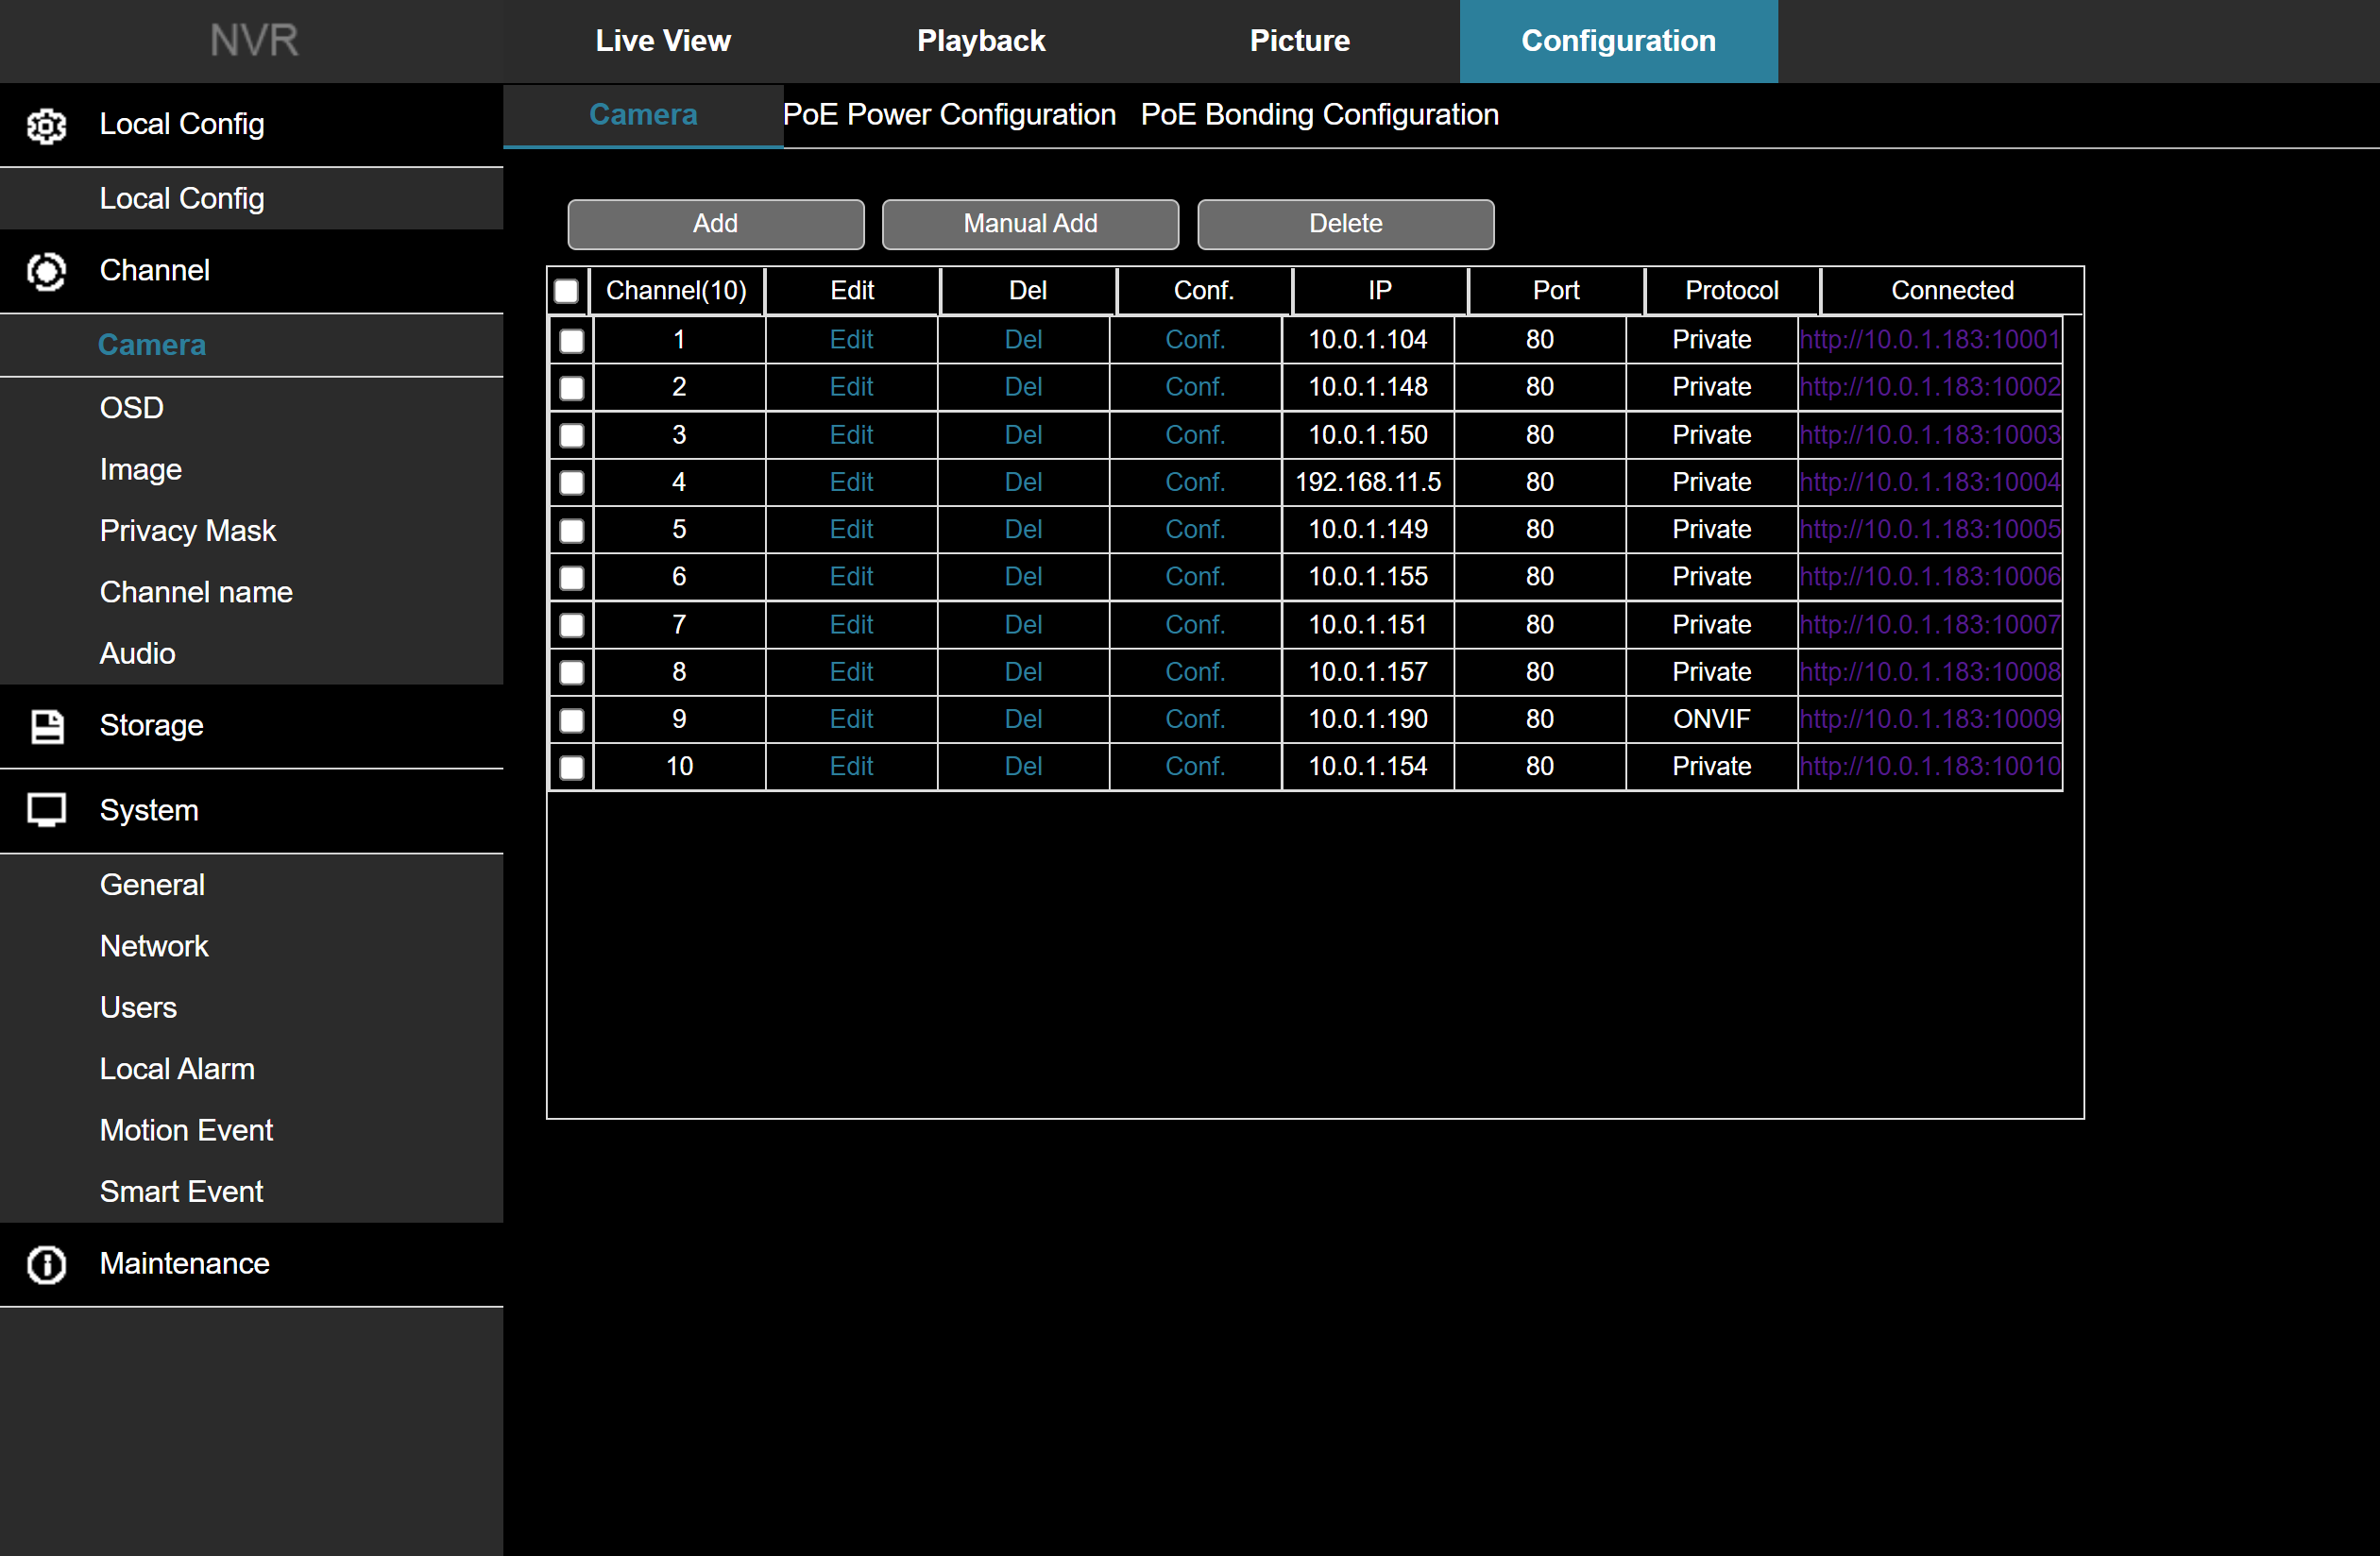
- Access the virtual host by clicking on the IP address of the camera you wish to view and login to the camera.
- Once logged into the camera, go to the Playback tab and view the stored events.
Conclusion
Clare Controls includes SD cards on many of its cameras standard. You can use the camera stand-alone OR use the SD card as a backup to the NVR. With a few minutes of work, you can assure you customer their data is safe!
Where do I find the UUID on an Installed Camera
If you camera is already installed and you need the UUID for setup – follow these instructions.
Let’s say you are being called out to configure cameras that have already been installed and no one wrote down the UUID you need for the password. There are two simple methods for retrieving the UUID without getting a ladder out and going to each camera
Method 1: Cameras are Stand-Alone on the LAN
Launch the ClareVision App
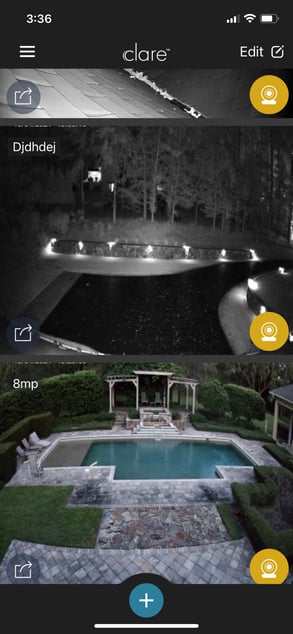
Tap the ‘Plus’ sign and you will be presented with the three options shown below.
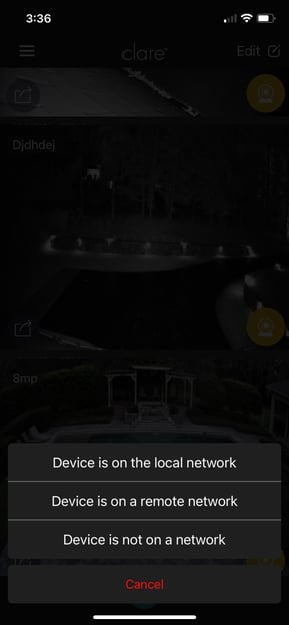
If you tap device is on the network, the app will scan the LAN for any ClareVision cameras and present them in the following screen.
There you have all ClareVision cameras attached to the LAN with the UUID (needed for the default password) and the IP address of the camera. You can now log into the camera your browser using the IP address and the first 6 digits of the UUID as the default password.
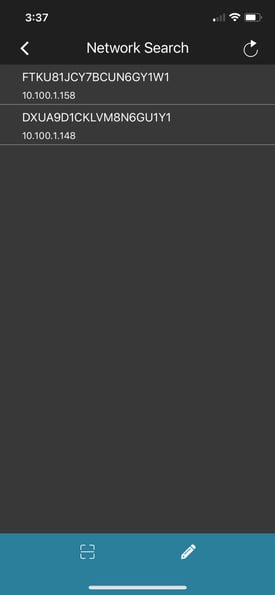
Method 2: Cameras are on the NVR
This is even easier. Log into the NVR, change the password as requested. When you do so, all attached cameras will have their UserID and password set automatically to the UserID and password of the NVR.
If you want to change the UserID and password of the NVR, you do so under the Configuration tab System/Users
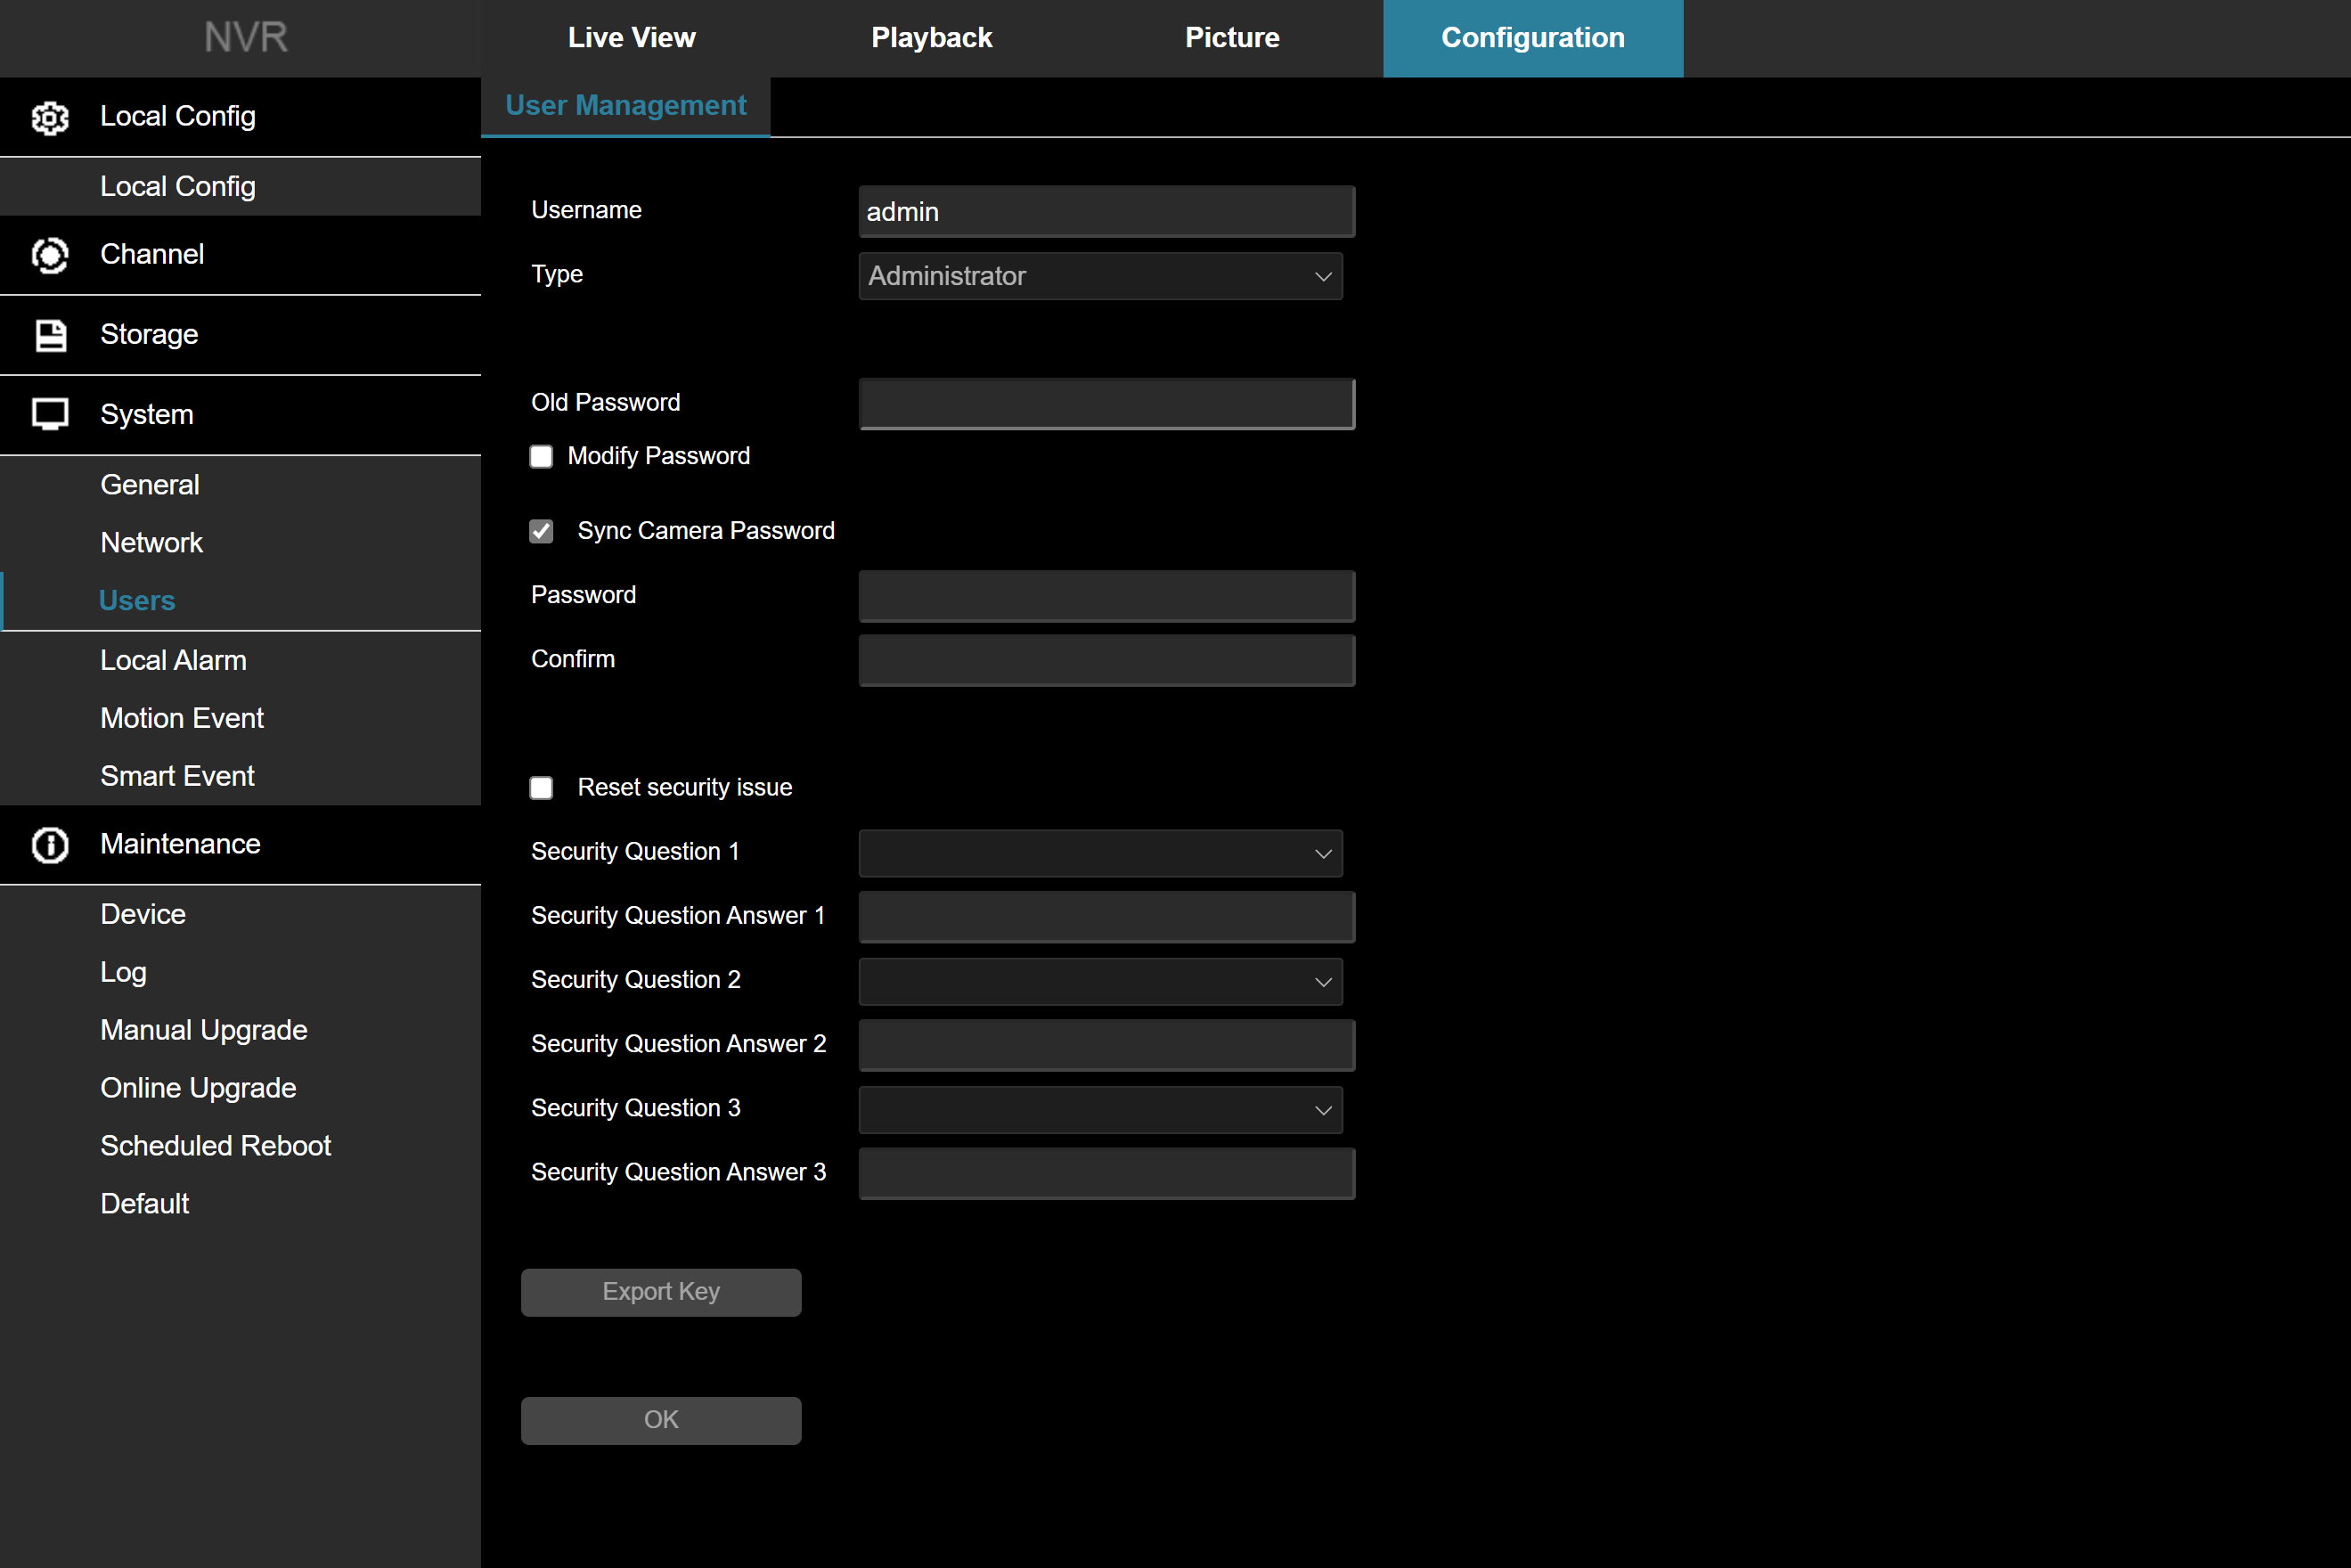
Check the “Sync Camera Password” box and password will change on all attached ClareVision cameras whether on the PoE ports or the general LAN when the NVR password change is accepted.
Note:
The camera password sync feature works with ClareVision cameras only. It does not work with attached ONVIF cameras (e.g. Luma, Hikvision etc)
How to set up Event Snapshots using cloud storage for ClareVision cameras and NVRs
Event snapshots can be configured for ClareVision cameras and NVRs that are backed up on a Google Drive account. Whenever an event is detected such as smart event, motion, or other alarm trigger, a snapshot image will be created of the scene and uploaded to your Cloud storage device. This guide will help you set up Google Drive for use as a backup with event snapshots.
Google Drive:
- Utilize IP Search Tool to find your camera on the network and notate the IP address.
- Open Edge or Chrome and navigate to the IP address for your camera.
- (ex. http://10.100.0.100)
- Log into the camera using camera’s credentials that you created at setup.
- Click on the “Configuration” tab, then click on “Storage” in the navigation tree on the left side of the page.
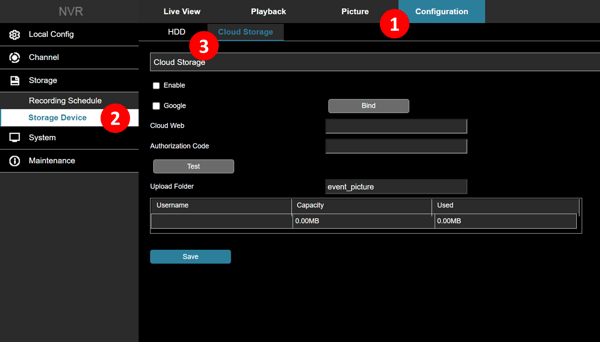
- Click on the “Storage Management” sub-menu and switch to the “Cloud Storage” tab.
- From the drop-down menu in a camera, select “Google” or the “Enable” checkbox and “Google” checkbox on an NVR. The web console will auto-fill with the Web setup URL and Authentication Code. You will need this code to complete setup.
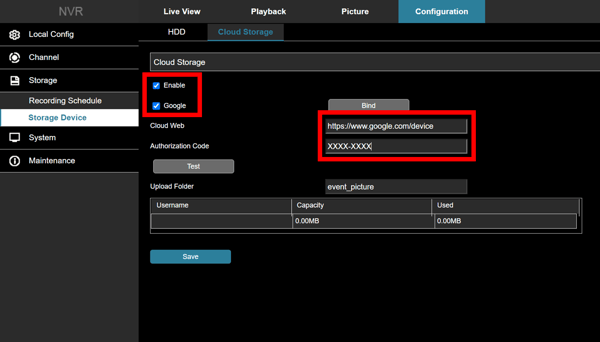
- Copy and past the web browser URL link (https://www.google.com/device) into a new browser tab.
- Copy and paste the Authentication code into the Google devices login window and tap “Next“.
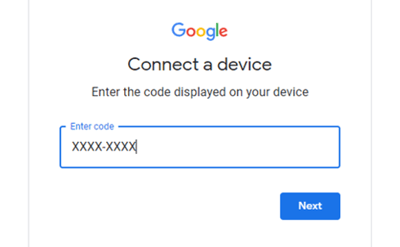
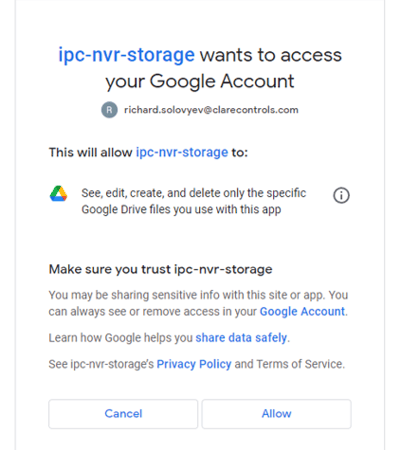
- Log in or select your Google Drive account.
- Tap “Allow” to give the NVR rights to your Google Drive.
- After the success screen displays, switch back to the camera web console and tap “Bind“.
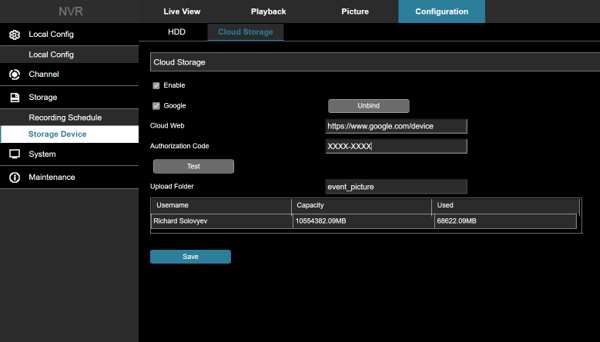
- The camera is now be connected with your Google Drive account. You must enable Cloud Snapshot Backup individually for each camera including those connected to an NVR by opening the camera through the Virtual Host. Configure the Cloud Linkage method in your motion detection settings:
- Open the “Events” window in the sub-menu and select “Ordinary Events or Smart Events“, depending on the need.
- Under your selected event type, select “Linkage Method” in the sub-menu.
- Add a check box next to “Upload Via Cloud” to have event snapshots loaded into the cloud.
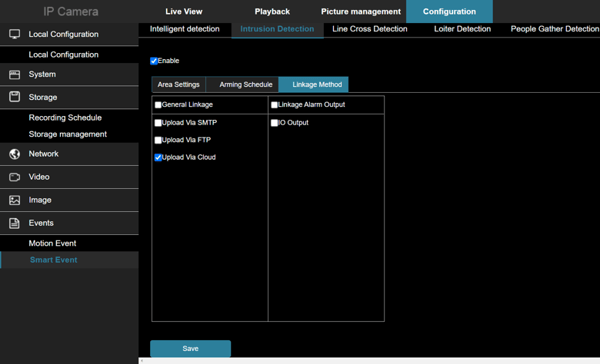
- Tab “Save“.
- The next time motion is detected, a folder will be created in your Google Drive that will capture and upload snapshots of motion events.
- Back of the installation manual
- Label on the camera box
- Label on the back of the physical camera
In this video, we will cover how to mount ClareVision Value and Performance Series Fixed Lens Turret cameras.
CLR-V100-2T36(W/B)
