Speco Blue Recorders User Guide, The Blue product series from Speco is a line of IP security cameras that are designed for...
Speco Blue Recorders User Guide, The Blue product series from Speco is a line of IP security cameras that are designed for high-performance surveillance applications. These cameras are known for their exceptional image quality, reliability, and ease of use. The Blue series is suitable for both indoor and outdoor surveillance needs and offers a wide range of features and capabilities.
How to enable camera audio from a Speco Blue recorder
This guide will go over the steps required to activate a camera’s audio feature from a Speco Blue recorder.
Disclaimer – For legal purposes, audio is disabled by default. Please review local and state laws before enabling the camera’s audio.
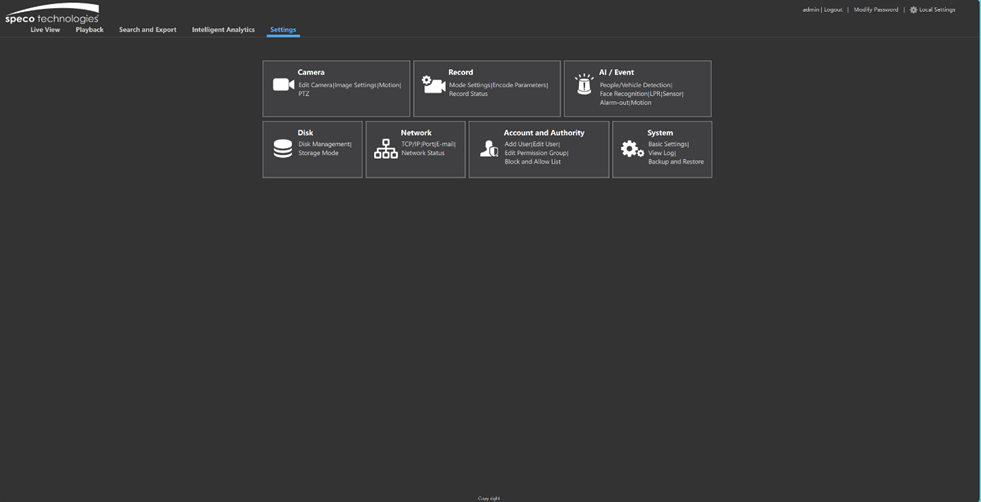
• First, access the Settings menu of the Speco Blue recorder.
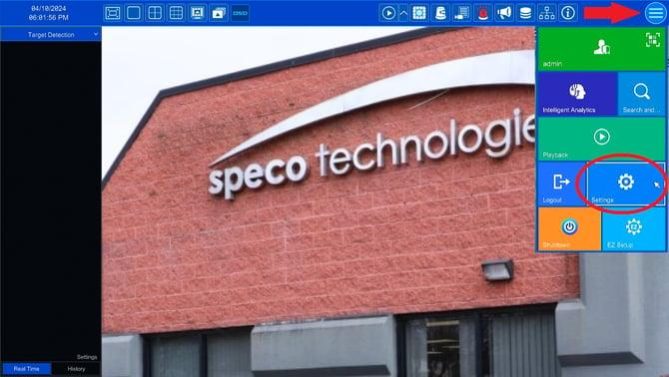
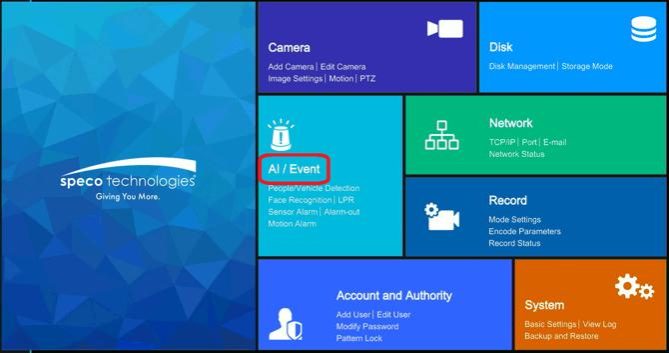
• Once the Settings menu appears, please select the AI/Event page. That will automatically open the Alarm-out settings page.
• From the Alarm-out page, select the Digital Deterrent option towards the top. Under Camera Audio, select Audio Device.
◦ Select the camera that needs its audio recorded and put a checkmark in the Enable checkbox.
· Adjust the volume as needed and select Apply at the bottom.
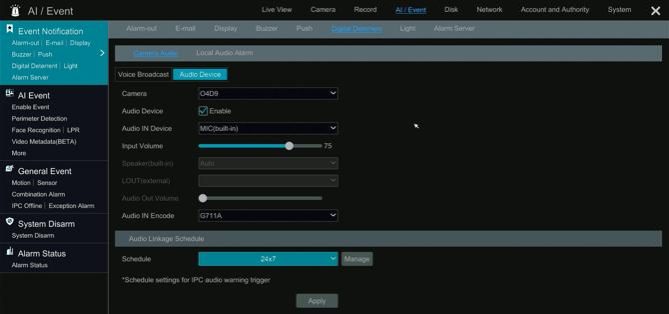
The recorder should now be recording the camera’s audio.
How to configure a Fisheye image on a Speco Blue Recorder.
While a fisheye camera can be used on all Speco Blue recorders, not all Speco Blue recorders support changing the view of the fisheye image.
.
FISHEYE CAN ONLY BE ADJUSTED ON AN N64NR/N128NR AS WELL AS ANY NRE/NRX SERIES RECORDER
.
• First, Right click on the fisheye camera’s image.
◦ A menu should appear. An option on that menu should be Fisheye. Please select Fisheye.
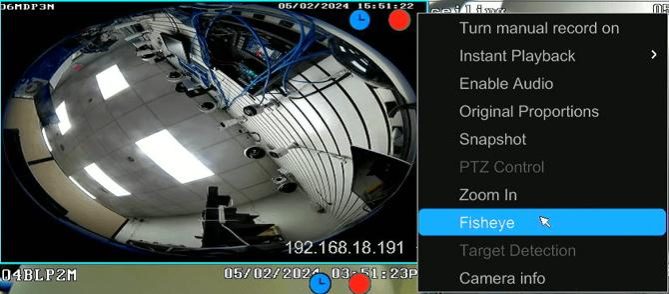
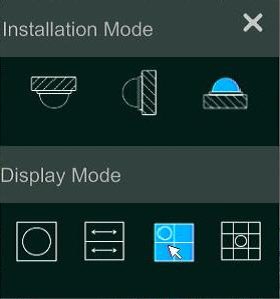
• The Fisheye Menu will appear.
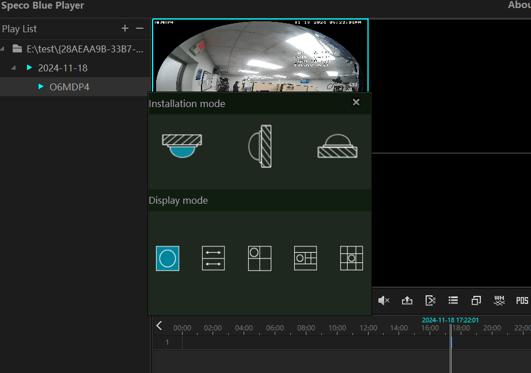
◦ The top option, Installation Mode, will tell the camera how it is orientated to ensure it is displaying its image in the correct orientation as well.
· Selecting the Top Mount option will correctly orientate the image from the ceiling’s perspective, so the image isn’t upside down to the viewer.
· The Wall Mount option will orientate the image, so the image isn’t sideways to the viewer.
· Desktop Mount is the same concept as Top Mount but this time the camera is pointing up instead of down.
◦ The bottom option, Display Mode, will change depending on what Installation Mode is selected. The options that are available in Display mode are:
· Fisheye, which is the default circular image.
· Panorama, which creates 2 separate 180-degree views.
· Fisheye+3PTZ, which will show the full fisheye image, as well as 3 separate images to view specific areas of the image.
· Fisheye+8PTZ, which will show the full fisheye image, as well as 8 separate images to view specific areas of the image.
Setting up a Pattern Lock on a Speco Blue Recorder
The Speco Blue Recorder gives the user an option to use a written password, or a pattern lock password. Here is how to enable Pattern Lock.
• First, access the Settings menu of the Speco Blue Recorder.
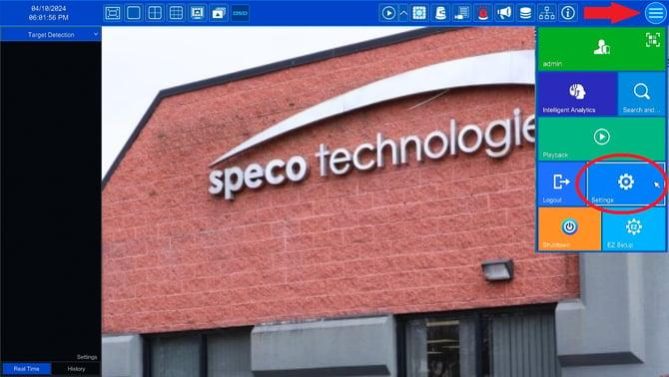
• Once the Settings menu appears, please select the Pattern Lock option under Account and Authority.
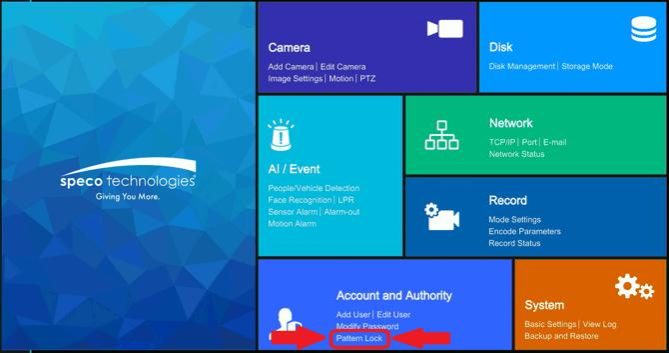
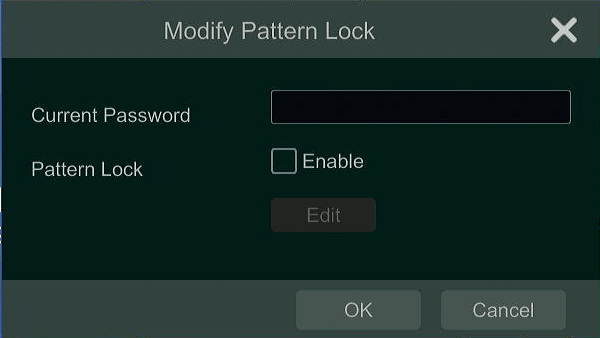
• A small menu will appear titled Modify Pattern Lock.
◦ Please insert the current password of the recorder where it says Current Password.
◦ Put a checkmark in the Enable box and select Edit.
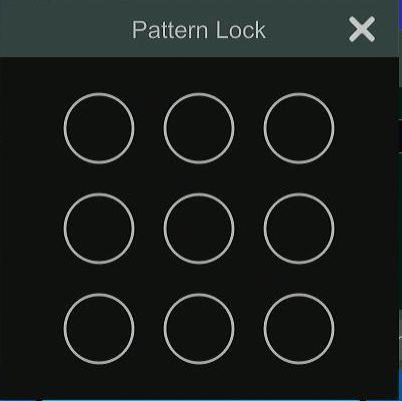
• A menu called Pattern Lock which will have a 3×3 circle grid will appear.
◦ Click and drag the mouse to each circle to create a pattern. Once the pattern is created it will ask to confirm the pattern, please insert it again.
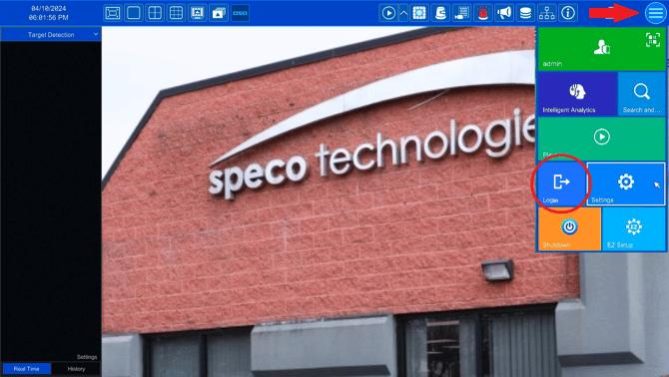
• Once the pattern has been confirmed, the recorder will log the user out and return to the Live camera screen.
◦ Select the Hamburger ☰ icon in the top-right corner and select Login.
• On the Login screen, select Change Login Mode and the Pattern Lock will appear.
◦ Insert the created pattern and the user should now be logged in.
.
The written password will still be required to login from any other platform.
How to play camera audio from a Speco Blue Recorder
This guide will go over the easy steps to hear audio at the recorder.
To hear audio at the recorder, two things are required:
1.Audio must be enabled from the recorder.
2.The monitor hooked up to the recorder needs to have a speaker; Or an external speaker can be plugged into the recorder’s AUDIO OUT output on the back.
Once these two requirements have been met, audio is ready to be played from the recorder. Please follow the steps below to enable the audio.
.
• At the Live camera screen of the recorder, right-click on the camera.
◦ From the menu that appears, select Enable Audio.
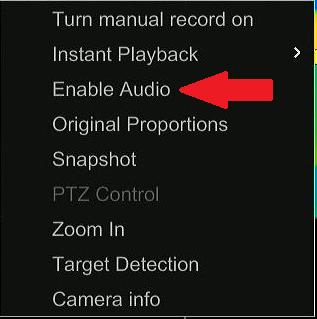
• Audio should now be heard from either the monitor with a built-in speaker, or the external speaker from the AUDIO OUT output.
◦ A speaker icon should appear on the camera that has audio playing. Only 1 channel of audio can be playing at a time.

How to enable the white light 24/7 using the Speco Blue recorders interface
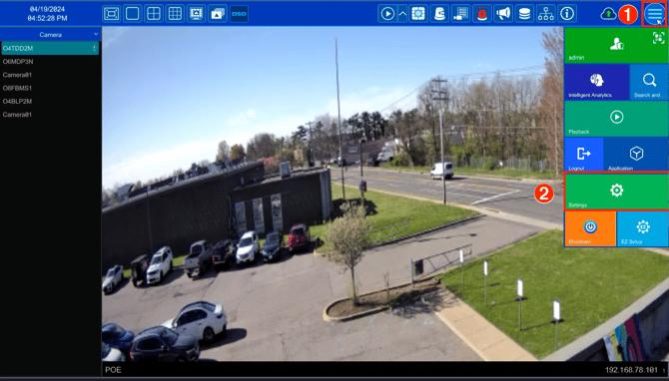
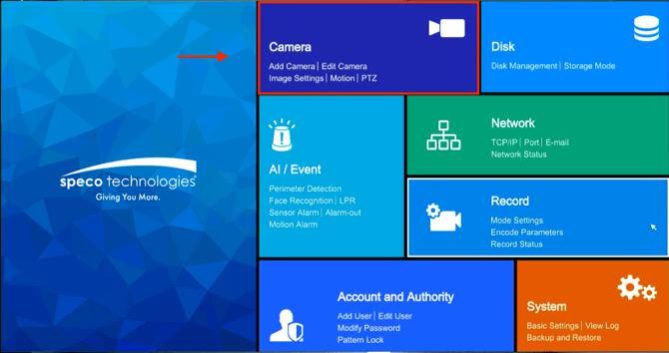
If looking to engage the white light 24/7 (on Speco Blue Cameras such as O4TDD2M) follow the instructions below.
Step 1:
• ➊ Click on the hamburger icon,
• ➋ Click on settings (gear icon)
Step 2:
Step 3:
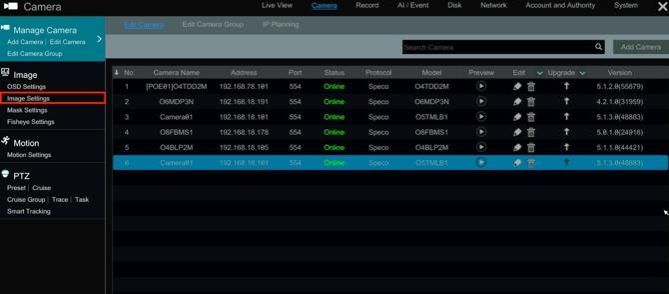
• Under Image, Click on image settings
Step 4:
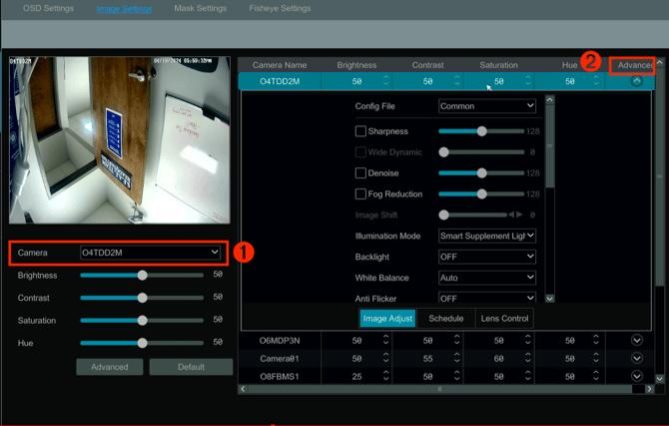
• ➊ From the pull down menu, Select the camera to be adjusts
• ➋ Choose the advanced tab
Step 5:
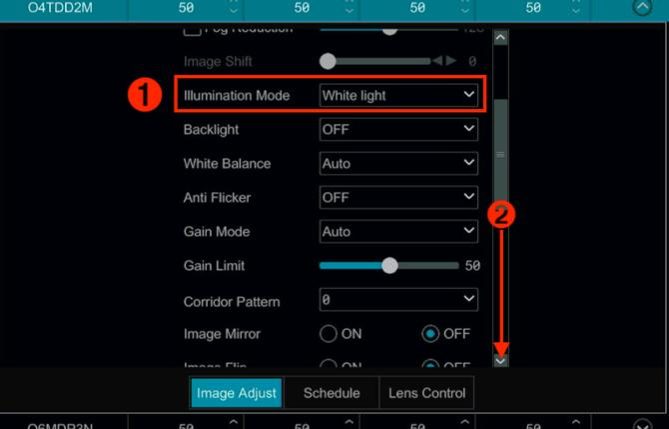
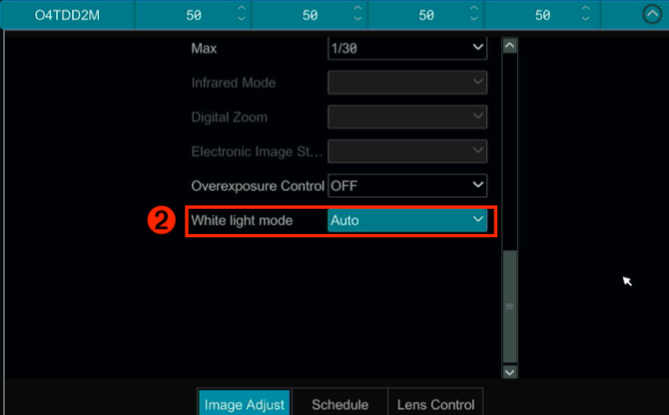
• ➊ Under illumination mode, select White light from the dropdown
• ➋ Scroll down and ensure White light mode is select to auto
Step 6:
• It will automatically apply the settings when changed.
How to disable Plug and Play (PnP)
There may be instances where you do not want the recorder to assign the IP address to the camera.
1. Log into the NVR
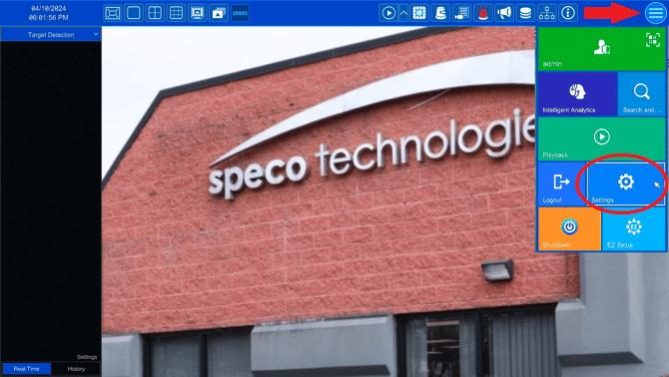
2.Click settings, then system. This will bring you to Basic Settings
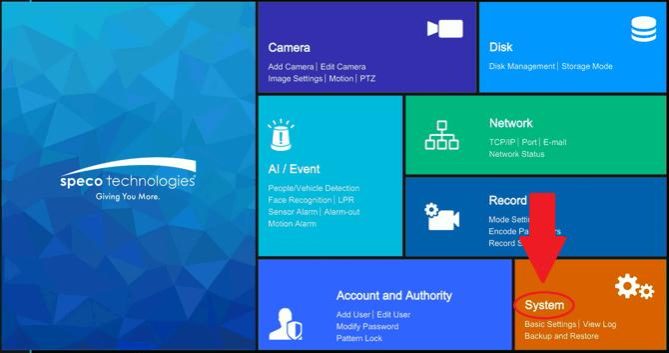
4 Click on POE Settings, this menu will populate
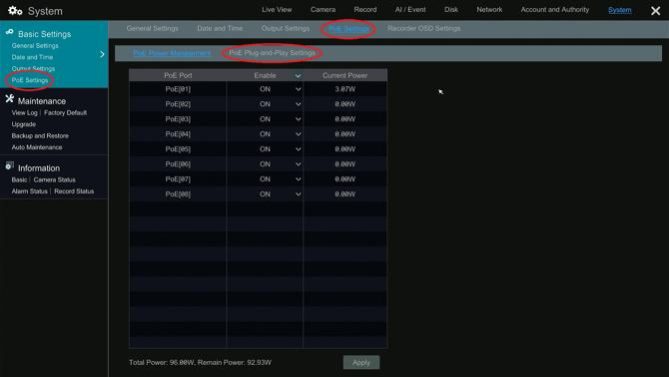
5. Click on the PoE Plug-and-Play Settings and choose the channels you want to turn off.
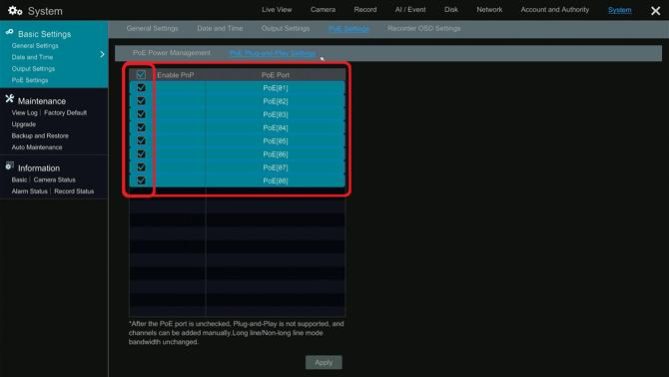
6. After disabling the plug and play, go the network setting , Internal ethernet port and change the address .unfortunately once this done you will need to statically address the camera with and IP address other then 192.168.78.(x)
How do I add an ONVIF camera to a Speco Blue Recorder?
Adding ONVIF Cameras to Speco Blue Recorder using the web interface.
1.Make sure that ONVIF is enabled in the third-party camera.
a.(Note: Each brand of camera has a specific method to turning on ONVIF, See the manufacturers manual or website for details.)
2.Access your recorder by typing in the recorder’s IP Address into your web browser.
a.Go to the settings in the menu at the top.
b.Choose “Camera’ from the tiles
c.On the left side bar under Manage Camera, click on “add camera”.
d.In the center of the grid at the top, Click the center tab “Add Manually.
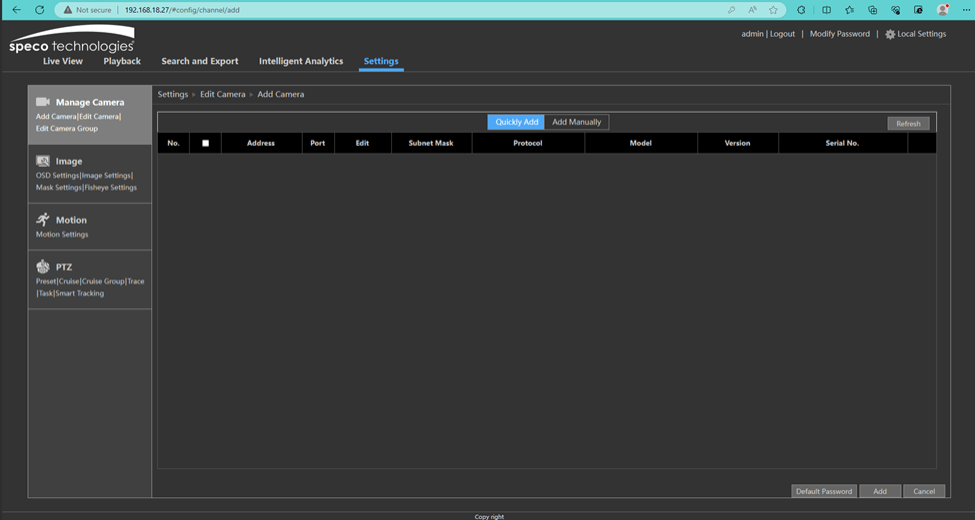
3.Once on the manual entry screen:
a.Under the heading ‘Address” adjust the pull down menu to the protocol of the camera you are adding (example: IPv4, IPv6, Domain) and then type in the IP address of the camera
b.Under the heading ‘Port” type in the RTSP port (Real Time Stream Protocol) of the camera which is generally found inside the camera’s network settings.
c.Under “Username and Password”, put in the ONVIF Username and password for the camera you created in the camera’s settings.
d.Under “Protocol”, Click the drop-down protocol and click on ONVIF.
e.Click “Add” at the bottom right corner of the screen.
f.Repeat to add additional camera(s).
How to Factory Default a Speco Blue Recorder
Below are the steps required to reset a Speco Blue Recorder to factory settings.
• First, access the Settings menu of the Speco Blue Recorder.
• Once the Settings menu appears, please select the System settings option.
◦ This will open the Basic Settings page.
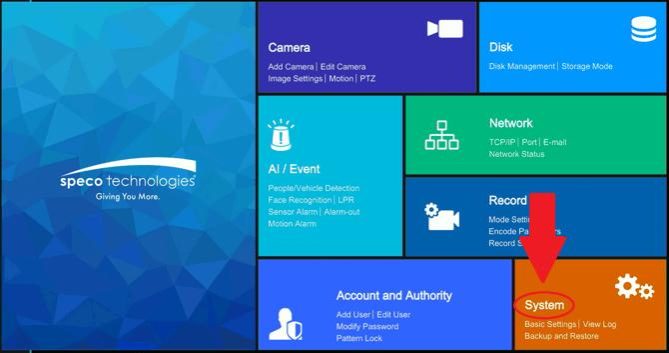
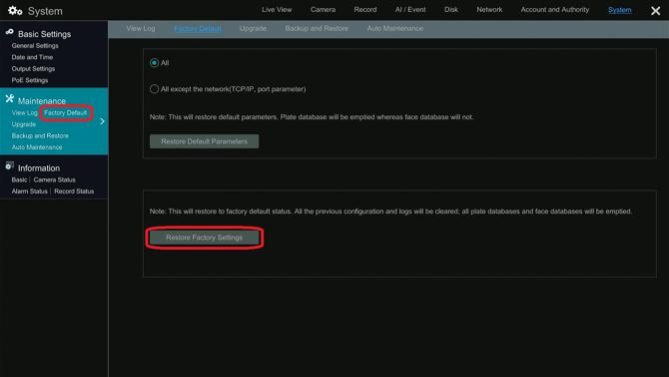
• From the Basic Settings page, on the left side of the screen, under the Maintenance option, select Factory Default.
◦ Select the Restore Factory Settings option.
· A pop-up will appear asking for admin credentials. Please insert the admin username and password. Once accepted, the recorder will reset itself and reboot.
.
PLEASE NOTE – A factory default will reset the entire recorder unit to its default factory settings. Any previous setting changes will be lost.
The unit’s recorded data will remain untouched.
How to Factory Default a Speco Silver Recorder
Below are the steps required to reset a Speco Silver Recorder to factory settings.
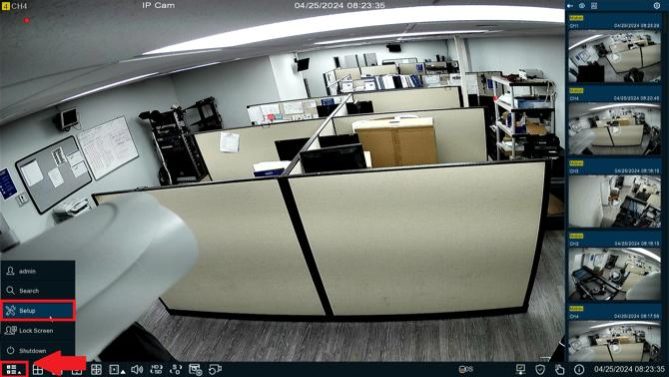
• First, access the Setup menu of the Speco Silver Recorder.
◦ You may be required to insert the username and password.
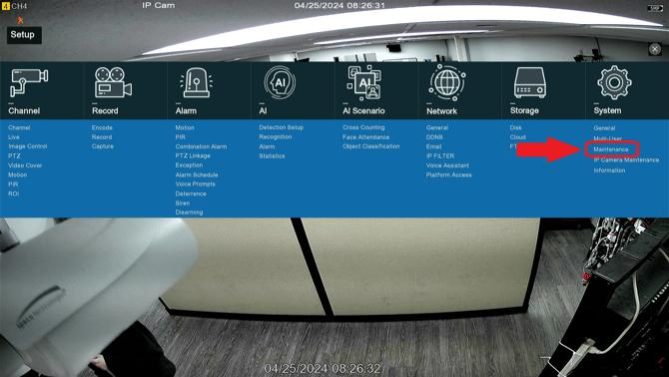
• Once the Setup menu appears, please select the Maintenance option under the System tab.
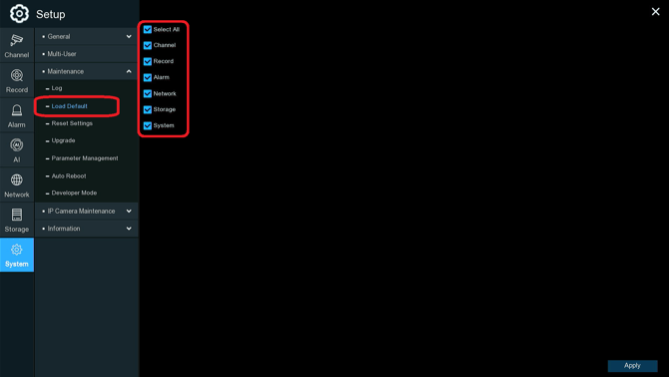
• On the left side of the screen, and option called Load Default can be found. Select Load Default.
◦ Select the options that need to be reset. It is recommended to choose Select All if the whole unit needs to be reset.
· Select Apply in the bottom right corner of the screen.
· A pop-up will appear asking for admin credentials. Please insert the admin username and password. Once accepted, the recorder will reset itself and reboot.
.
PLEASE NOTE – A factory default will reset the entire recorder unit to its default factory settings. Any previous setting changes will be lost.
The unit’s recorded data will remain untouched.
How to get a recorder to display in full screen mode.
In order to get your recorder to show full screen, Target detection needs to be turned off.
Step1:
• Click the arrow point down under target detection.
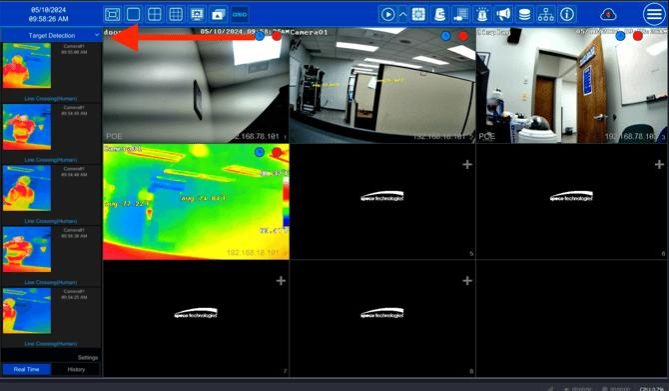
Step 2:
• Click on the camera tab.
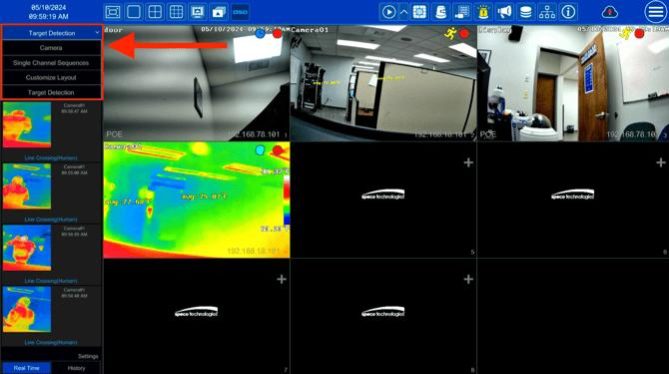
Step 3:
• Go into full screen mode.
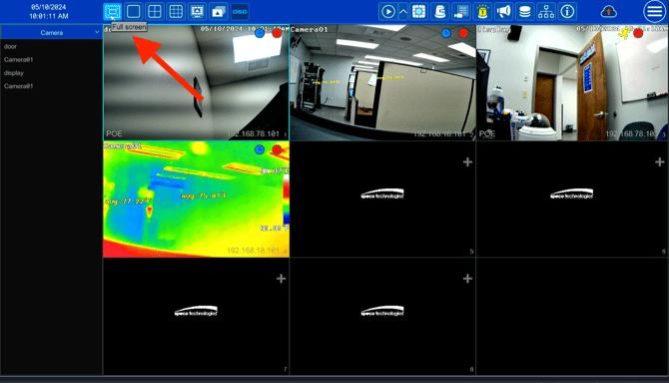
• This is the end result (Full Screen Mode)
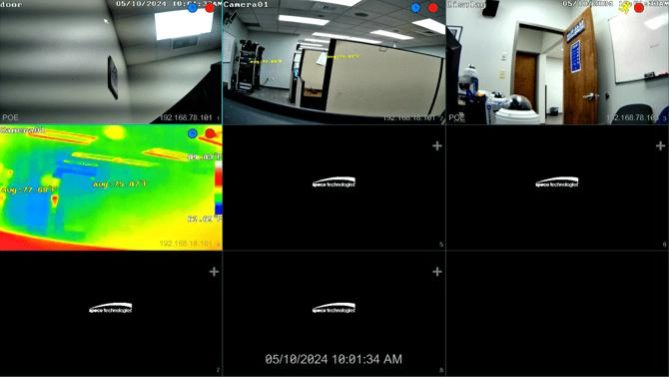
How to setup email alerts from a VN recorder
In order to setup email alerts, you need to create an email app password.
Step 1
• Create an app password for your email, check with your email service provider.
Step 2
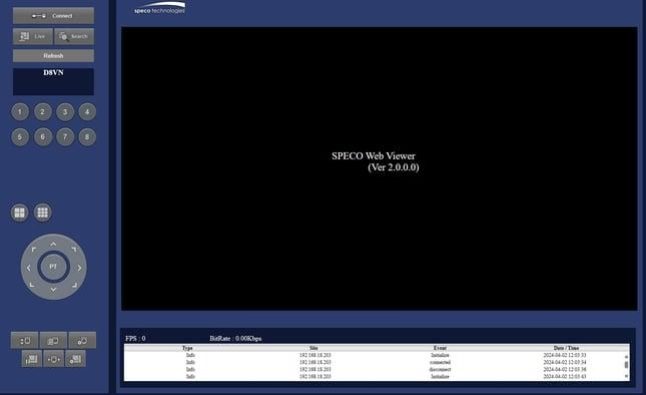
• Type in the IP address into the web browser. Click the connect button and it will prompt for the username and password for the recorder.
Step 3
• After you log into the recorder, click on the remote setup tab which is the bottom right.
Step 4
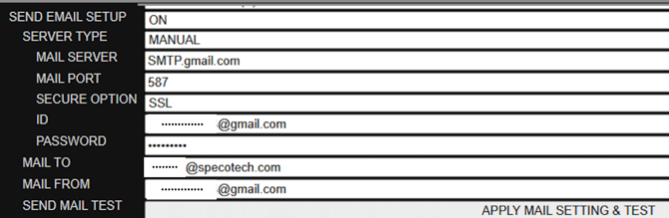
• Turn on email setup as shown below.
Step 5
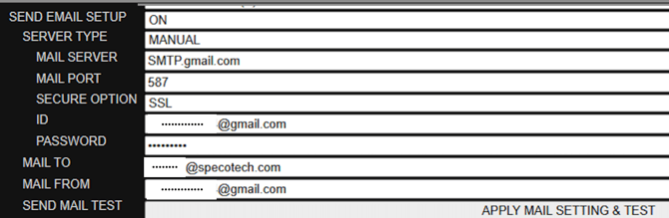
• After you turn on the email setup fill out the email information from your provider as shown below.
Step 6:
• Hit apply mail settings and test
How to configure Secondary Output on a Speco Blue Recorder.
This guide will go over the steps requires to set up the Secondary Output to view cameras.
.
• First, access the Settings menu of the Speco Blue Recorder.
.
• Once the Settings menu appears, please select the System page. That should automatically open the Basic Settings > General Settings page.
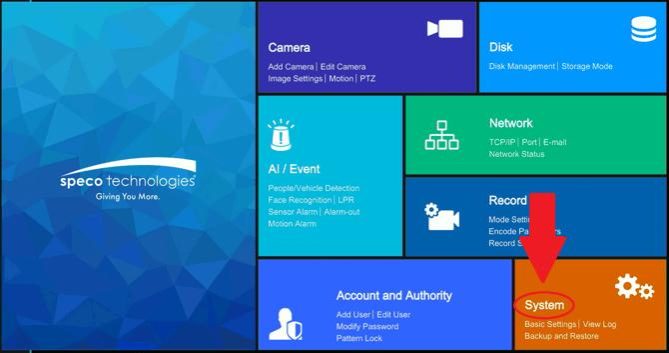
• At the top of the page, select Output Settings.
◦ Select Secondary Output at the top of the Output Settings page.
· Camera grid options are available towards the bottom of the screen.
• Some recorders are only capable of Sequence views and will not have grid options to select.
· A camera list is available towards the right of the screen.
◦ Once the desired grid is selected, click and drag the camera names from the camera list into the empty grid squares. This will assign the cameras their positions.
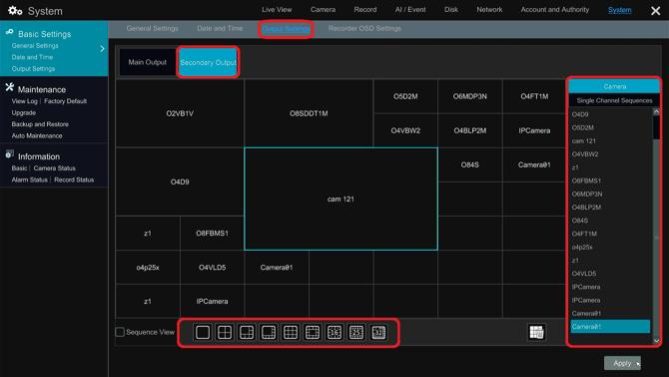
The assigned cameras should now appear on the secondary output monitor.
How to disable Exception Alarms on a Speco Blue recorder
Some users do not want to be notified if something with their unit goes wrong. Other users do not want to hear the alarm during a troubleshooting process. Here is a guide on how to disable the Exception Alarm.
.
• First, access the Settings menu of the Speco Blue Recorder.
.
• Once the Settings menu appears, please select the AI/Event page. That should automatically open the Event Notification > Alarm-out page.
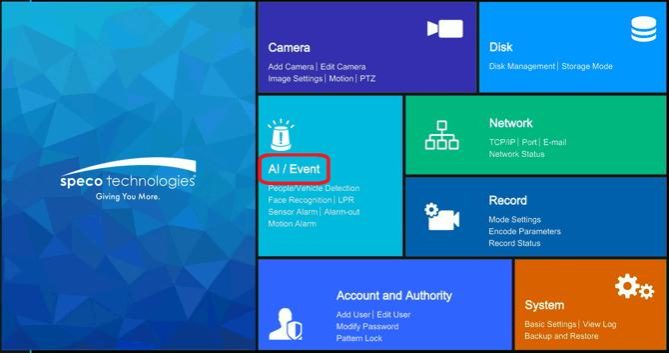
• Towards the left side of the screen, under the General Event section, select Exception Alarm.
◦ The ‘Event Type’ on the left is what the system needs to detect in order to trigger an Exception Alarm.
◦ The alarm by default will send out a Push Notification, create a Buzzer alarm at the recorder, and have a pop-up message appear at the recorder as well.
· Disable Push to stop receiving exception alarm notifications from the Speco Blue app.
· Disable Buzzer to stop the recorder unit from producing a beeping sound when something wrong occurs.
· Disable Pop-up Message to prevent the recorder from displaying an error message to indicate the recorders current problem.
• Select Apply once the desired settings are set.
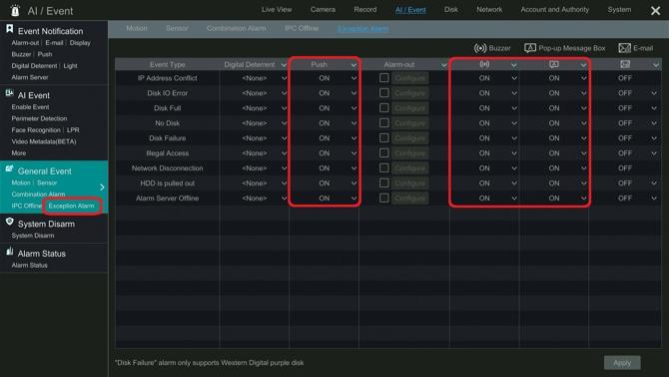
The recorder unit should now be disabled as per the selected settings.
How to upgrade firmware for a Speco Blue Recorder from a web browser
This guide will go over the steps required to update the firmware on a Speco Blue Recorder utilizing a web browser.
.
◦ At the top of the page, within the Support tab, select Recorder Software updates.
◦ On the page, select the recorder that needs upgrading and download the file from the page. The download button is a downward arrow.

· Do not forget to extract/unzip the upgrade file.
· If the firmware file needed is unavailable from the website, please contact techsupport@specotech.com to acquire the needed file.
◦ If the computer is local to the recorder unit, type in the recorder’s IP address into the address bar of the web browser.
· Example: Type “192.188.2.200” and hit enter.
· Please note, systems using MacOS cannot utilize the QR Code connection so connect.specotech.cloud is not an option for those users.
• If the IP address is used.
◦ Insert the username and password of the recorder unit and select Login.
• If connect.specotech.cloud is used.
◦ Insert the written QR Code for the recorder unit, as well as its username and password and select Login.
·
CLICK HERE for a link on how to find the QR code
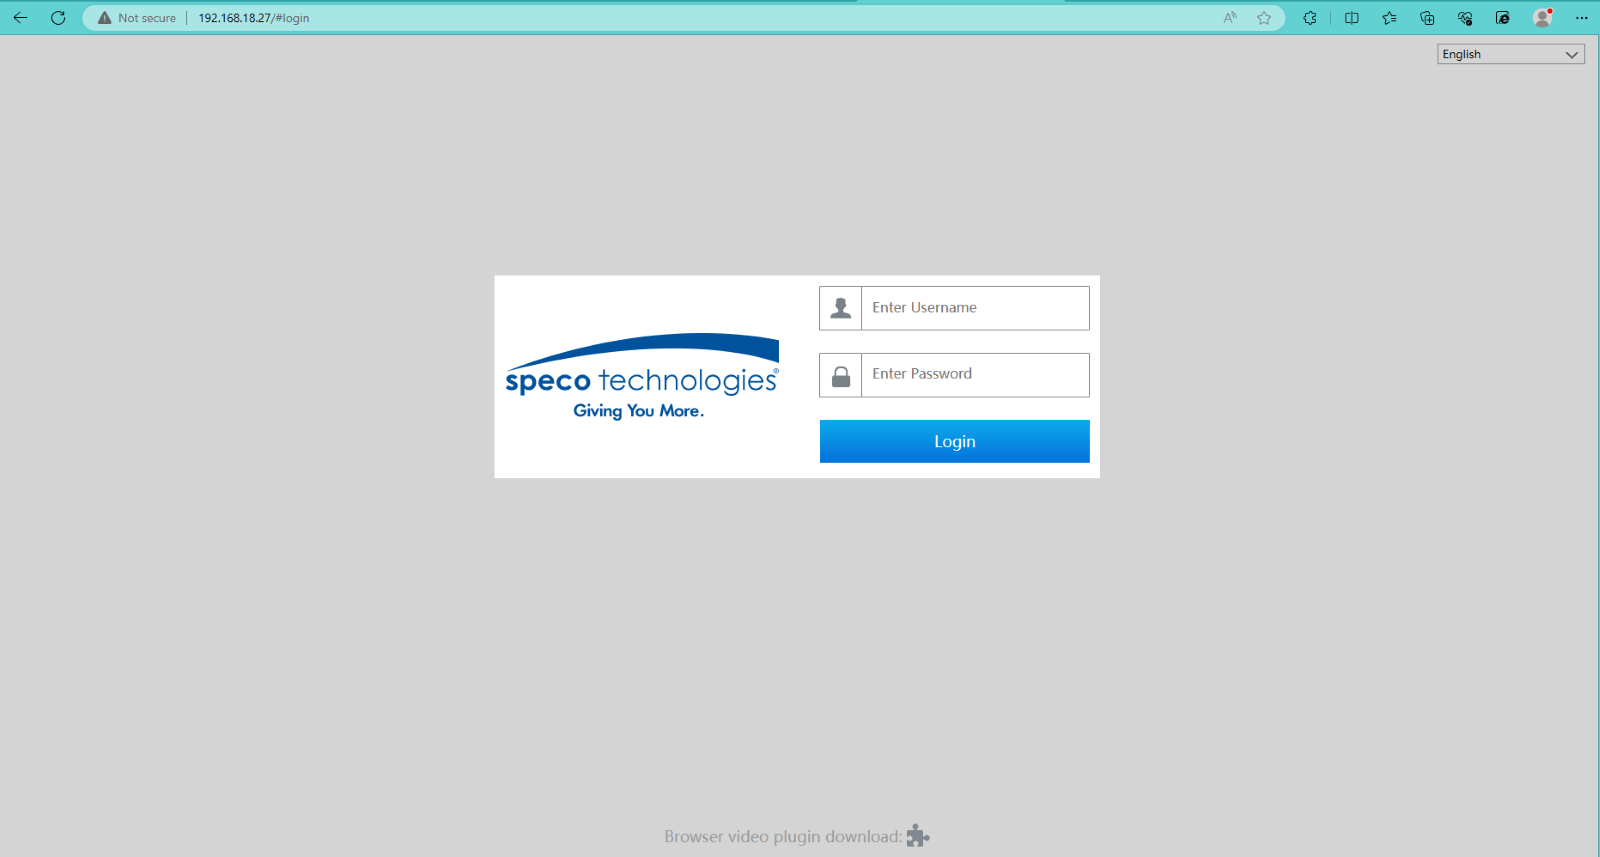
PLEASE NOTE – Once logged in, the web page may ask to download a plugin. Please download the plugin to proceed further, if prompted.
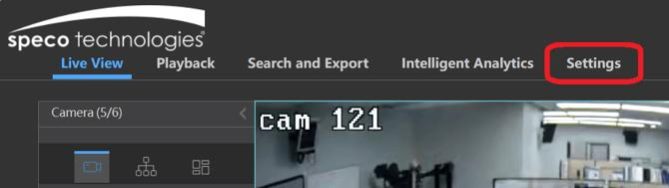
• Once logged in, select Settings at the top of the page.
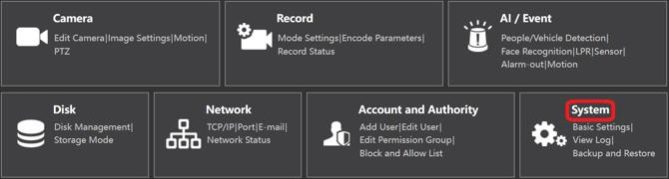
• Click on the option for System.
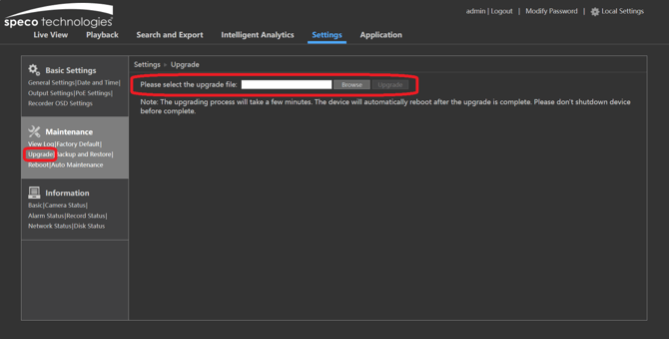
• On the left side menu, under Maintenance, please select Upgrade.
◦ Select Browse on the Upgrade page and a File Explorer will appear. Please go to the location where the upgrade file was extracted/unzipped and select the file.
· Once the appropriate file has been selected, select Upgrade.
• The recorder will ask for its username and password. Please insert the username and password.
A file upload can be seen going from 0% to 100%. Once 100% is reached, the recorder unit will reboot and begin the firmware upgrade process.
How to upgrade firmware on a Speco Blue recorder
This guide will go over the steps required to upgrade your Speco Blue recorder unit’s firmware.
◦ At the top of the page, within the Support tab, select Recorder Software Updates.
◦ On the page, select the recorder that needs upgrading and download the file from the page. The download button is a downward arrow.
· Do not forget to extract/unzip the upgrade file.
· If the firmware file needed is unavailable from the website, please contact techsupport@specotech.com to acquire the needed file.
• Once the file has been extracted/unzipped, please insert the file into a USB Flash Drive.
• Eject the USB Flash Drive from the computer and insert it into the Speco Blue recorder.
.
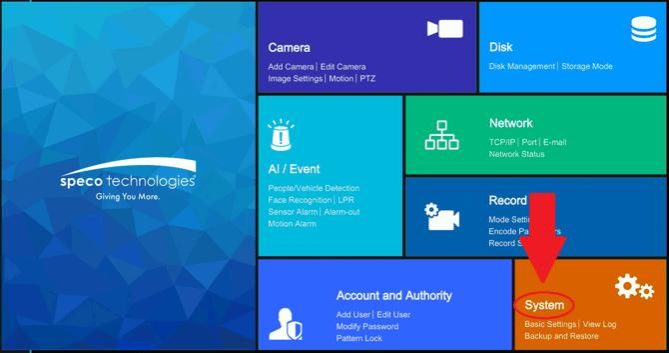
• Once the USB Flash Drive is inserted into the recorder, access the Settings menu of the Speco Blue Recorder.
• Once the Settings menu appears, please select the System page. That should automatically open the General Settings page.
• On the left side of the screen, under the Maintenance section, there is an option for Upgrade. Select the Upgrade option.
◦ The upgrade menu will reveal the USB Flash Drive and its contents.
· Find and select the upgrade file from the upgrade menu.
· Click upgrade at the bottom.
· Insert the device’s administrator username and password as prompted. The recorder will reboot and upgrade once OK is selected.
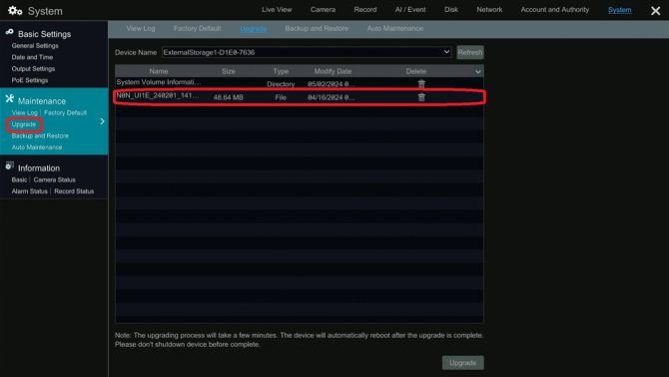
• If the recorder unit cannot detect the USB Flash Drive, the USB Flash Drive is more than likely not formatted to a FAT32 File Format. The recorder will only recognize an external storage device if it is running a FAT32 File Format.
◦
CLICK HERE for a guide on how to get the recorder to detect the USB Flash Drive.
How to enable Talkback for a Digital Deterrent® Camera on a Speco Blue Recorder
This guide will go over the steps required to enable the Talkback function for a Digital Deterrent® camera on a Speco Blue recorder.
.
• First, access the Settings menu of the Speco Blue Recorder.
• Once the Settings menu appears, select the AI / Event option.
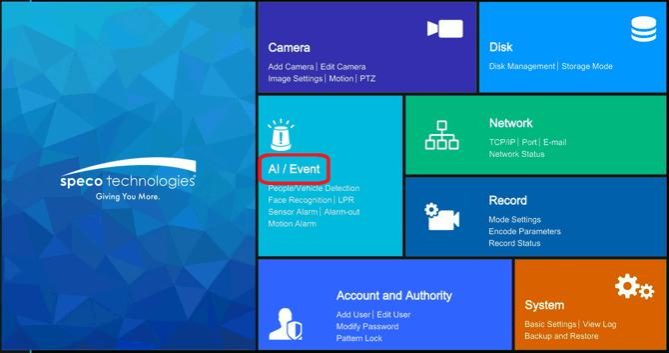
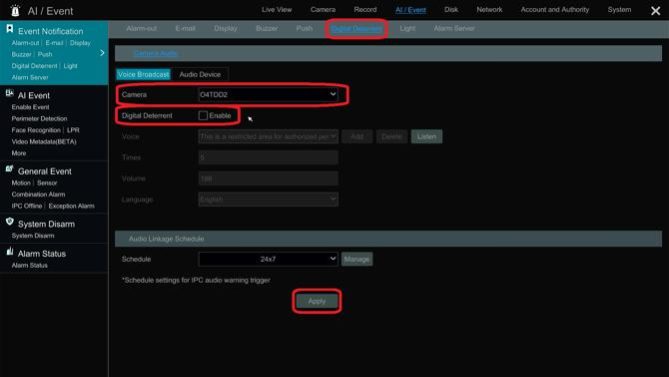
• At the top of the page that appears, select the option for Digital Deterrent. The Camera Audio > Voice Broadcast page should now be open.
◦ Select the camera in question with the Camera option.
◦ The next option below is Digital Deterrent. Please ensure the setting is turned off.
· Select Apply at the bottom when finished.
• Next, at the top of the page select Audio Device.
◦ Select the camera in question with the Camera option.
◦ The next option below is Audio Device. Please ensure the settings is turned on.
◦ Next, change the Speaker (built-in) option to Talkback.
· Select Apply at the bottom of the page.
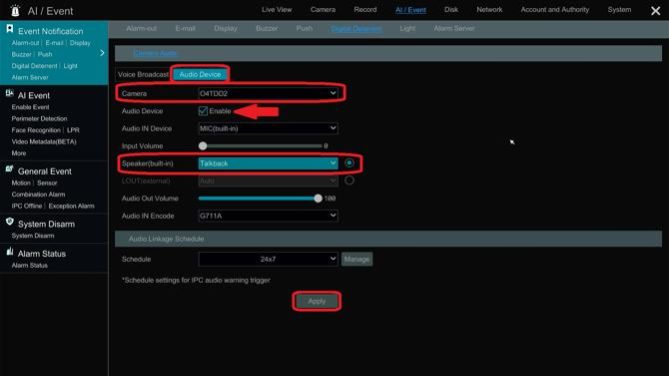
The recorder and camera are now setup to utilize the talkback feature. Talkback can be done at the recorder unit with an external microphone, from the Speco Blue mobile app, the Speco Blue VMS desktop application, as well as a web browser.
How to configure PTZ Cruise on a Speco Blue Recorder.
This guide will go over how to configure a PTZ Cruise event on a Speco Blue Recorder
.
Please Note: A Speco Blue PTZ camera is required.
.
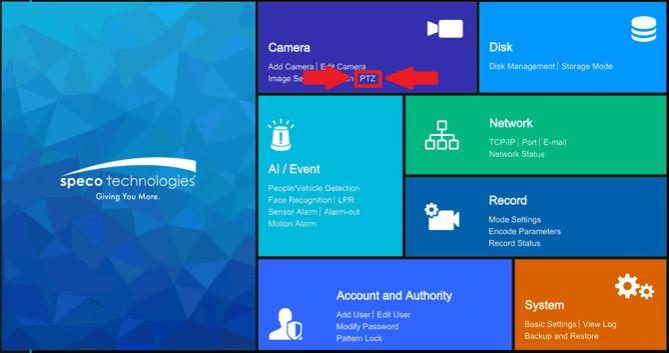
• First, access the Settings menu of the Speco Blue Recorder.
• Once the Settings menu appears, select PTZ under the Camera section. This will automatically open into the Presets page within PTZ settings.
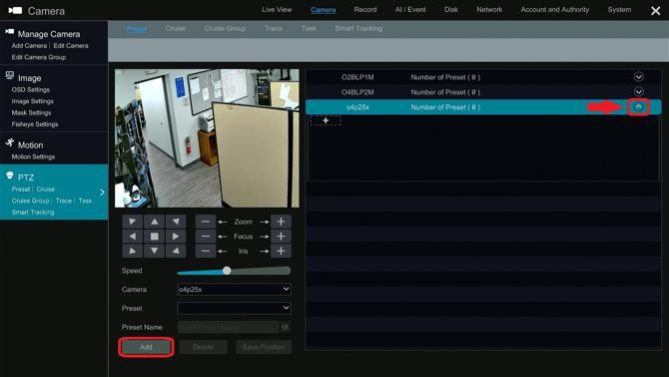
• At the Preset page, towards the right side of the screen, click the drop-down arrow for the camera in question.
◦ Select Add towards the bottom left of the menu. An Add Preset menu will appear.
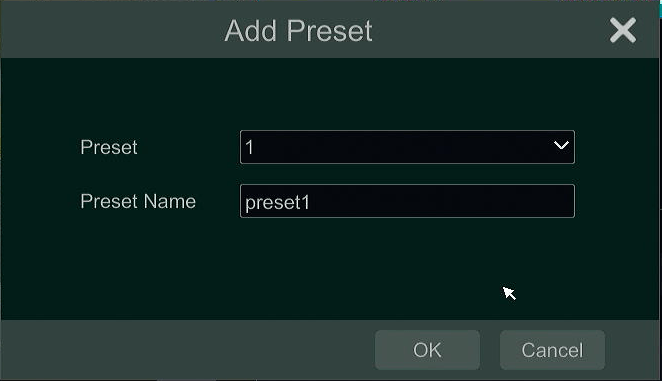
• On the Add Preset menu, set a preset number, and give the preset a name.
◦ It is recommended to leave the preset numbers in numerical order.
• The created preset should be seen under the selected camera. Verify the preset number is selected for the Preset option on the left side menu.
◦ Using the directional arrows underneath the cameras image, set the camera in the required position.
· Once set, select Save Position towards the bottom.
• Multiple presets are required to create a cruise event.
◦ Select the Add button at the bottom left and repeat the steps above.
· As seen in the example image below, 3 presets were created for this demo.
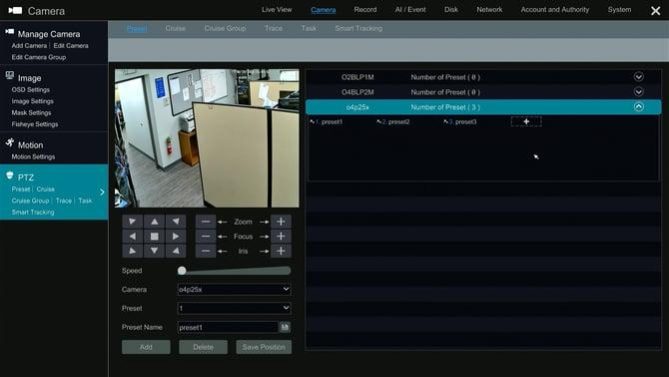
• Once the required number of presets have been created, select the option for Cruise at the top of the page. This will open the Cruise settings page.
◦ Click the drop-down arrow on the right for the camera in question.
· Select the Plus + button the appears under the camera name once the drop-down arrow was selected. An Add Cruise menu will appear.
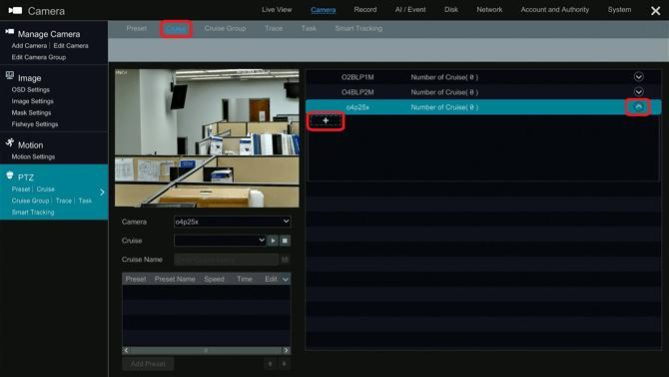
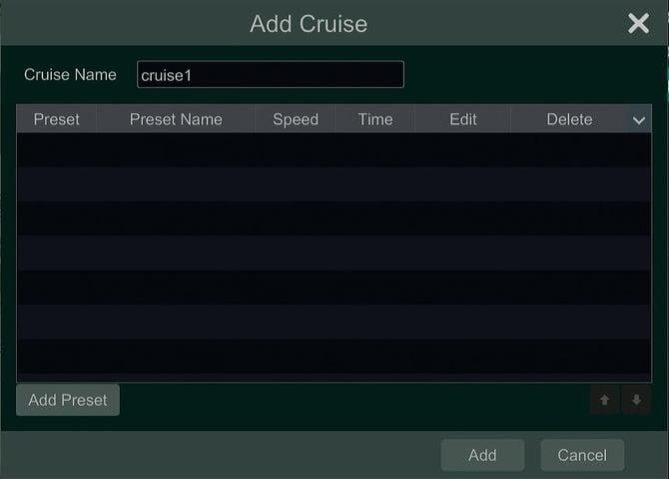
• On the Add Cruise menu, assign the event a name with the Cruise Name option.
◦ Select Add Preset towards the bottom left. A different Add Preset menu will appear.
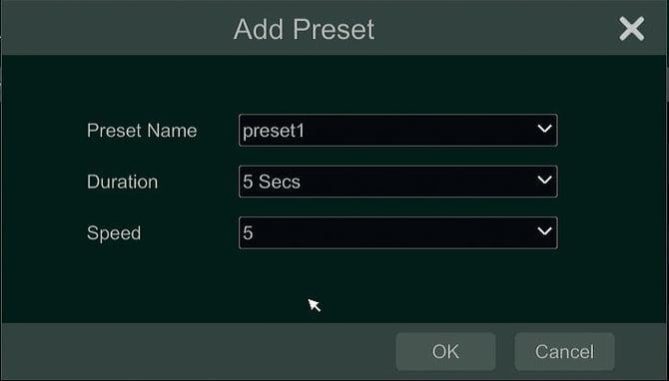
• On the Add Preset menu, select the first preset position for the cruise event from the Preset Name option.
◦ The Duration option will determine how long the camera sits on the position.
◦ The Speed option will determine how fast the camera will move from position to position.
• The selected preset will now appear on the Add Cruise page.
◦ As stated earlier, Multiple presets are required to create a cruise event.
• Select the Add Preset button from the bottom left and repeat the steps above.
◦ Select Add when done.
· As seen in the example image below, 3 presets are used for this cruise event.
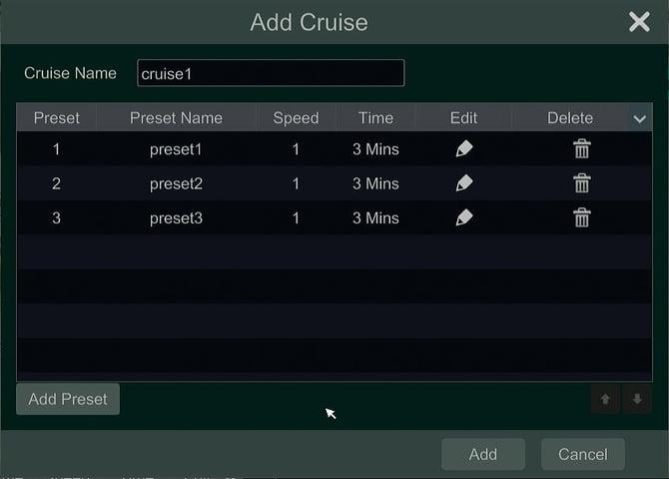
• The created cruise event should appear underneath the selected camera.
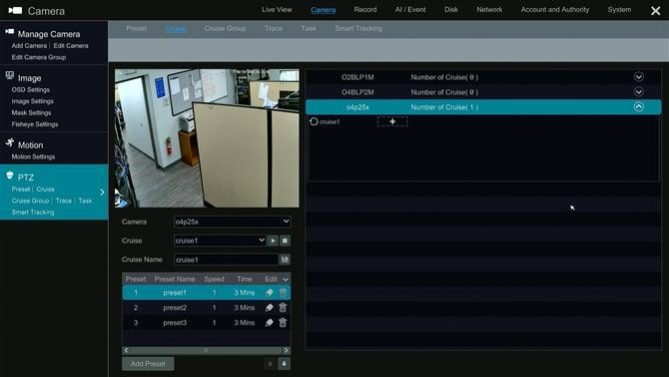
.
To activate the Cruise event…
• At the Live camera screen, right click on the camera that a Cruise event was created on.
◦ From the menu that appears, select PTZ Control.
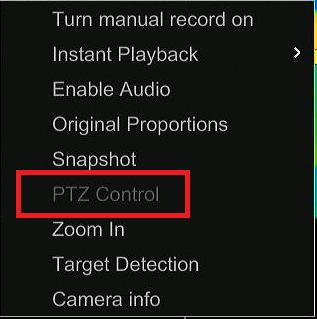
.
• A PTZ menu will appear on the right side of the screen.
◦ Select the Left or Right arrows until Cruise is selected.
· Select the Play button on the cruise event. The Cruise function should activate and cycle through the preset locations at the set time and speed.
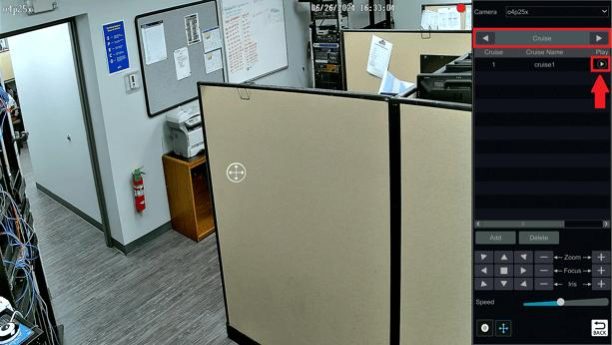
How to Find the Firmware Version on a Speco Blue Recorder
This article explains how to view a Speco Blue recorder’s current firmware version.
.
• Click the Hamburger menu ☰ icon in the top-right Corner and select the option for Settings.
◦ This will open the settings menu.
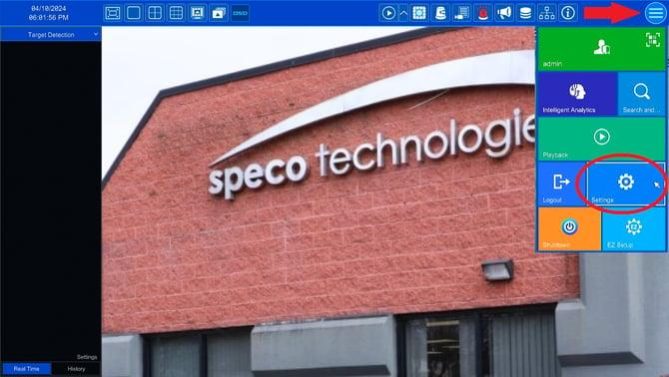
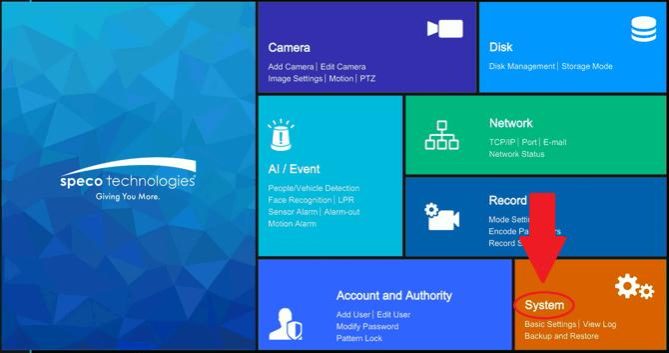
• From the Settings menu, click the option for System towards the bottom right of the menu.
◦ This will open the Basic Settings page of the recorder.
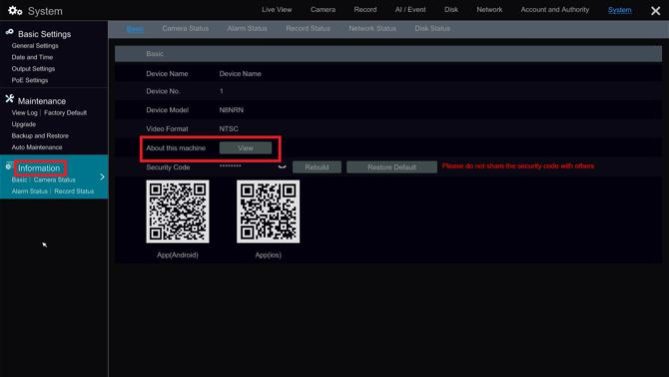
• On the left-side of the screen, select the option for Information. This will open the Basic information page.
◦ On that page, click view next to About this Machine. This will pull up an additional page of information.
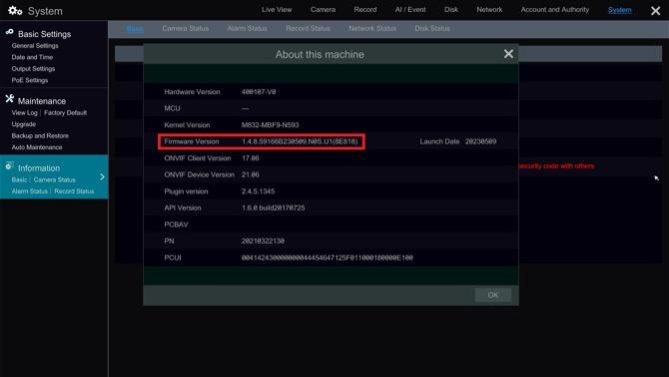
• On the page that appears, Firmware Version can be found towards the middle.
.
To find and download the most current version of firmware for a recorder,
CLICK HERE.
How to enable Push Notifications on a Speco Blue Recorder
This guide will go over the steps required to enable Push Notifications to be sent from the Speco Blue Recorder to the Speco Blue mobile app.
.
• First, access the Settings menu of the Speco Blue Recorder.
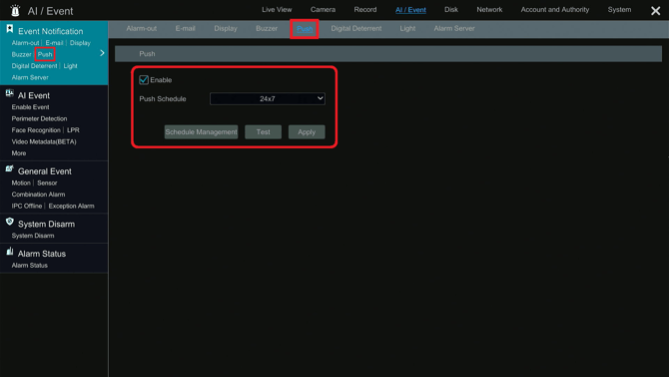
• Once the Settings menu appears, please select the AI / Event page. That should automatically open the Event Notification > Alarm Out page.
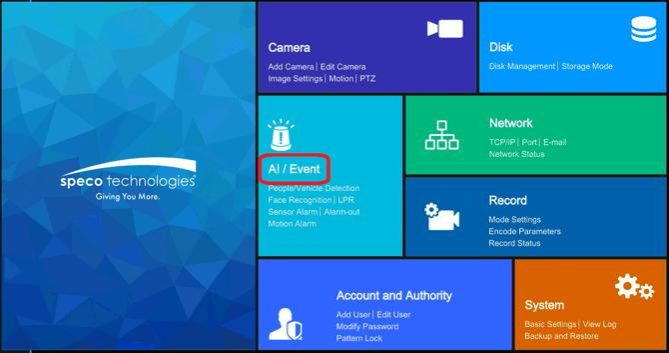
• Towards the top of the page that opens, or top-left of the screen, there will be an option called Push. Please select Push.
◦ On that page, put a checkmark in the box next to Enable.
◦ The Schedule option is set to 24/7 by default. The schedule can be adjusted to only send push notifications at certain times for certain days.
· Select Apply to activate the feature.
· Select Test to test the connection to Speco’s Push Server.
• Please note: Selecting Test before selecting Apply will result in a test failure.
.
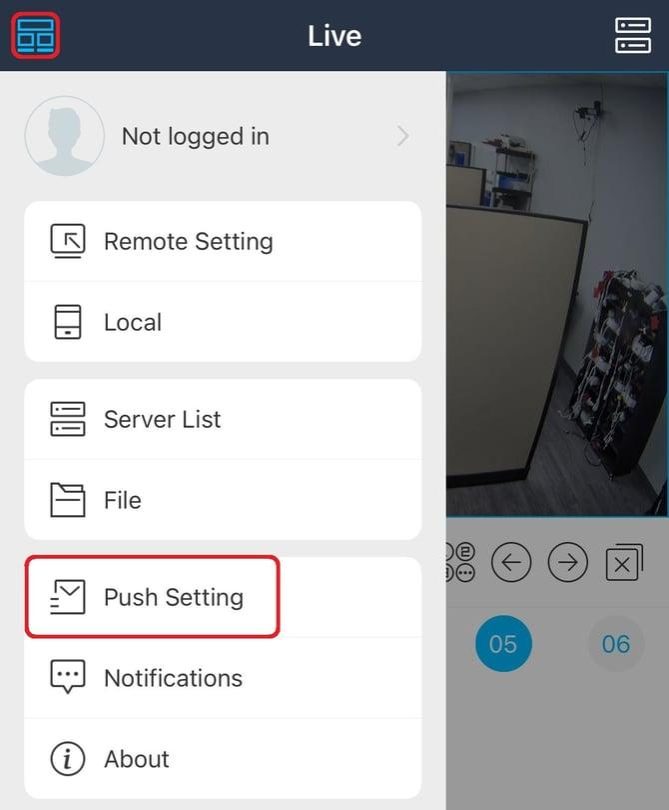
• Opening the Speco Blue app on a mobile device, the Live screen should be the first to appear. From the Live screen, select the button in the top-left corner. (Looks like a rectangle on 2 squares)
◦ From the left-side menu, select Push Setting.
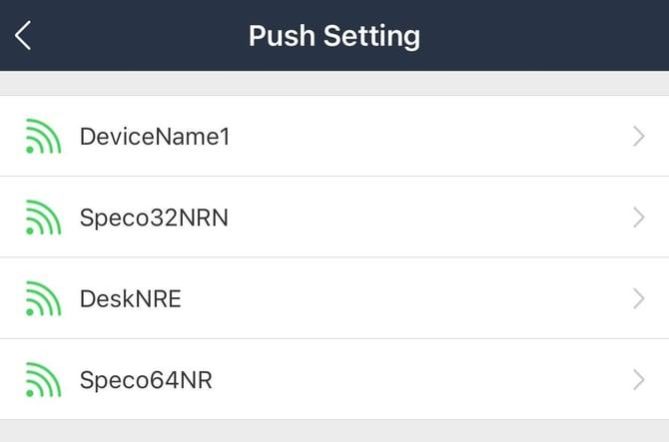
• At the Push Setting menu, select the recorder unit that needs push notifications enabled.
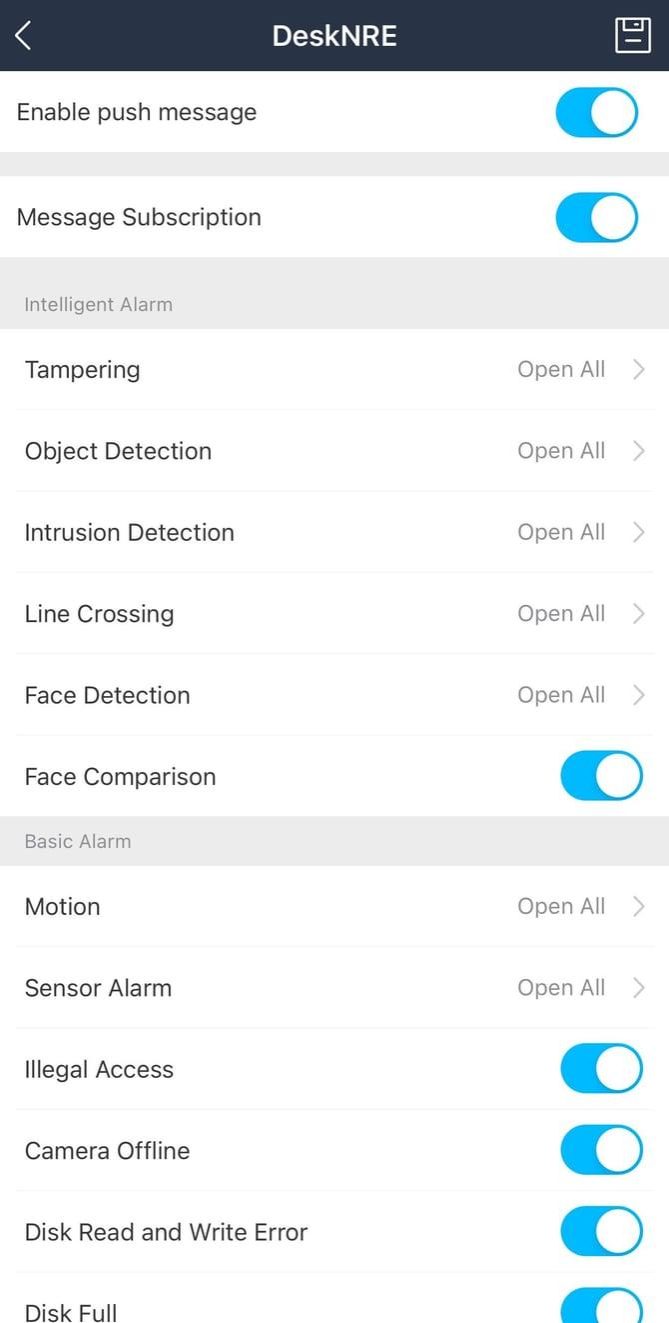
• Once the recorder is selected, select the slider next to Enable Push Message to activate push notifications on the mobile app.
◦ A larger menu will appear, this menu allows the user to determine exactly what notifications they would like to receive, and from which cameras. Please adjust as-per user preference
.
The recorder unit should now be configured to send push notifications, and the mobile device should now be configured to receive push notifications.
.
Upon activating this feature, some users report receiving a large amount of motion notifications. This is dependent on many environmental factors. CLICK HERE for a guide on how to decrease the amount of motion notifications being received.
.
Some mobile devices ask for an additional permission for an app to send/receive push notifications. Please allow the permission as denying the permission will block the device from receiving notifications.
How to configure Hybrid channels on a Hybrid Speco Blue Recorder
This guide goes over the steps required to change which ports are running IP or Analog on a Hybrid series Speco Blue Recorder.
.
• First, access the Settings menu of the Hybrid Speco Blue Recorder.
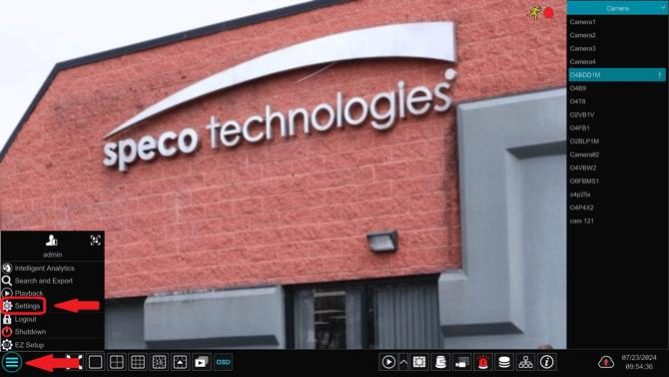
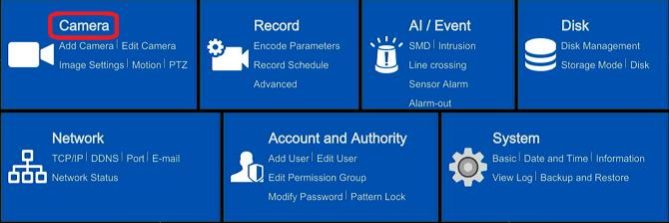
• Once the settings menu appears, please select the option for Camera. That will automatically open the Edit Camera page.
• At the Edit Camera page, at the top, there is an option for Camera Signal. Please select Camera Signal. This will pull up the page.
◦ The Camera column lists the designated port number that can be adjusted.
◦ The Analog/IP column determines which signal the port is assigned to, this option changes the port from an Analog channel to an IP channel or vice versa.
· The recorder unit is set up to detect the format type of the analog signal. Manual adjustment may be required.
• Once the desired settings are set, select Apply at the bottom of the page.
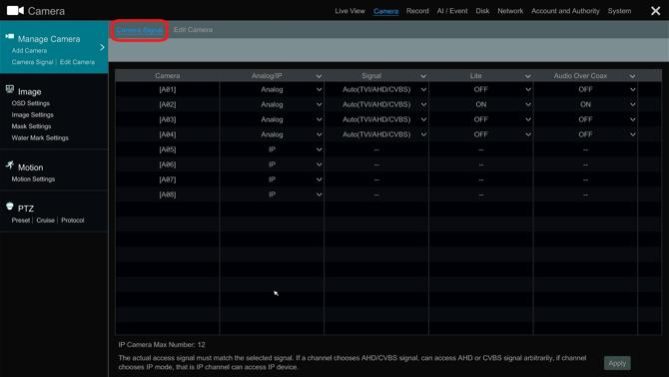
The ports should now be configured to run either IP cameras or Analog cameras.
When configuring the H40HR, only ports 25-32 are adjustable
.
Exporting a License Plate Database File from a Speco Blue Recorder
This guide goes over the steps required to export a .CSV file from the License Plate Database of a Speco Blue Recorder
.
• Click the Hamburger menu ☰ icon in the top-right corner and select the option for Intelligent Analytics.
◦ This will open the Intelligent Analytics Search function.
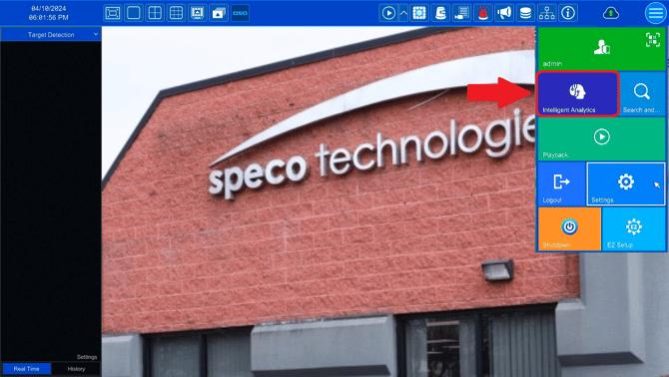
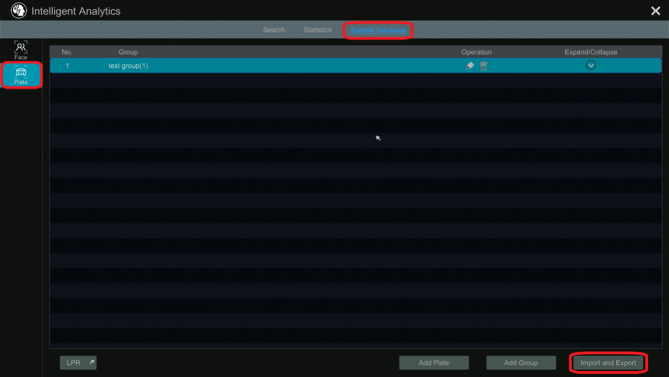
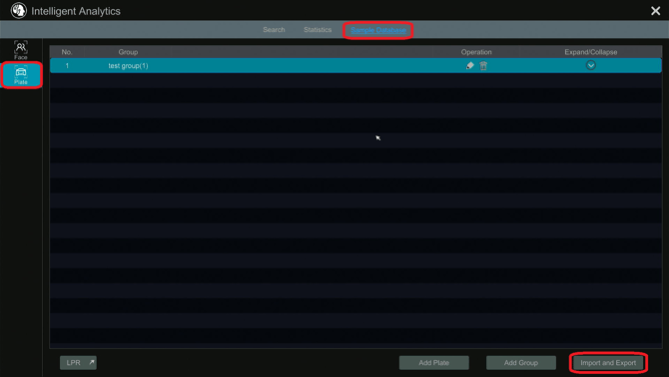
• At the top of the Intelligent Analytics Search page, there is an option called Sample Database. Please select Sample Database.
◦ From the Sample Database page, select the Plate option on the left side of the screen.
◦ Once Plate is selected, select Import and Export at the bottom of the page.
· At this point, there must be a USB flash drive that is formatted as FAT32, plugged into a USB port on your recorder.
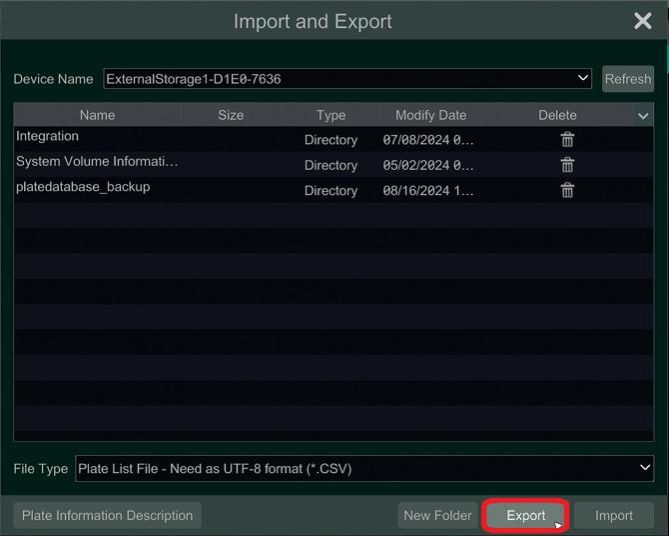
• The Import and Export window will appear with the thumb drive and its contents visible.
◦ In the bottom right corner of this window, click the Export button.
· The file should export successfully.
.
How to set up email notifications on a Speco Blue Recorder
This guide goes over the steps required to setup email notifications on a Speco Blue Recorder unit.
.
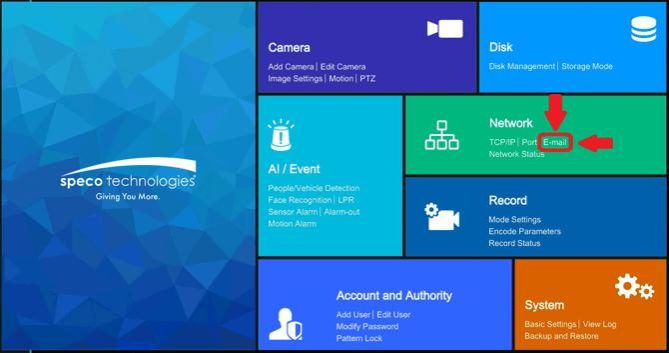
• First, access the Settings menu of the Speco Blue Recorder.
• Once the Settings menu appears, please select the Email page under the Network section.
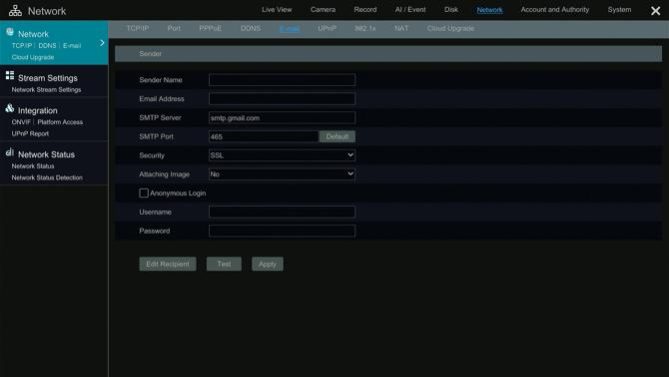
• The email page will ask for several pieces of information:
◦ Sender Name can be set to anything. This is the name that will be attached to the notification email as it gets sent out.
◦ Email Address is the email address that is going to be used to send out the notification emails. The recorder unit does not have its own email to use, so the user will need to provide their own.
◦ SMTP Server is the address for the email’s SMTP Server. Different email services have different SMTP server addresses. A quick Google Search can help find this information. (If a work email is being used, ask your IT department.)
Here are some examples below:
· OUTLOOK – smtp.office365.com
· YAHOO – smtp.mail.yahoo.com
◦ SMTP Port is the SMTP port number associated with the SMTP Server address. Different email services have different SMTP ports. A quick Google Search can help find this information. (If a work email is being used, ask your IT department.)
Here are some examples below:
◦ Security refers to the method of email encryption being used by the server. There may be no encryption at all, or it would utilize TLS or SSL. Different email services have different security methods. A quick Google Search can help find this information. (If a work email is being used, ask your IT department.)
Here are some examples below:
◦ Attaching Image will attach images of the event in question with the email notification. This option can be disabled, set to send one picture, or multiple pictures.
◦ Anonymous Login will need to be unchecked. (Some work servers require this be checked, consult with your IT department if that is the case.)
◦ Username should be identical to the Email Address line as explained above.
◦ Password will be determined by the email server being used. Some email servers allow the normal password to the email account to be used. Some email servers require the use of a secondary app password. As the instructions are different for activating app passwords for each email server, please go to your email server’s support page for instructions on how to activate app passwords.
• Once all information has been inserted, select Apply.
• Select the option for Edit Recipient.
• The Recipients page is where emails can be added to receive the email notifications.
◦ Select Add in the top right corner.
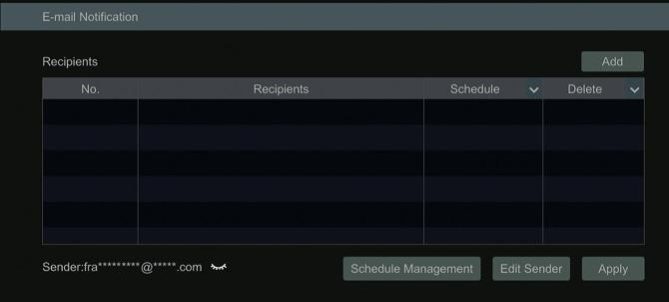
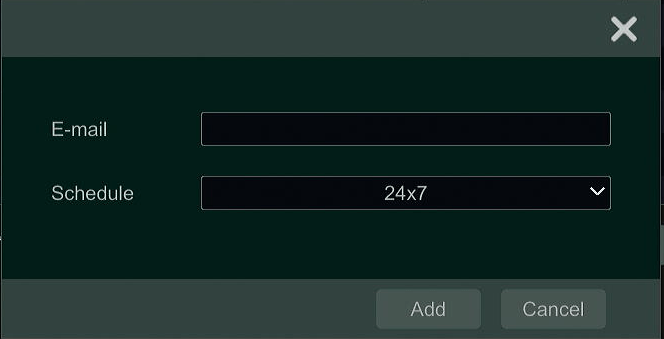
• A menu will appear. Insert an email to receive notifications.
• The Schedule option dictates when the email can receive notifications.
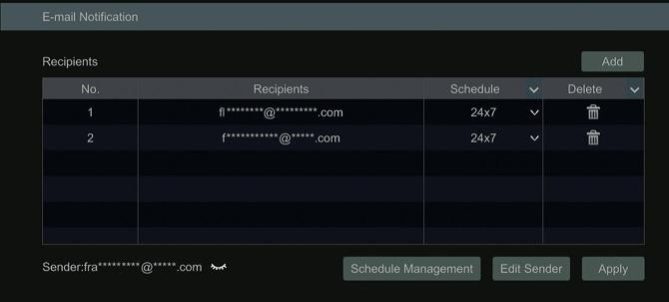
• The emails should now appear on the Recipients page.
◦ If the default schedule options are not enough, there is a Schedule Management option at the bottom of the page. Schedule Management will allow the user to create their own custom schedules.
• Select Apply once done. Select Edit Sender once Apply has been selected.
• Back at the previous email page, select the Test button at the bottom.
◦ A test menu will appear. Select the recipient to receive the test email. Select OK once the recipient is selected.
· A “Test Successful” message should appear, and the selected email address will receive a test email.
.
Importing a License Plate Database File to a Speco Blue Recorder
This guide goes over the steps required to import a .CSV file for the License Plate Database of a Speco Blue Recorder
.
• Click the Hamburger menu ☰ icon in the top-right corner and select the option for Intelligent Analytics.
◦ This will open the Intelligent Analytics search function.
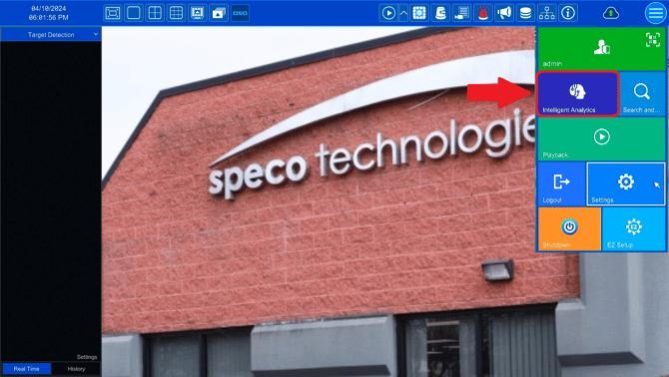
• At the top of the Intelligent Analytics Search page, there is an option called Sample Database. Please select Sample Database.
◦ From the Sample Database page, select the Plate option on the left side of the screen.
◦ On the bottom of this screen, click Add Group to create the group for your license plates.
· On the menu that appears, make sure to name the plate group and click OK
· If you already have a database group setup, skip the above step.
• Once a plate group has been created, or if there is one created already, click and highlight the group, and then click the Import and Export button on the bottom right of the screen.
• For the next step, there must be a USB Flash Drive that is formatted as a FAT32 format with the desired file on it, plugged into a USB port into the recorder.
◦ If there is not one inserted, insert one now, and after inserting the USB Flash Drive, select the Refresh button to have the recorder recognize it if the Import and page is already up.
· NOTE: When importing your database file out of Microsoft Excel, make sure it is .CSV with UTF-8 format
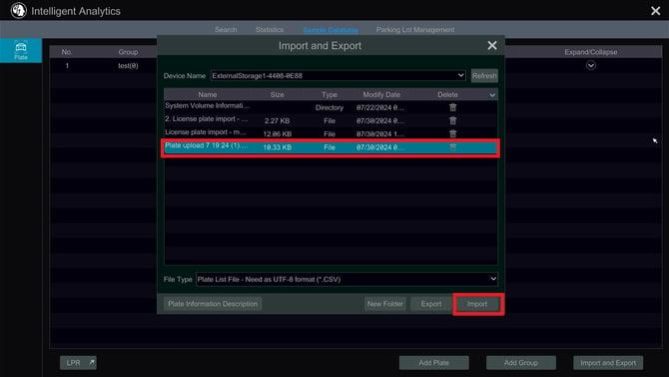
• The Import and Export page will automatically pull up the USB Flash Drive and its contents.
◦ Click on the desired file, then click Import and the entries in the file will be imported into your database group.
.
In case this is unsuccessful….
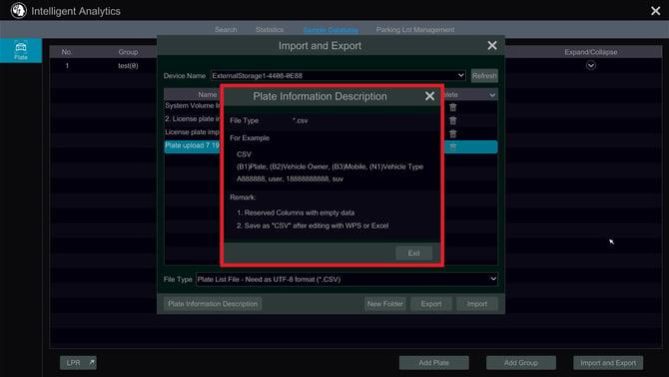
• For details on how the information in the spreadsheet needs to be laid out, click on Plate Information Description to see the fields needed for a successful upload.
How to configure and utilize the arm/disarm feature of a Speco Blue Recorder
This guide goes over the steps required to configure and utilize the arm/disarm feature in the Speco Blue Recorder, as well as from the Speco Blue app.
.
• First, access the Settings menu of the Speco Blue Recorder.
• Once the Settings menu appears, please select the AI / Event page. That should automatically open the Event Notification > Alarm Out page.
• On the left-side of the screen, there should be an option called System Disarm. Please select the System Disarm option.
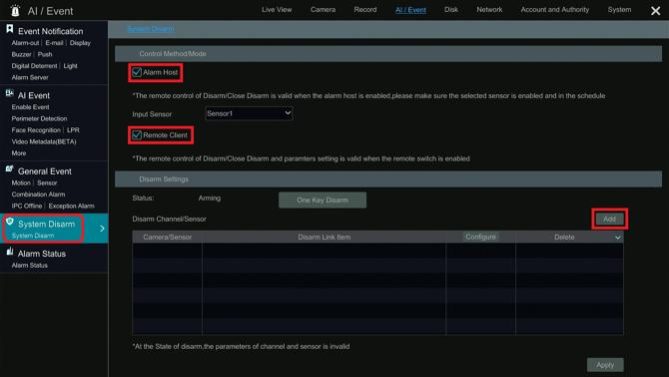
◦ At the top of the System Disarm page, ensure the check boxes for both Alarm Host and Remote Client are both enabled.
· Alarm Host will allow the physical relays on the back of the recorder unit to act as a hardwired Arm/Disarm switch. The Input Sensor option determines which relay will act as the switch.
· Remote Client will allow the Speco Blue App to configure and utilize the arm/disarm features of the recorder unit.
◦ Select the option for Add located on the right side of the screen.
• The Add menu that appears will list every camera, sensor and virtual alarm available to recorder unit. Please select the options that need to be armed/disarmed on command.
· Select OK once complete.
In this example, the Digital Deterrent siren and flashing light function will be disarmed.
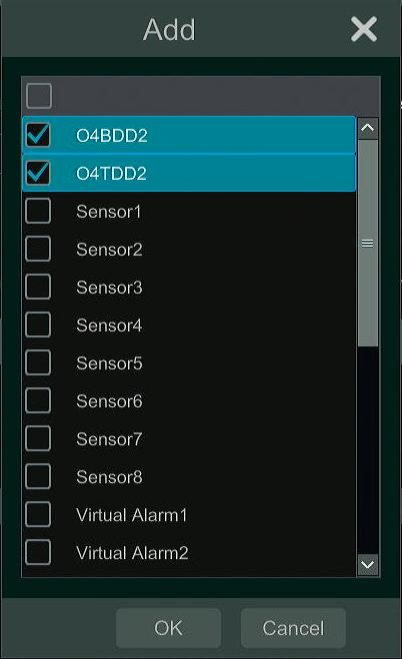
• The previous System Disarm page will appear. Now select Configure on the newly added camera/sensor/virtual alarm.
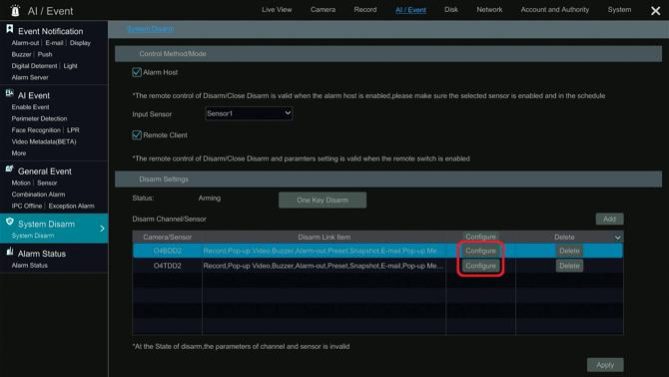
• The Disarm Link Item page will appear. On this page, select the options that need to armed/disarmed on command.
◦ Select OK once complete.
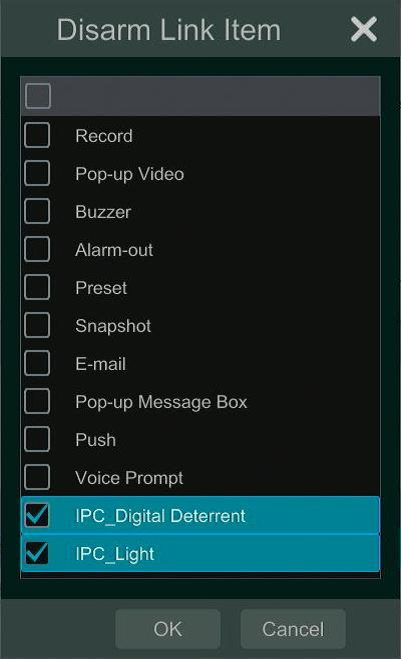
Only the O4TDD2 / O4TDD2M / O4BDD2 / O4BDD2M can have their light and siren disarmed. All other digital deterrent cameras are incapable of this function.
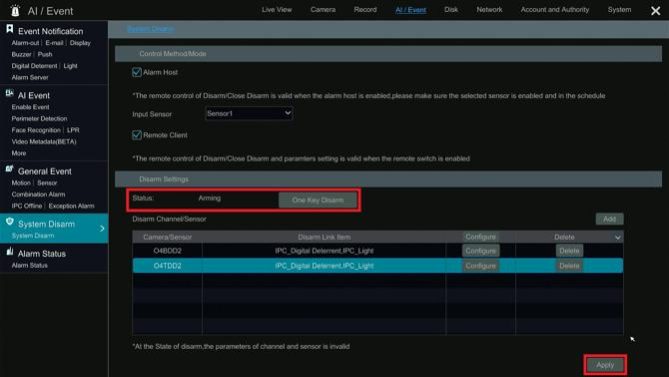
• Back to the System Disarm page, the selected parameters should all be visible from the bottom portion of the screen.
◦ Select Apply at the bottom right corner to save the configuration.
• To Disarm the configured alarms, select the One Key Disarm button in the middle of the page.
◦ The Status will change from Arming to Disarming. The One Key Disarm button will change to read Close Disarm.
· Select Apply to confirm the disarming of the alarms.
• To Arm the configured alarms, select the Close Disarm button in the middle of the page.
◦ The Status will change from Disarming to Arming. The Close Disarm button will change to read One Key Disarm.
· Select Apply to confirm the arming of the alarms.
.
• Opening the Speco Blue app on a mobile device, the Live screen should be the first to appear. In the top right corner, a button can be found that looks like two rectangles. Please select that button.
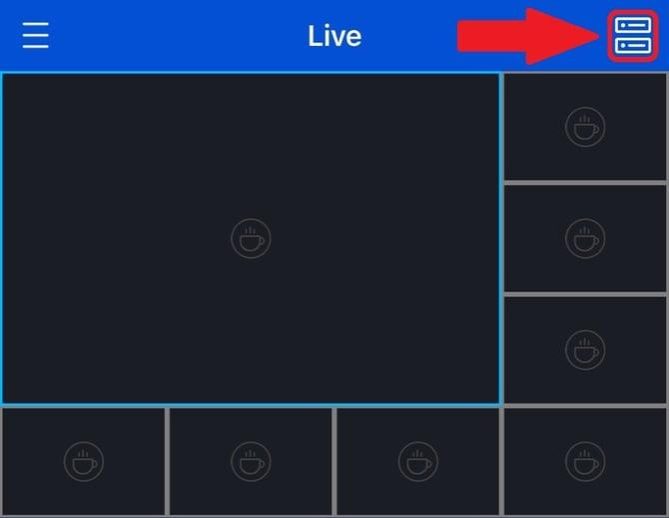
• That button will open up the Server List of the app. Please select the recorder unit in question by pressing the Play button underneath the recorder unit. This will pull up the live video of the recorder unit.
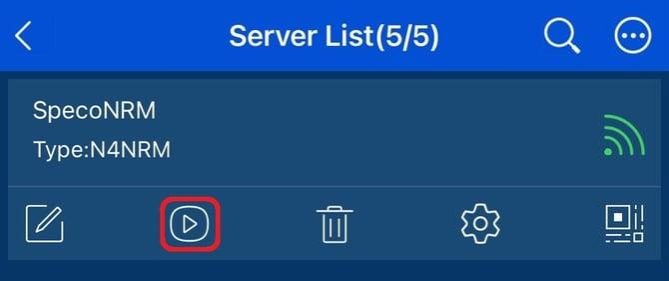
• Back to the Live page, the top half of the screen should contain live video, the bottom half will contain some options for configuration.
◦ Please swipe left on the bottom half menu. This will open the Arm/Disarm menu.
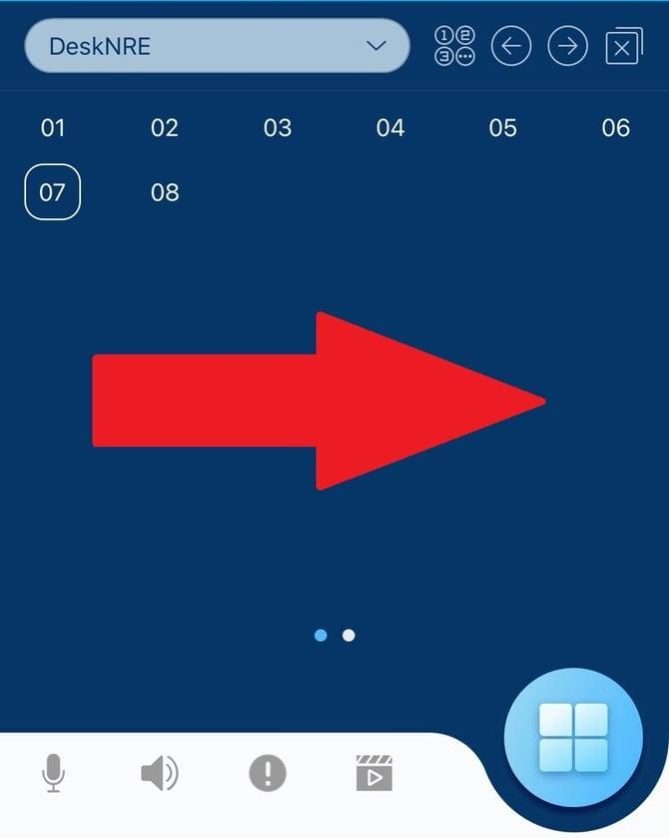
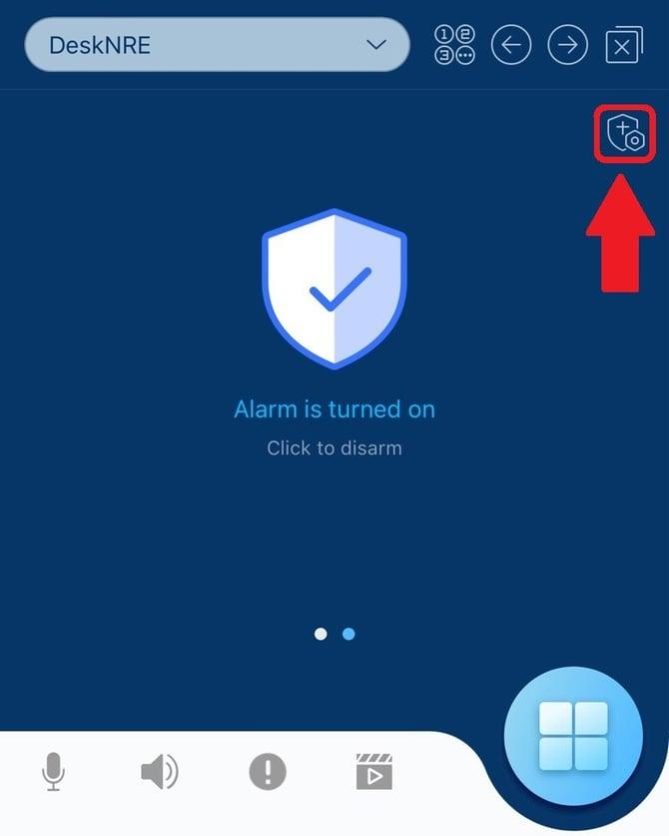
• On the page that appears after swiping left, a shield symbol will appear. This is where the system can be armed/disarmed.
◦ Please select the smaller shield button towards the top-right corner.
• If the alarms have been configured locally at the recorder unit, confirm that the settings set in the recorder have transferred correctly to the Channels or Sensor page.
◦ If the settings are displayed properly, exit the page and return to the Live view with the shield symbol displayed.
.
• If the alarms have yet to be configured, at the top of the page, select Channel if a camera alarm needs to be configured. Select Sensor if a sensor or virtual alarm needs to be configured.
◦ Select Add at the bottom of the page once the desired setting is selected.
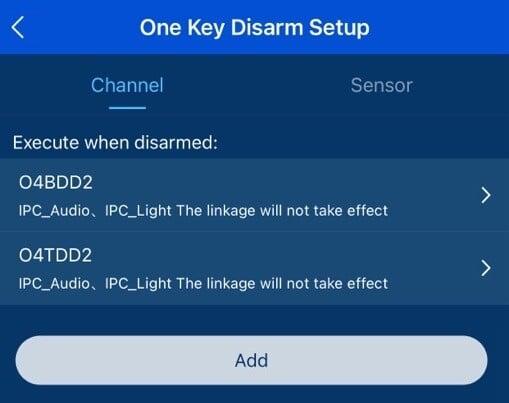
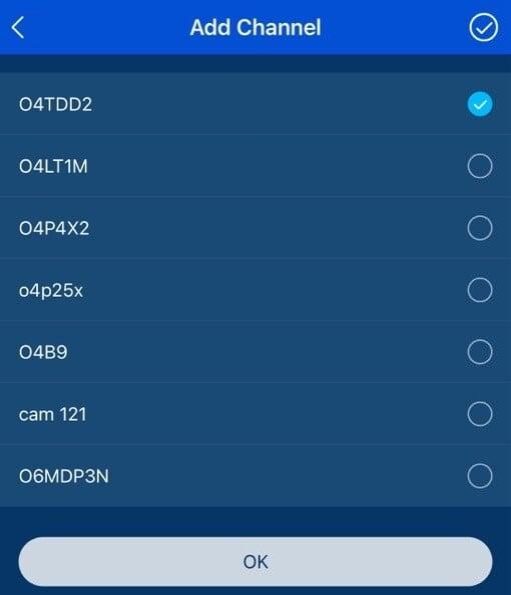
• From the Add Channel/Sensor menu that appears, select the camera/sensor/virtual alarm that needs to be configured.
◦ Select OK at the bottom of the page to confirm the selection.
.
• The One Key Disarm Setup page will reappear with the previously selected channels/sensors added to the list.
◦ Select the added camera/sensor to configure it.
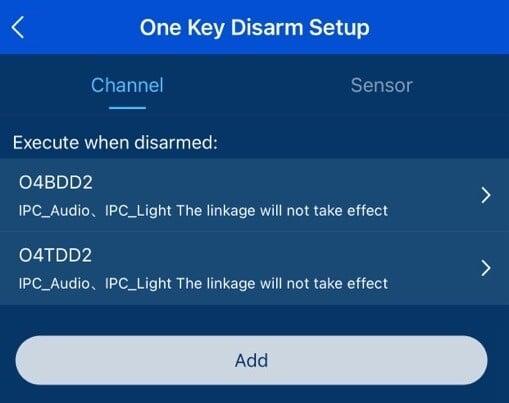
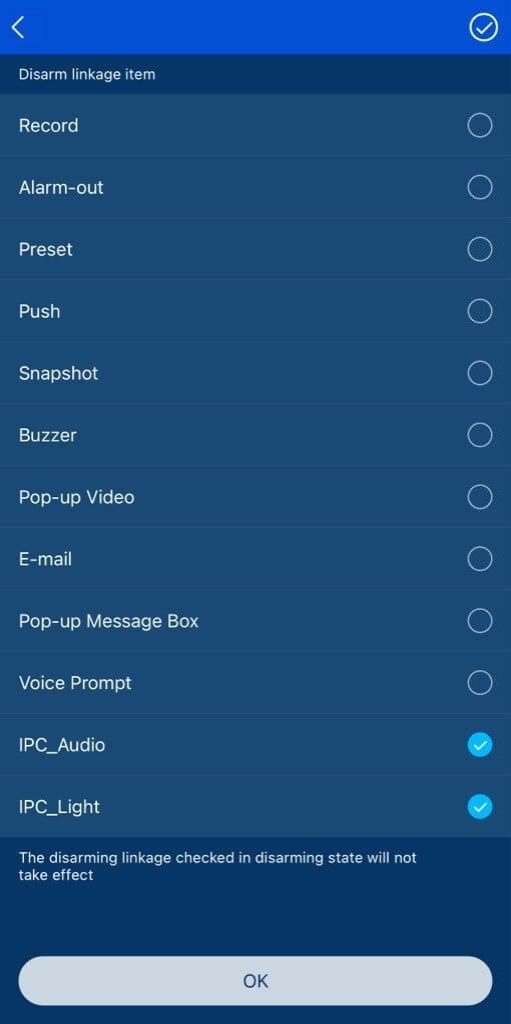
• The Disarm Linkage Item page will appear. Select the options that need to be armed/disarmed on command.
◦ Select OK at the bottom of the page when complete.
.
• Exit the One Key Disarm Setup menu once all desired channels/sensors have been configured and return to the Live screen with the shield symbol displayed.
◦ Tap on the shield icon to change the Armed/Disarmed state. A message of confirmation will appear each time. Please confirm the change.
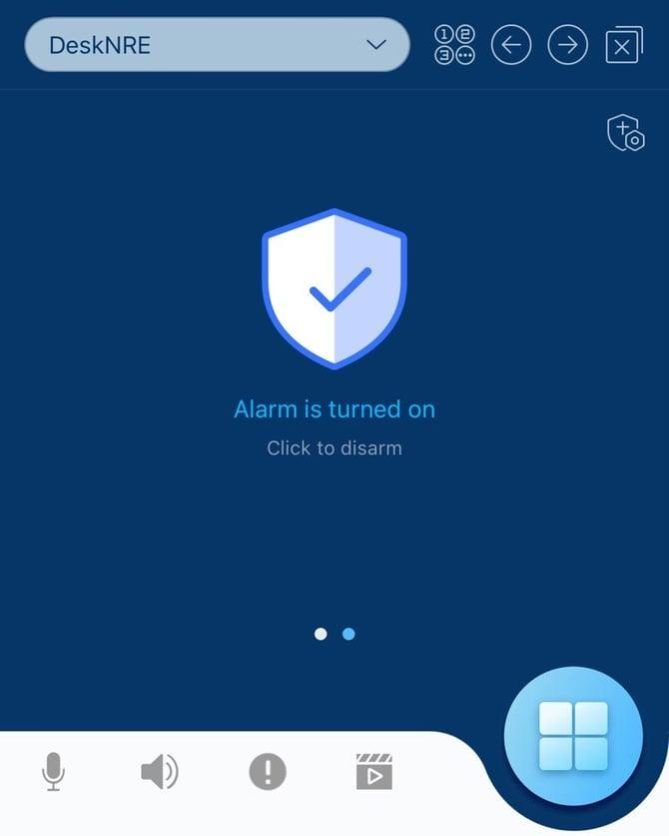
• If the alarm is armed, the shield will be blue and read “Alarm is turned on. Click to disarm.”
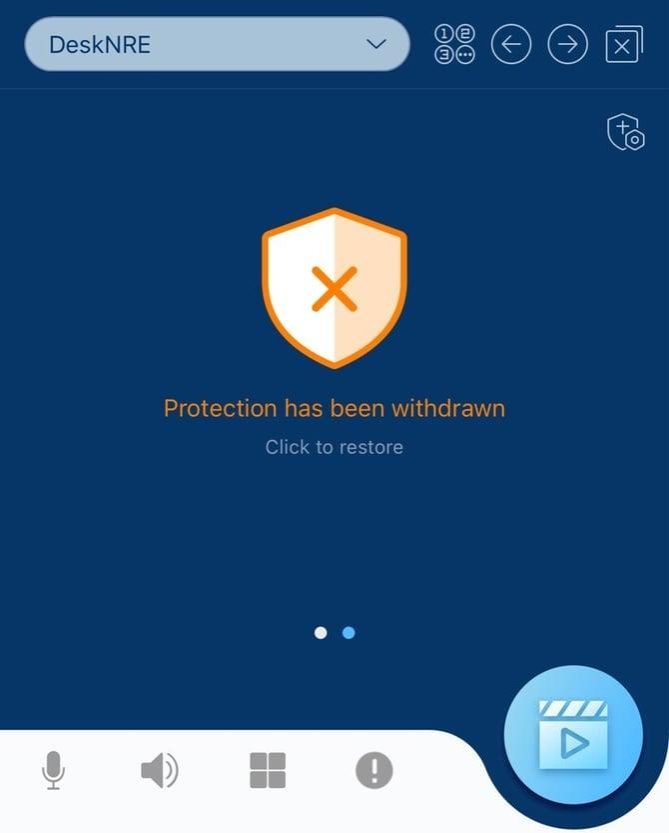
• If the alarm is disarmed, the shield will be orange and read “Protection has been withdrawn. Click to Restore.”
How to Configure Fisheye Viewing on Speco Blue Recorder in Web Browser
A fisheye camera can be used on all Speco Blue NVRs, and all Speco Blue NVRs support changing the view of the fisheye image from a web browser
.
.
• First, connect to the recorder unit from a web browser, either locally with the IP address or remotely with connect.specotech.cloud
◦ For a guide on how to connect to a recorder unit from a computer,
CLICK HERE
.
• Then, click on the fisheye camera’s image in the live-view grid.
◦ The pane on the right side by default will be set to Operation.
◦ An option on the top of that menu will be Fisheye.
· Select Fisheye.
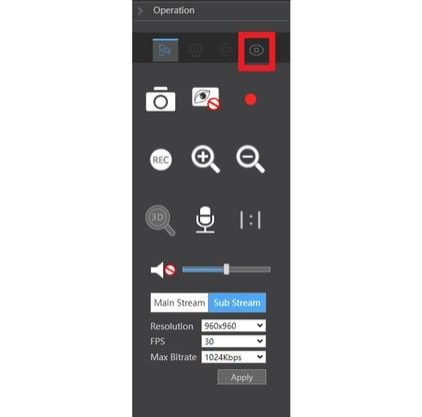
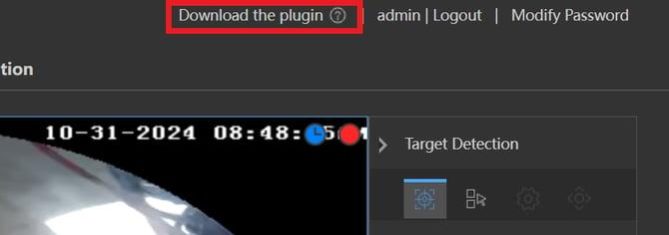
*If the Fisheye Icon is Greyed out when selecting your Fisheye camera, make sure to download and install the plug-in in the top right of your screen.*
.
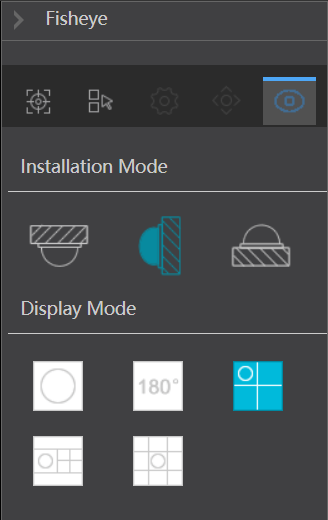
• The Fisheye Menu will appear.
◦ The top option, Installation Mode, will tell the camera how it is orientated to ensure it is displaying its image in the correct orientation as well.
· Selecting the Top Mount option will correctly orientate the image from the ceiling’s perspective, so the image isn’t upside down to the viewer.
· The Wall Mount option will orientate the image, so the image isn’t sideways to the viewer.
· Desktop Mount is the same concept as Top Mount but this time the camera is pointing up instead of down.
◦ The bottom option, Display Mode, will change depending on what Installation Mode is selected. The options that are available in Display mode are:
· Fisheye, which is the default circular image.
· Panorama, which creates 2 separate 180-degree views.
· Fisheye+3PTZ, which will show the full fisheye image, as well as 3 separate images to view specific areas of the image.
· Fisheye+8PTZ, which will show the full fisheye image, as well as 8 separate images to view specific areas of the image.
How to bypass the Authorization Code
An authorization code request may appear when connecting to the NVR through a web browser. It will appear after logging in with the QR code, username, and password.
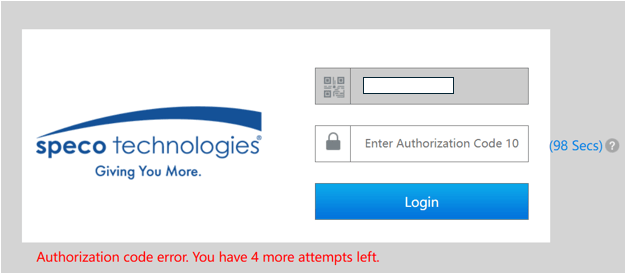
To bypass the authorization code seen above, it is required to unbind the NVR from its corresponding Speco Blue account. This can be done by following the instructions from the following article: How to unbind your NVR from the Speco Blue app
How To Format a Usb Flash drive or Hard drive to Fat32
In order to export video from a Speco Technologies recorder (NVR/DVR) to a USB flash drive, the drive must be formatted FAT32.
FAT32 is a file system that can be read by both Mac and PC computers. It’s also the most compatible file system for older and modern computers, gaming consoles, and other devices with a USB port.
These instructions are specific to Windows 10
Step:1
Insert the USB flash drive into an available USB port on your computer.
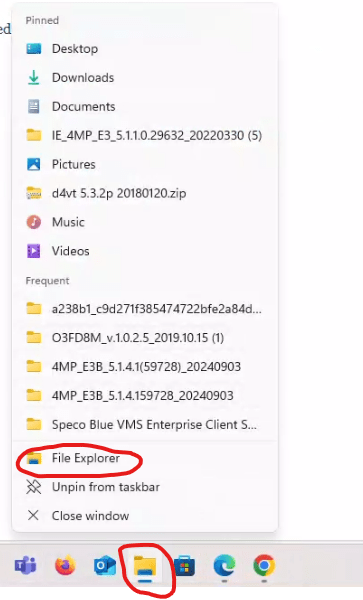
• To access File Explorer or Disk Management, right-click the File Explorer icon on the taskbar at the bottom of the screen.
Step:2
• Locate the USB drive that requires reformatting among the listed volumes. It’s crucial to accurately identify the correct USB drive to prevent accidentally formatting a different drive.
Step:3
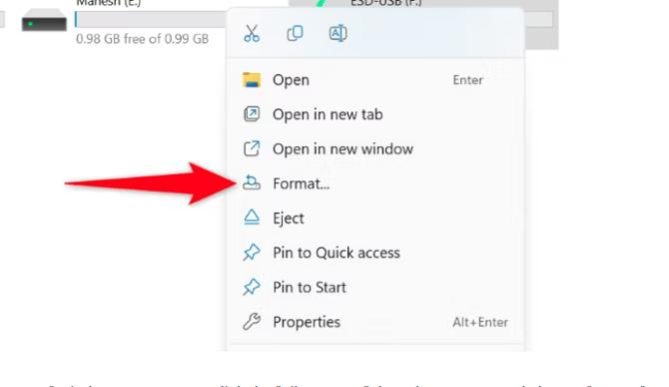
• Right-click on the USB drive and select “Format” from the menu that appears. This will bring up a new window.
• Choose the file system and configure additional settings. Completing this step will bring you closer to preparing the drive for use.
Step:4
• A “Format” window opens. Here, click the “File System” drop-down menu and choose “FAT32.” Optionally, configure other options. Then, click “Start.”
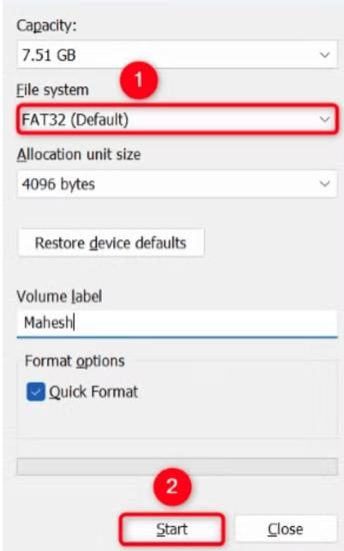
• When the drive is Formatted, it will be in Fat32 format and can be used on the recorder.
How to change the default Plug-and-Play password for IP cameras on Speco Blue Recorders via the Web Browser
This article explains how to create a custom default password for plug-and-play cameras.
Step 1:
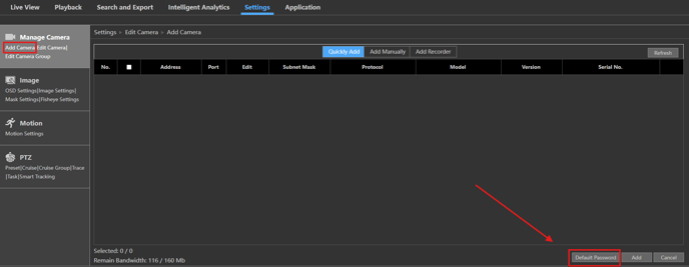
• Click on the Settings tab on the top Menu Bar
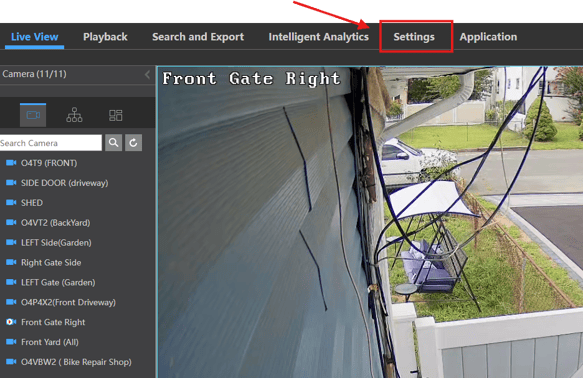
Step 2:
• Click on the Camera tab
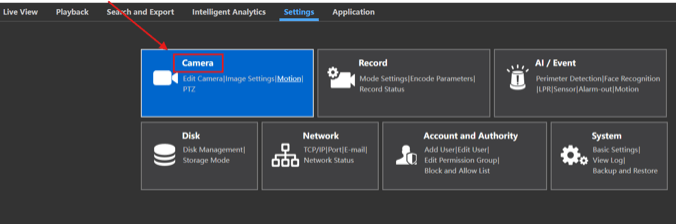
Step 3:
• Under Manage Camera, Click on Add Camera
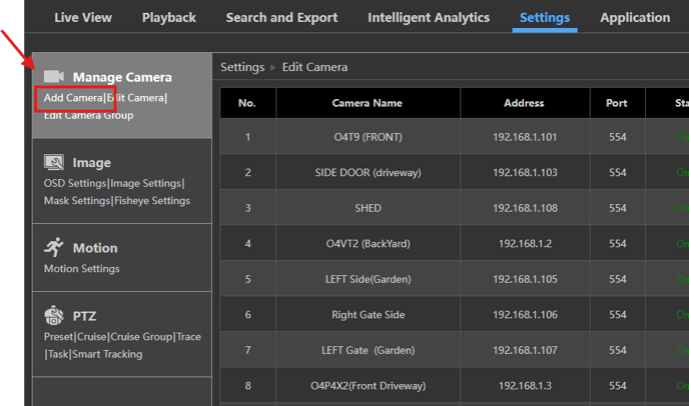
Step: 4 :
• Click on Default Password
Step 5:
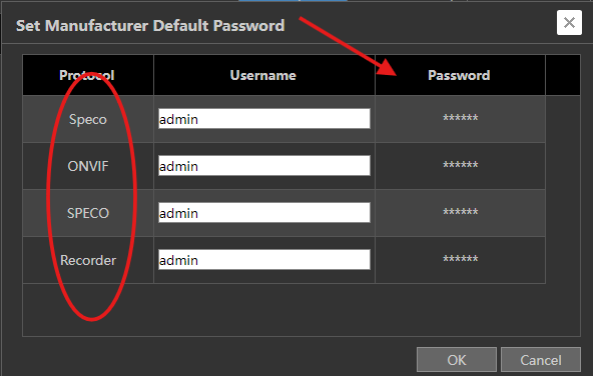
• Select the desired protocol to update the Plug-and-Play password
◦ Click “OK” to apply and save changes
How to Export Clips on Blue Series Recorders from a Web Browser
This article reviews how to export clips when accessing a recorder from connect.specotech.cloud or local IP address
.
Step 1: Access the Recorder
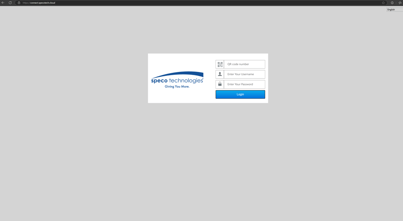
• Method 1: Connect.specotech.cloud
◦ Log in using the QR code and recorder credentials (username and password)
• Method 2: Local IP Address
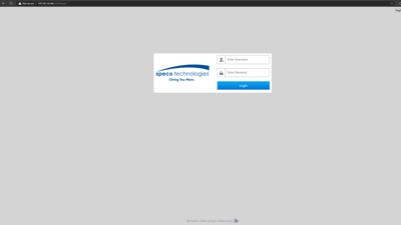
◦ Enter the local IP address of the recorder
◦ Then enter the username and password of the recorder
.
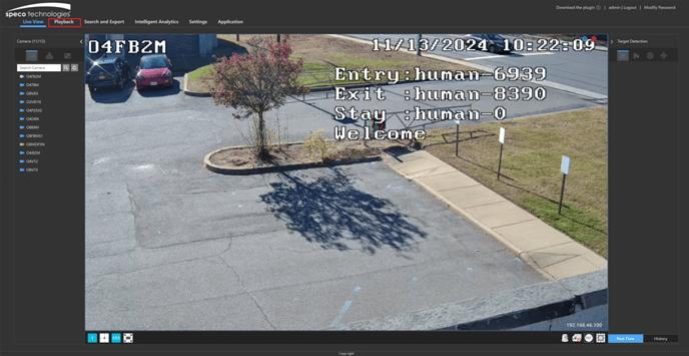
Step 2: Open Playback Mode
• Click on the Playback tab on the top Menu Bar
.
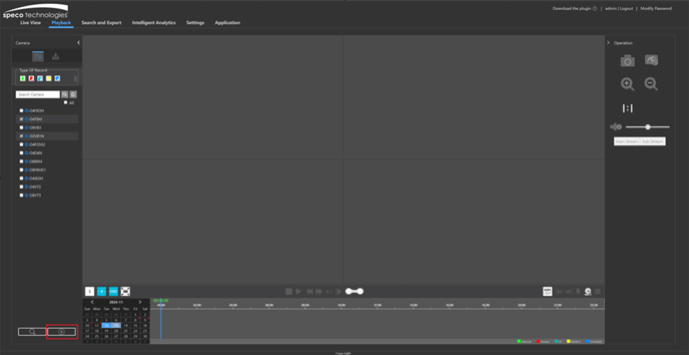
Step 3: Select Cameras and Playback Time
• Choose the desired cameras, and select the date and time for the recording
• Click the Play button to start the playback
.
Step 4: Define Export Start and End Times
• Click the Start Scissors

to mark the start time for the export
• When you reach the desired end time, click the End Scissors

again to mark the end of the segment. The selected segment will be highlighted in white and red
• Click the Export

to begin downloading the file
.
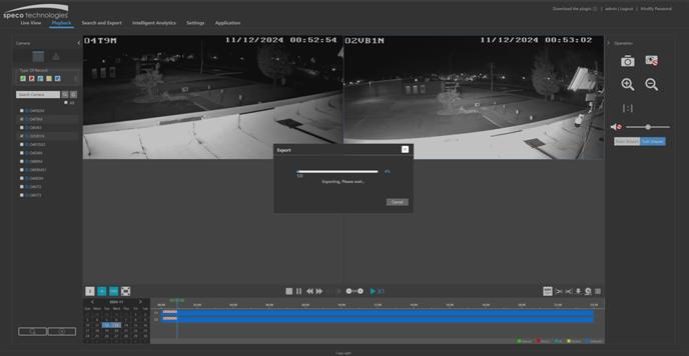
Step 5: Download the File
• Choose the download location for the file on the computer and click OK
◦ The file will start downloading, and a progress bar will display the export percentage
How to setup the Main and Secondary Display N8/N16NRX recorders
The N8NRX and N16NRX can be configured so that the HDMI and VGA outputs can be customized as 2 separate displays, not mirrored displays.
.
Step 1: Go To System Settings
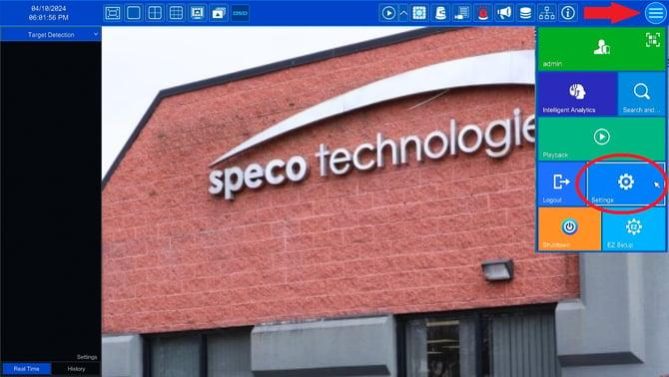
• Click the Hamburger menu ☰ icon in the top-right corner and select the option for Settings.
◦ This will open the settings menu
.
• From the Settings menu, click the option for System, towards the middle right of the menu.
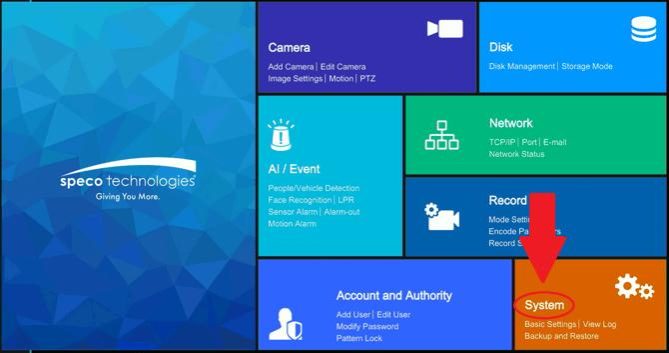
.
.
Step 2: Output Settings
• Under Basic Settings, click on Output Settings
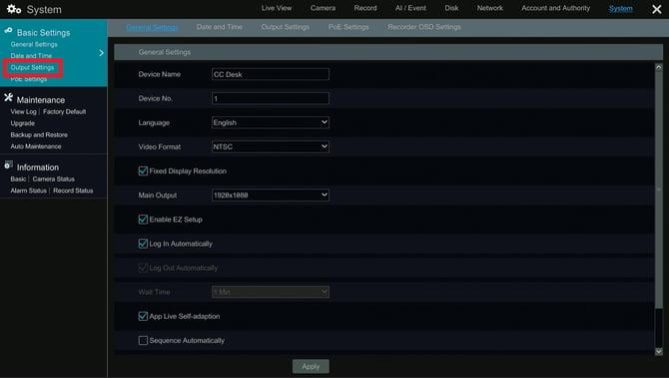
.
Step 3: Initiate Feature
• Next to Main Output, click on the Switch
◦ Click OK on the question
◦ Input the recorder credentials
◦ Then the recorder will reboot to make the feature change
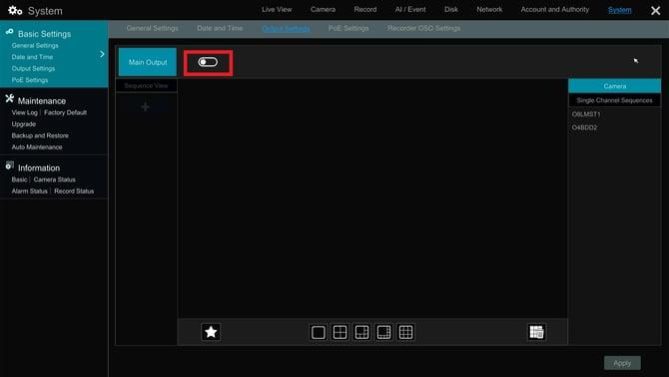
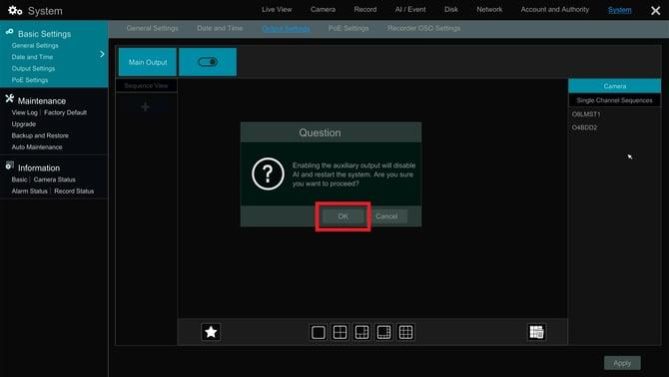
.
.
Step 4: Configuration
• Go back to Settings > System > Output Settings
• Now it will have options for Main and Secondary Output
◦ VGA – Secondary Output
· (These cannot be switched)
• You can then configure the outputs like any other dual-output recorder in this window
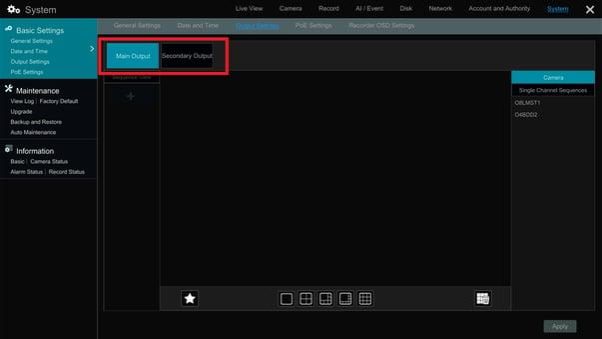
Click here to learn more about configuring Display Outputs
.
Step 5: Reverting Back to Mirroring Outputs
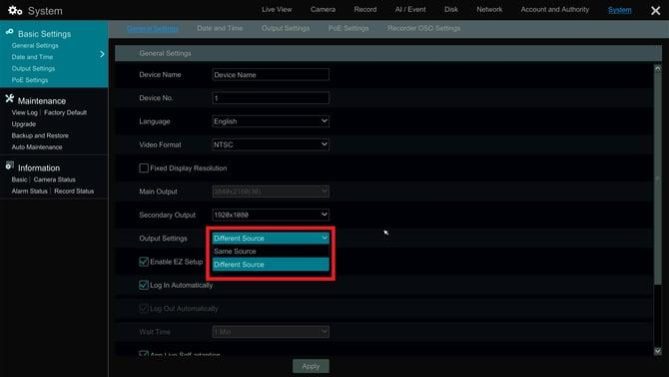
• Go to Settings > System
◦ Switch the Output Setting from Different Source to Same Source
◦ Then the recorder will reboot again and revert back to mirroring the outputs
How to View Fisheye Video Clip in Dewarp after Export from Speco Blue Recorder
This article explain how to view a fisheye video clip in the proper dewarp after exporting.
Click here to review How To Export Video from a Speco Blue Recorder
.
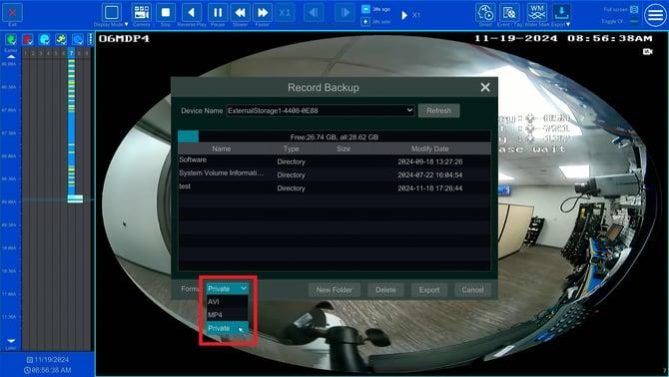
Step 1: Export Clip as Private
• When exporting the clip from the recorder, make sure the Format is Private.
.
Step 2: Open with Speco Blue Player
• This is how the export should look like on your thumb drive.
◦
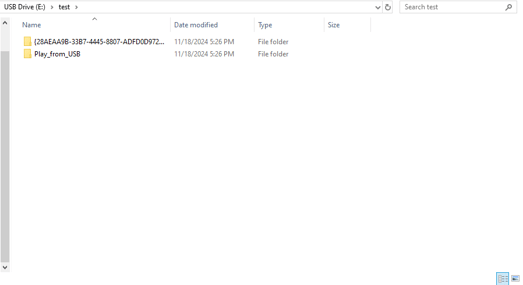
• Open the folder labeled “Play_from_USB”
◦ Run the Speco Blue Player.exe file.
◦
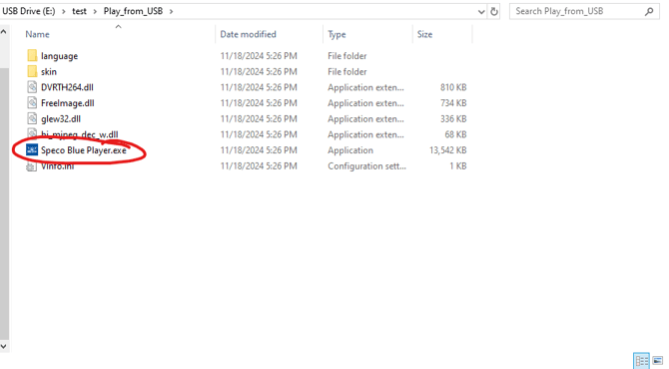
• Click Open Folder.
◦
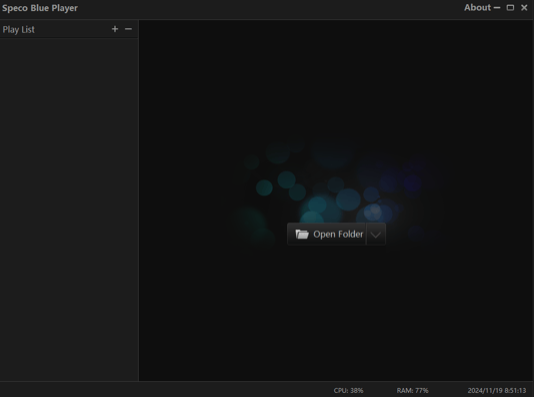
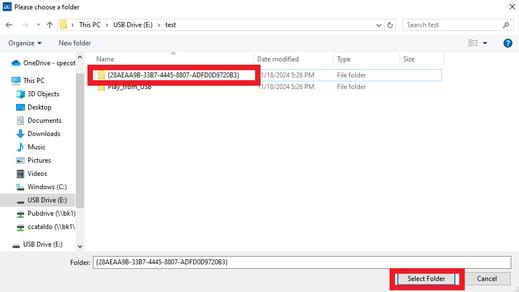
• Click the other folder from your export.
◦ Then click Select Folder
◦
• Double click the camera source on the left-side bar.
◦
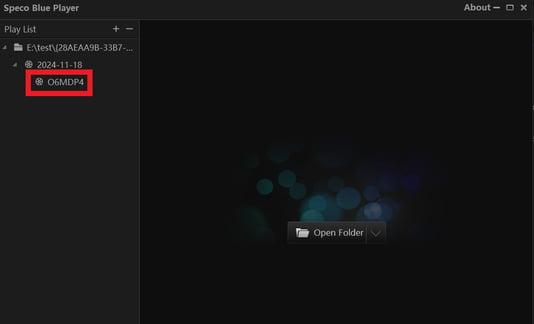
• The camera clip will populate in the grid
◦ Click the Eye Icon on the setting bar.
◦
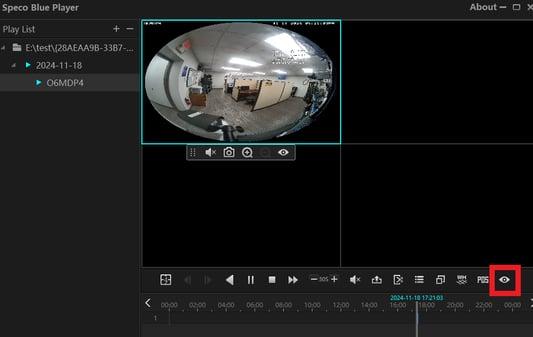
• The fisheye dewarp options will appear the same way they do at the Recorder interface.
◦
How to Create Custom Live View Grid on Speco Blue Recorder
This article reviews how to configure a custom live view grid locally on your Speco Blue Recorder.
.
Step 1: Setup
• If Live View is in full-screen, please make sure to exit full screen mode.
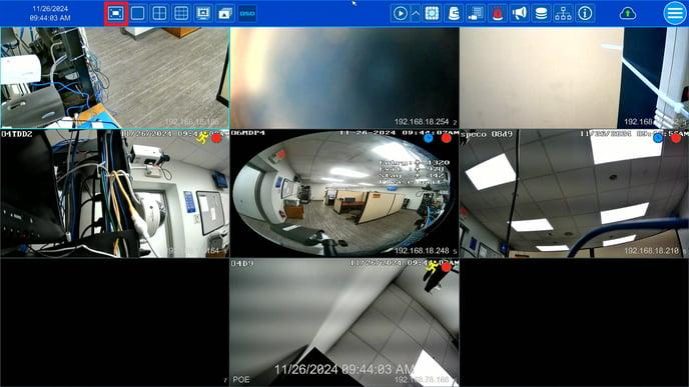
• Click the carrot on the left hand side bar.
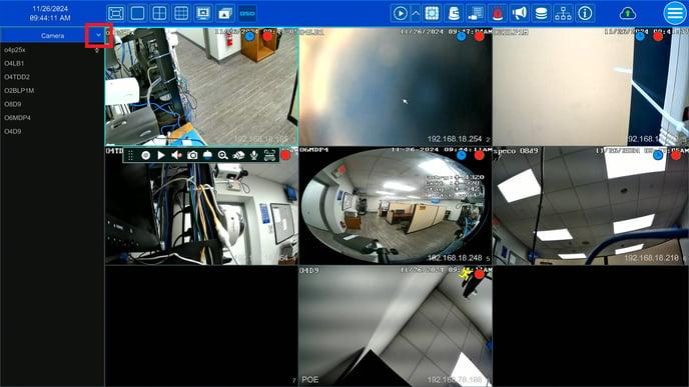
• Click Customize Layout.
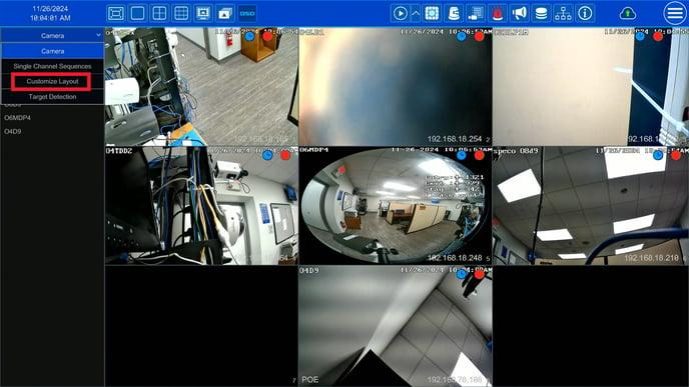
.
Step 2: Configure Layout
• Click and drag the camera sources to the desired layout.
.
Step 3: Save
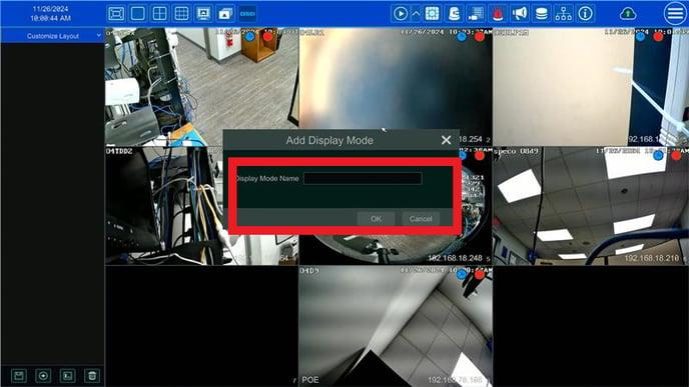
• After the layout is set, Click on the plus icon on the bottom of the left hand side bar to Save your layout
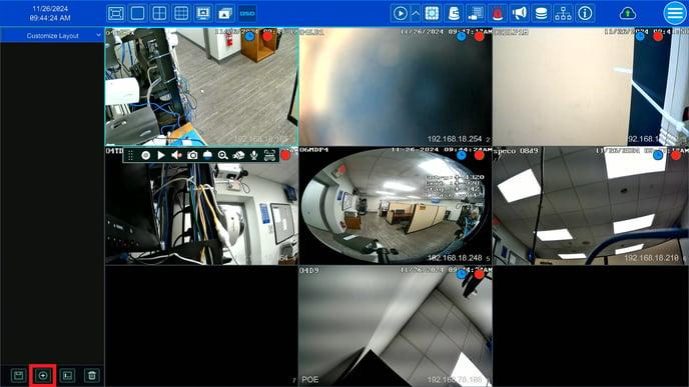
• Give this layout a name and click OK
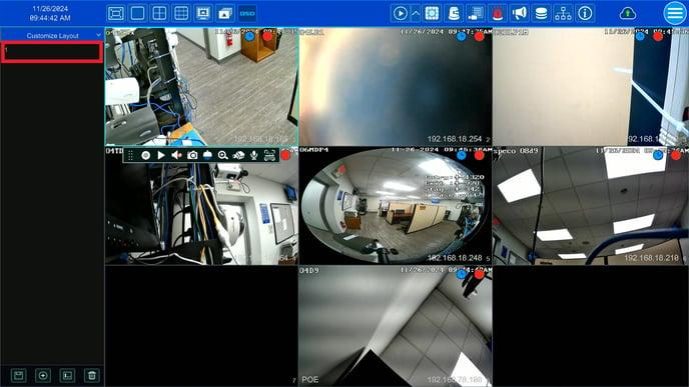
• Now every time this layout is needed, simply double click the saved layout under Customize Layout
.
Click here to learn how to configure your Secondary Output
How to enable Motion Record on a NR Series Recorder locally from browser
This guide will go over the steps required to enable Motion Detection on a Blue series recorder.
If you don’t have the system set up locally online, please refer to the article first:
How to Connect to a Speco Blue Recorder from a Computer.
If this step has already been completed please continue to step 1.
.
Step 1:
• Connect to the recorder locally using its IP address,
◦ for example: http://192.168.1.100.com, then hit enter
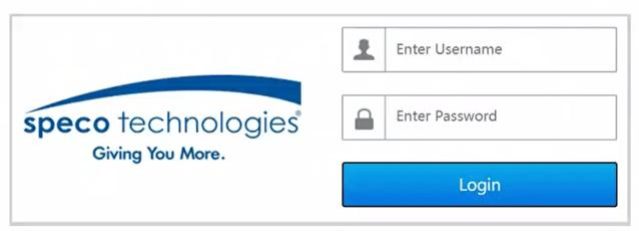
• A login screen should present itself.
• Insert the username and password of the recorder, select Login.
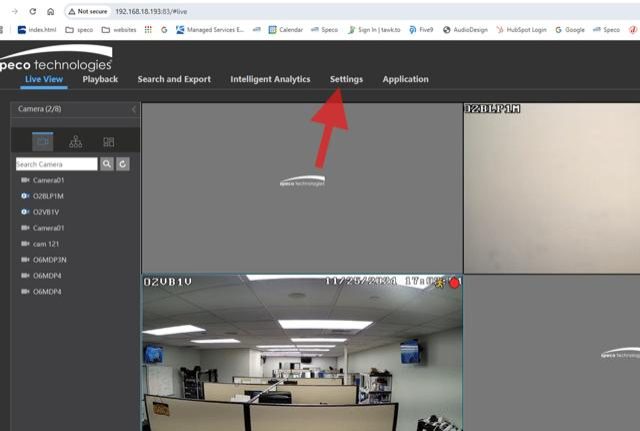
Step 2: Click on Settings
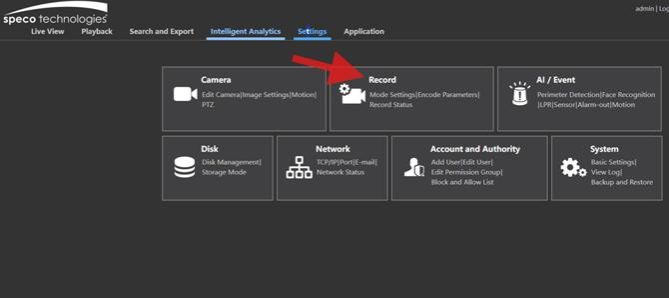
Step 4: Click on Record
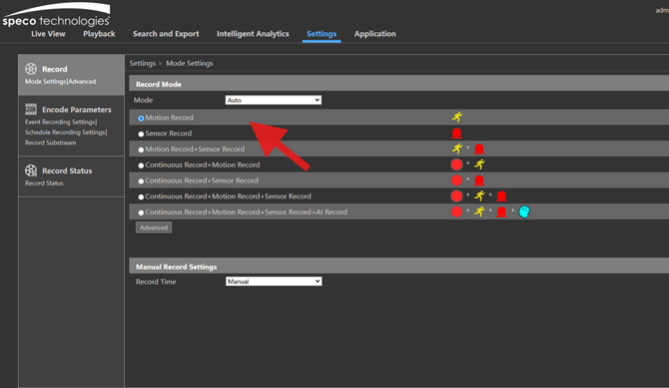
Step 5:
• Make sure mode is set to Auto, and Motion Record is enabled.
How to change the Date and Time settings on a Speco Blue Recorder
How to adjust Date and Time settings like Date Format and Time Format on a Speco Blue series NVR.
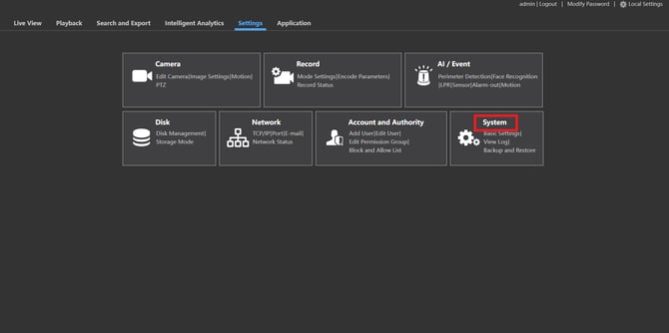
To adjust the Date and Time settings on a Speco Blue Recorder, we must first go to the settings. Once in Settings, click on System.
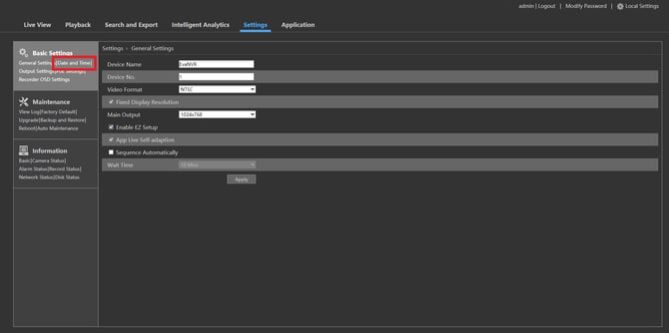
After clicking on System, you can find the Date and Time settings on the left-hand side. Go ahead and click on Date and Time.
Here we can see the various Date and Time settings that can be adjusted to meet your preferences.
• For example, you can change the Date Format to change the order of Month/Day/Year. You can also change the Time Format to read in 24-Hour instead of 12-Hour.
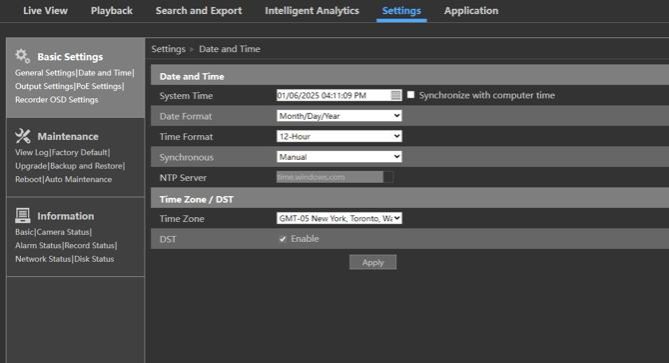
When you are done making adjustments, click Apply to save your changes.