Saturday, 29 August 2026
Home News Politics Business
🇹🇷 TR | 🇬🇧 EN
xvraid.com logo
Random Post
  • Home
  • General
    Recent PostsView All →
    Best XVR Devices 2026: Future-Proofing Your Security with Top Hybrid Recorders
    Feb 02

    Best XVR Devices 2026: Future-Proofing Your Security with Top Hybrid Recorders

    Installing DW Spectrum for Windows
    Jun 19

    Installing DW Spectrum for Windows

    IPC360 Home Camera User Manual
    Dec 21

    IPC360 Home Camera User Manual

    • DVR General
    • NVR General
    • IP Camera
  • Download
    • Firmware
    • Software
  • FAQ
    • Guide
    • How To
    • Password Tools
  • General
  • Contact
  • Forum
REKLAM
Guide How To

How to remotely connect to Bosch Devices

By XVR AiD October 23, 2024 10 min read
How to remotely connect to Bosch Devices
How to remotely connect to Bosch Devices, This article contains a step by step guide meant to show you how to remotely...
REKLAM

How to remotely connect to Bosch Devices, This article contains a step by step guide meant to show you how to remotely connect to your DIVAR Network or Hybrid by using your phone/ tablet via DIVAR Mobile Viewer App.

Table of Contents

Toggle
  • Step-by-step guide
    • How to remotely connect to Bosch Devices
      • A) Setting up DDNS & Remote Portal account
    •  
      • B) UPnP SET UP
      • C) Mobile device set up | DIVAR Mobile Viewer App (phone/ tablet)
  • Question
  • Answer

Step-by-step guide


REKLAM

exclamation mark 1 It is mandatory to have the monitor & mouse & Keyboard connected to your DIVAR.

 info symbol  Recommendation

When adding your DIVAR in Remote Portal, please consider to use a separate Technician account when performing this action.

In case you are using an Admin account to connect your DIVAR to it and if you forgot the password of the Admin account, after resetting it, you will be required to re-add the password locally, physically on your DIVAR.

Therefore, by using a Technician account added into an Admin account, after resetting the Admin account password, this action will not impact the password of your DIVAR when adding it into the Remote Portal.


How to remotely connect to Bosch Devices

A) Setting up DDNS & Remote Portal account


First, you have to create a Remote Portal account, if you don’t have one yet.

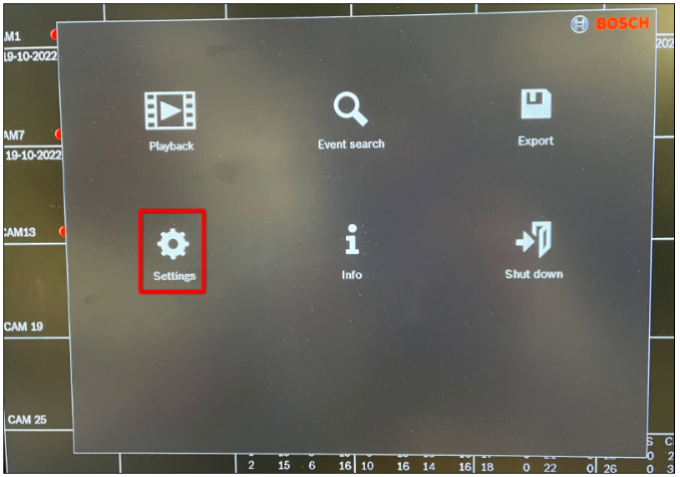
If you already have an account, add it locally (not via web interface) to the DIVAR by accessing Settings > Network > DDNS


You can create the Remote Portal account in advance from any browser by accessing
https://remote.boschsecurity.com and click Sign up button.
.

• See more details here: How to create a company’s account in Bosch Remote Portal?


Or you can create the Remote Portal account directly from your DIVAR Hybrid/ Network only if you have connected locally the monitor & mouse & Keyboard to your DIVAR:

To create a new Remote Portal account from your DIVAR Hybrid/ Network: 

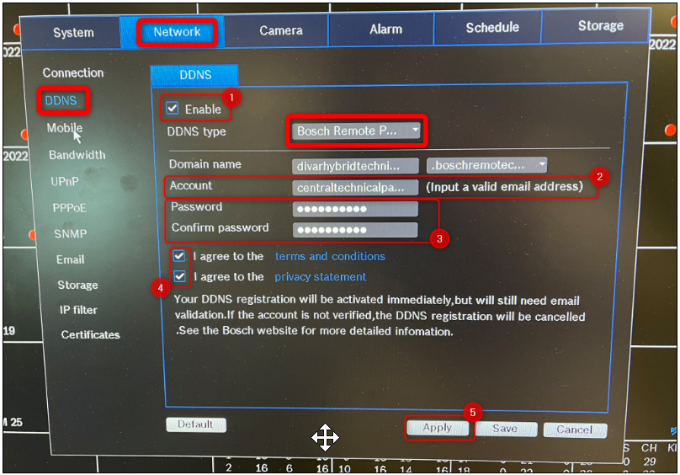
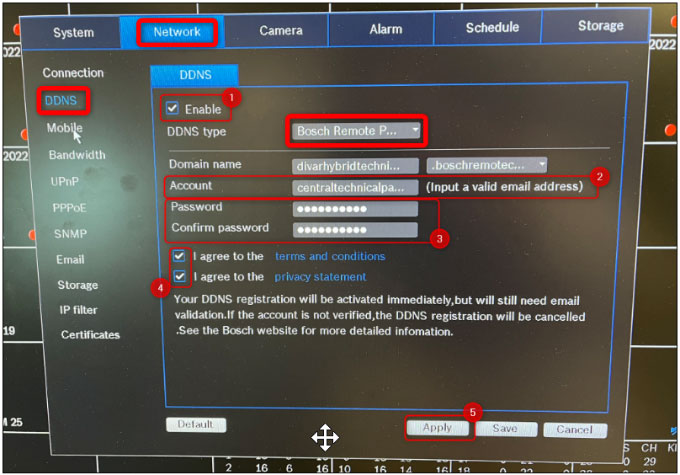
• Go to Settings > Network > DDNS > select “Bosch Remote Portal” next to the DDNS type

exclamation mark 2   Important!

      Make sure the recorder is connected to the open internet, before you configure the DDNS service. (see point B)


 centralsupport 1 1666270113891 680w477h


centralsupport 2 1666270161794


1.Tick the box next to “Enable”
2.Type in the e-mail address that will be used to log in to the Bosch Remote Portal
3.Insert the password that will be used in Bosch Remote Portal
Note: The password must contain minimum 8 characters that must include at least one letter and one number.
Hint: While creating the Remote Portal account, please note that the password length displayed in the dedicated password field will display maximum 11 dots characters instead of the real number of dots characters that you typed in for your password. Therefore, behind the 11 dots characters, it will be the password of your choice.This is also valid for the users on the Divar. 
4.Agree to the conditions
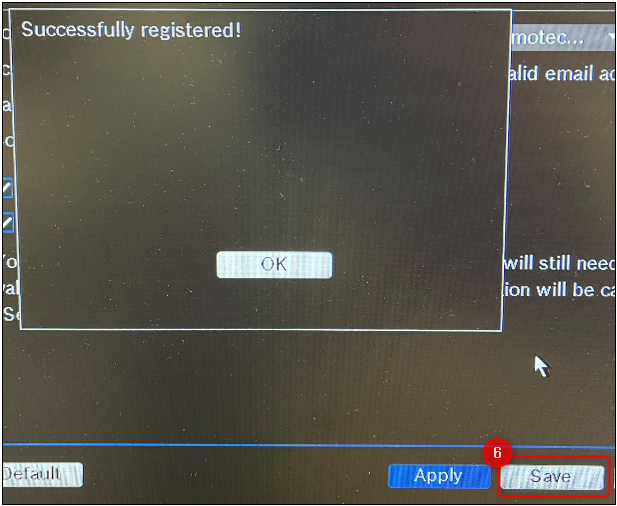
5.Click Apply → “Successfully Registered” message will appear within a few seconds:

centralsupport 3 1666270252996

 6      Click Save
.

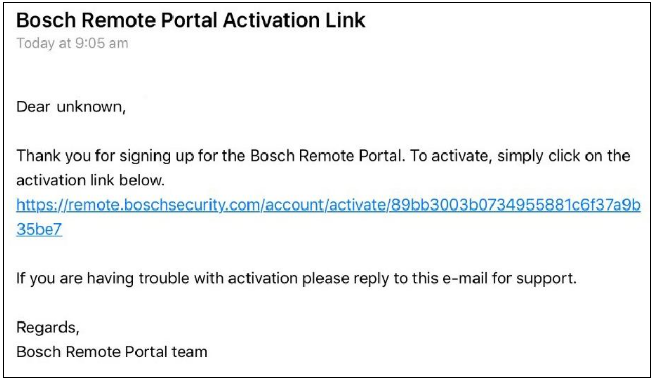
• An e-mail will be sent to your nominated email address with the Bosch Remote Portal activation link. Click on the link from the e-mail. This will redirect you to the Bosch Remote Portal web page to login.

centralsupport 4 1666270371683

This message should be displayed:

centralsupport 5 1666270422283


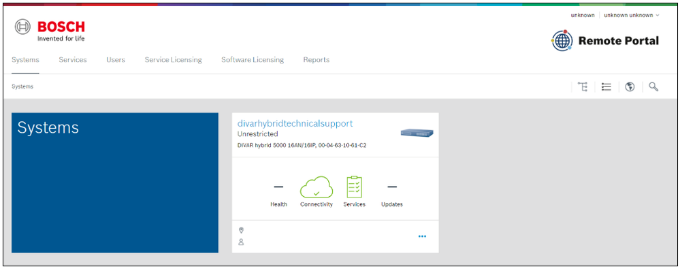
After logging in to your Bosch Remote Portal Account (with the credentials you previously set within your DIVAR, DDNS tab), you should be able to see the DIVAR as connected:
centralsupport 6 1666270476790


B) UPnP SET UP


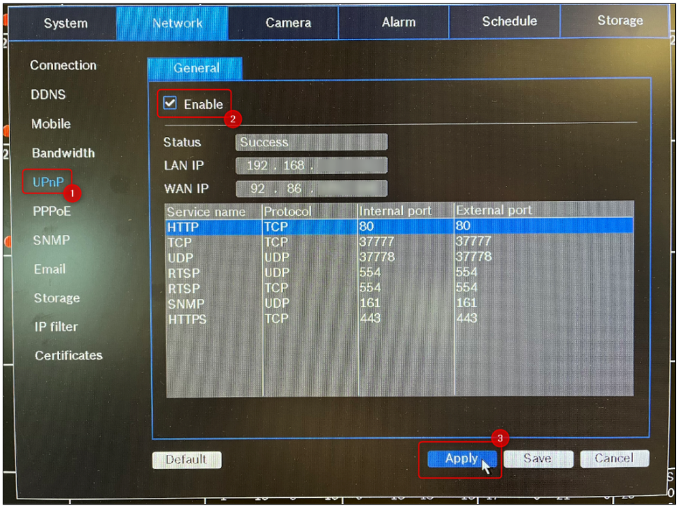
Now, you have to go in the UPnP menu and tick the box next to Enable > click Apply

The status should display “Success” and the LAN IP and WAN IP fields will be populated. The table shows the port-forwarding rules that will be passed through your router, if UPnP is enabled on the router.

 heavy check mark  Tip

         Please make sure that the Public IP is correctly set.

        If you don’t know what your Public IP is, type in “what is my IP” in any search engine and you will find it.

centralsupport 7 1666271454271


warning For remote access on your Divar Network/Hybrid, you will need to forward certain communication ports on your router that connects you to the internet.

 Read your router manual for instructions to forward ports to a device or you can refer to this link where basic information on Port Forwarding are provided.

The Divar Mobile Viewer App only needs TCP port 37777.

However, if you also plan to connect remotely to the unit via web browser, you will need to forward the HTTPS port and/or HTTP port. Bosch advises to use only HTTPS connections for a higher security. 

See below an overview of the ports default values and their usage:

• TCP port: 37777 – used for video streaming, mandatory. This port is used by the Bosch DIVAR Mobile Viewer app to connect to the recorder. The web client also uses TCP port 37777.
• UDP port: 37778 – used for UDP type data streaming
• HTTPS port: 443 – used for secure connection via web browser
• HTTP port: 80 – used for connection via web browser.

Bosch strongly recommends to only use HTTPS communication. However, if the network bandwidth is limited, the system has a very high load or the remote workstations are not powerful enough, the HTTP connection can be used to increase the systems performance and reduce network bandwidth stress.

• RTSP port: 554 – used for accessing the video using an RTSP stream

See also this article: Which ports are used by Bosch DIVAR Mobile Viewer App?


C) Mobile device set up | DIVAR Mobile Viewer App (phone/ tablet)
 

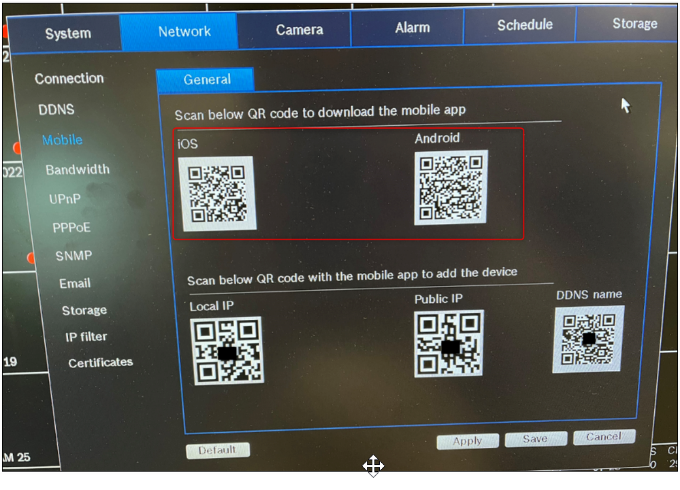
• Go to Network > Mobile  > General and scan the QR code to download the Mobile Viewer app if you do not have it already installed on your phone/ tablet
• centralsupport 8 1666271562472centralsupport 9 1666271593560
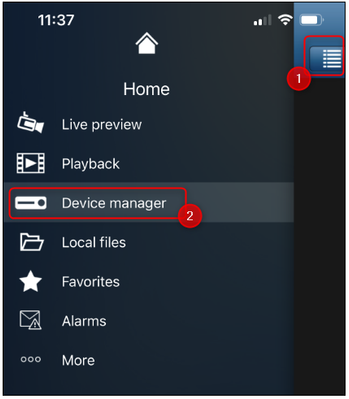
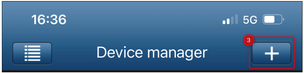
◦ Once the DIVAR Mobile Viewer App is installed on your mobile device, open the App > click on the left side menu > select Device manager > then click + to add a new devicecentralsupport 10 1666271649999centralsupport 11 1666271704410
· Add the preferred name for your DIVAR
· Now you have 2 options to add your DIVAR in the App
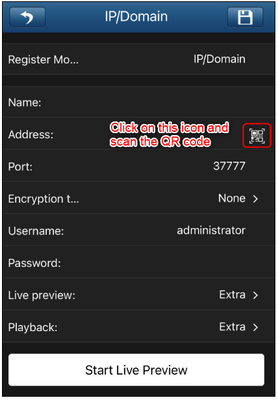
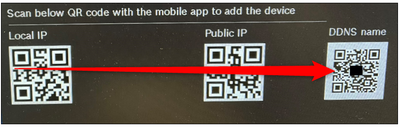
· Option 1: by scanning the QR code (next to the DDNS name) displayed on the DIVAR’s screen 
• centralsupport 12 1666271796391centralsupport 13 1666271823093

Option 2: by manually adding the details. 
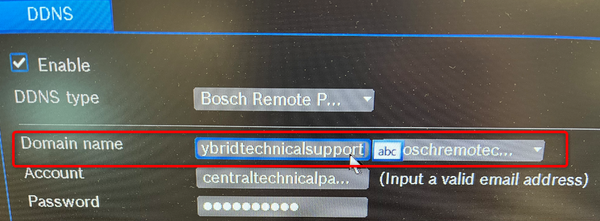
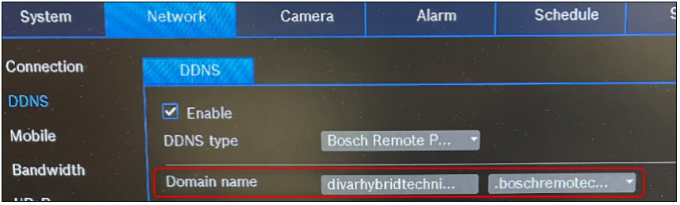
Note: if you manually add the details, for remote connection you should enter the Domain name from the DDNS menu on your DIVAR:
centralsupport 14 1666272396604 680w


heavy check mark 1 Tip

     The abc icon is displayed in the domain name when you are hovering over it. Move the mouse outside of it to make the abc icon disappear.

         warning 1 Behind the abc icon there is ‘.’ and not ‘@’ 

image2022 10 19 16 45 52


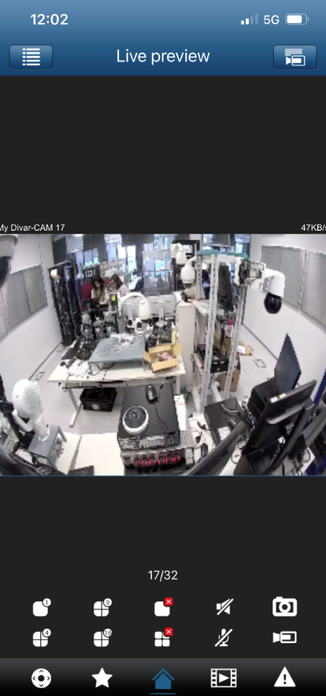
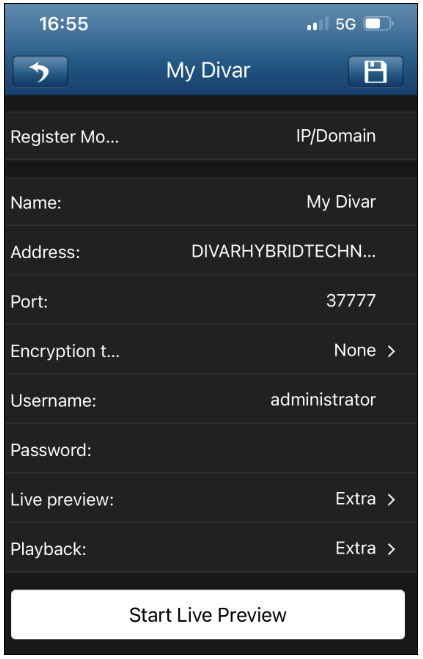
Whether you follow the Option 1 or Option 2, you will have the overview below in the DIVAR Mobile Viewer App:
centralsupport 16 1666272960851


Enter the Username and the password and click Start Live Preview

exclamation mark 3  Important

     The username and the password are the credentials of your DIVAR!


• Now, you can remotely see the cameras connected to your DIVAR Network or Hybrid, directly on your phone/ tablet via Mobile Viewer App!

image2022 10 19 17 0 56

How can I access my DIVAR Network or Hybrid web GUI given that Internet Explorer has been retired?

Question


How can I access my DIVAR network/hybrid 2000/3000/5000 web GUI given that Internet Explorer has been retired?


Answer


Given that the Internet Explorer 11 desktop application has retired and is out of support as of June 15, 2022 for certain versions of Windows 10, the new PCs have only Microsoft Edge installed on them or Microsoft rolled out the New Edge browser automatically via Windows Update.


If you have a DIVAR network/hybrid 2000/3000/5000 recorder and you want to connect and configure it, you can do it with the internet explorer compatibility mode in Microsoft Edge and you can use the system as before.


There is an Internet Explorer extension for Microsoft Edge and you can enable it as following:

Enable IE mode on Microsoft Edge
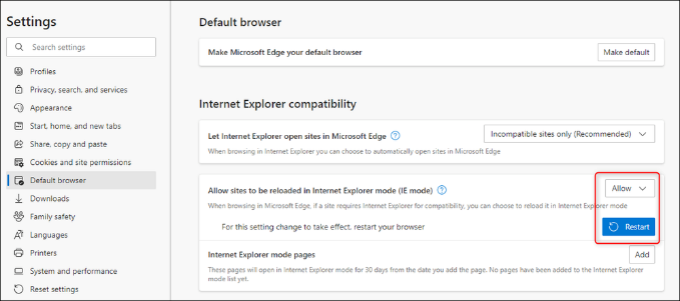
1.Open Microsoft Edge on Windows 10.
2.Click the Settings and More (ellipsis) button on the top-right corner.
3.Select the Settings option.
4.Click on Default browser.
5.Under the “Internet Explorer compatibility” section, turn on the “Allow sites to be reloaded in Internet Explorer mode” toggle switch.
6.Click the Restart button.

central support 0 1665149668286 680w


More details here: What is Internet Explorer (IE) mode?

You can also add the IP address of your DIVAR to the IE mode list:
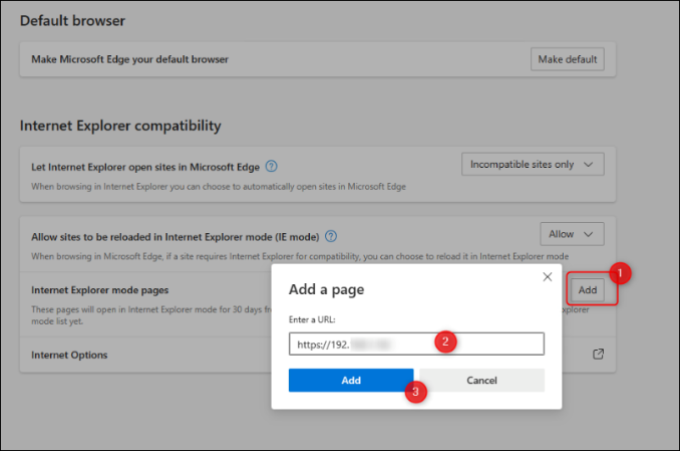
central support 0 1697465991160 680w451h


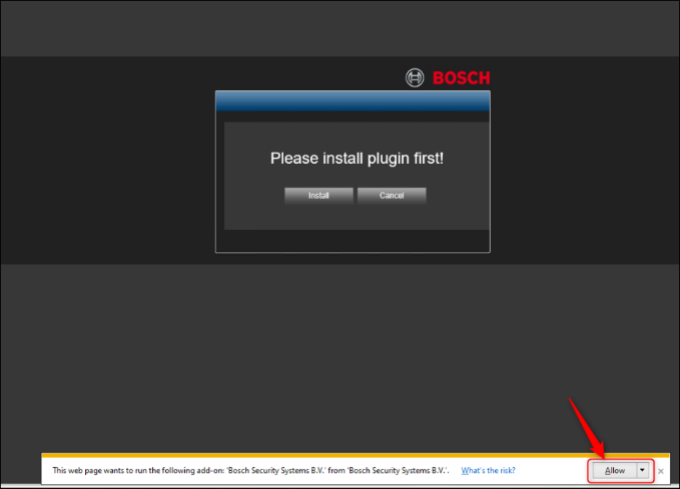
When DIVAR is accessed for the first time using web interface, the URL for downloading the prerequisites (addon) remain the same.

Click “Install“:
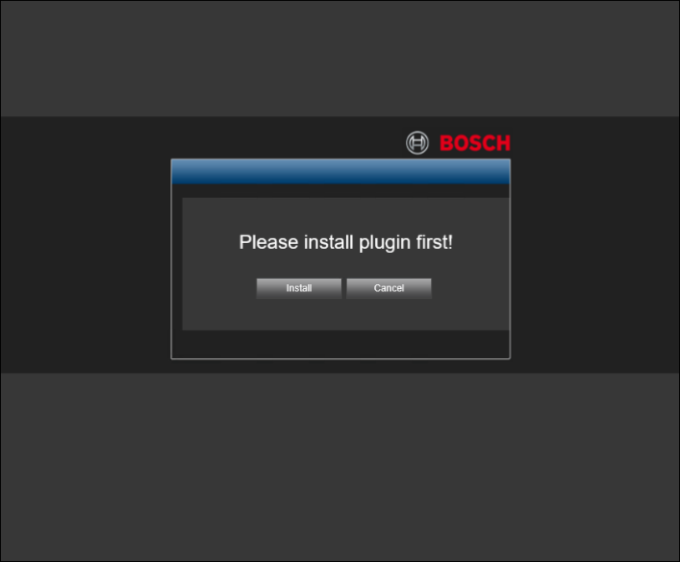
central support 1 1697466047825 680w562h


Click “Run“:


null


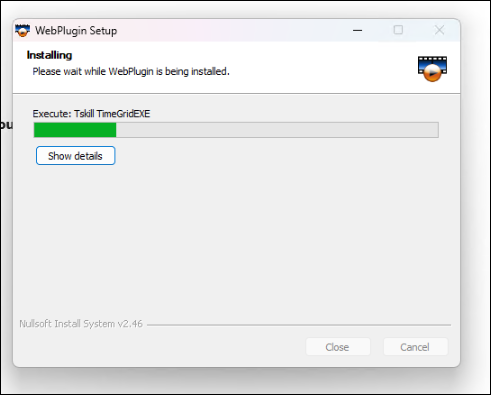
Be aware that after installing the WebPlugin Setup, you will be redirected again to the webplugin.exe link to be downloaded. Select the “webplugin.exe” and remove it from the URL.

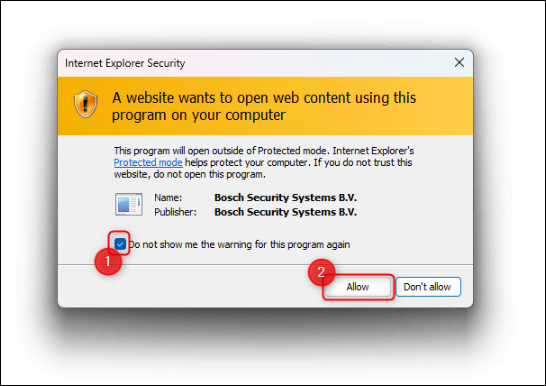
Type only the IP address of your DIVAR > press ENTER and click “Allow” for the add-on to run:
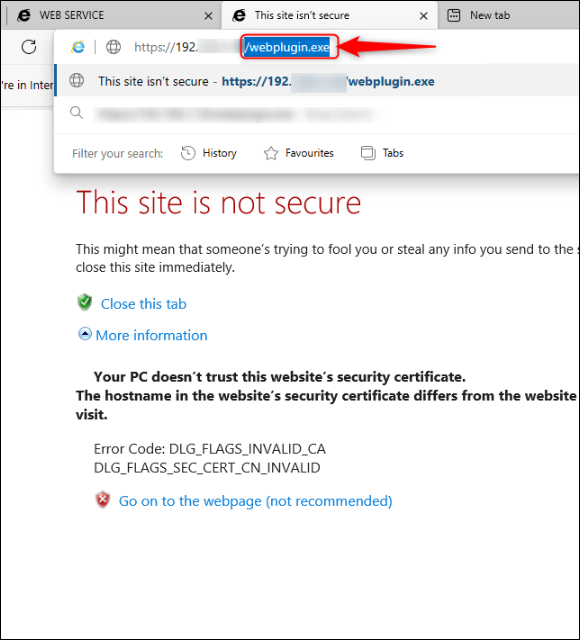
central support 4 1697466230399central support 5 1697466280055 680w489h


Tick the checkbox and click “Allow“:
central support 6 1697466337263


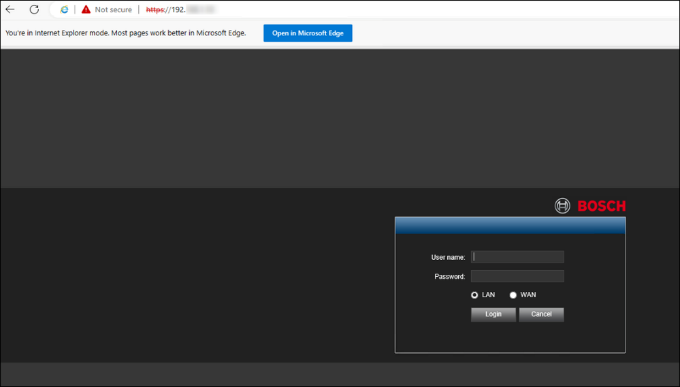
Now, your DIVAR is accessible from the Microsoft Edge in IE mode.

Insert the credentials and start using your DIVAR:
central support 7 1697466386629


Also, if you need a software to view and monitor the cameras, you can try *BVMS viewer.

*applicable for DIVAR AN as well

How to exchange the battery for the DIVAR Hybrid and Network series?

This article explains how to exchange the battery on the DIVAR Hybrid and Network in a safe way

Product families

• Divar Hybrid 3000 and 5000 series
• Divar Network 2000, 3000 and 5000 series


When the battery is getting too less power due to his lifetime, it needs to be exchanged. For the above mentioned families the life time of the battery is guaranteed for 5 years. When the power of the battery is getting to low the clock of the recorder will be displaying the wrong date and time at startup it shows 01-01-2000 00:00

This wrong date and time will only be seen at the moment the CTN has been started up after powered off.
.

Step-by-step guide


What is being done or recommended to address:
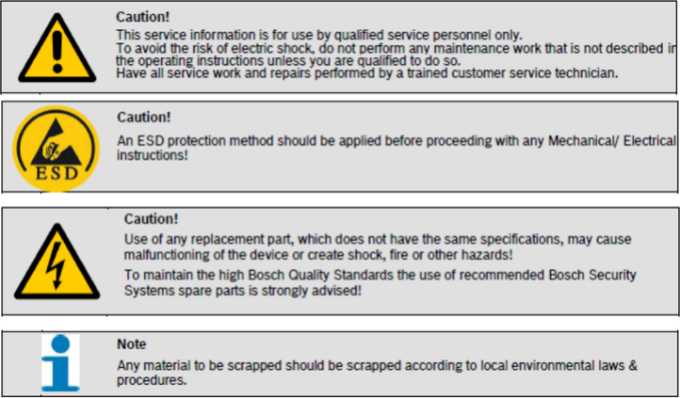
• To exchange the battery you need to take some safety precautionary measures first;
central support 0 1658312238577 680w398h


• Repair work on the device must comply with the safety standards specified in EN 60065 (VDE 0860).
• A mains isolating transformer must be used during any work for which the opened device is connected to and operated with mains voltage.
• The device must be free of any voltage before performing any alterations with upgrade sets, switching the mains voltage, or performing any other modifications.
• The minimum distance between voltage-carrying parts and metal parts that can be touched (such as the metal housing) or between mains poles is 3 mm, and must be observed at all times.
• The minimum distance between voltage-carrying parts and circuit parts that are not connected to the mains (secondary) is 6 mm, and must be observed at all times.
• Special components that are marked with the safety symbol in the circuit diagram (note) must only be replaced with original parts.
• Unauthorized changes to the circuitry are prohibited.
• The protective measures issued by the relevant trade organizations and applicable at the place of repair must be observed. This includes the properties and configuration of the workplace.
• Observe the guidelines with respect to handling MOS components.


When these safety measures has been taken, you can open the recorder. To open the CTN unscrew the 4 screws marked red and remove the top cover of the unit.

central support 1 1658312308506 680w104h


When you look at the main board you can see the battery (see picture below)
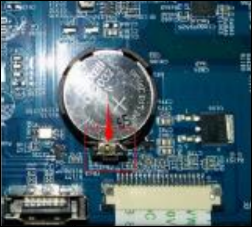
• The battery which is used is the CR2032
• To remove the battery push as shown in the picture against the battery holder.
• When done correct the battery will be lifted and can be taken out.
• Place the new battery.

central support 2 1658312347980


Additional information:

• In case you have exchanged the battery no settings or recordings are lost.
• The only thing which needs to be done is setting the time and date back to the actual time/date.


How to change the time:

• After exchanging the battery and closing the unit again startup the unit.
• Fill in the administrator password
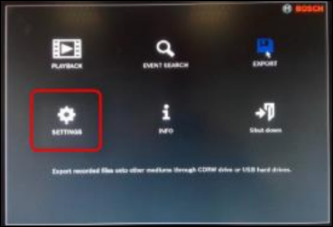
• Go to main menu
• Go to settings

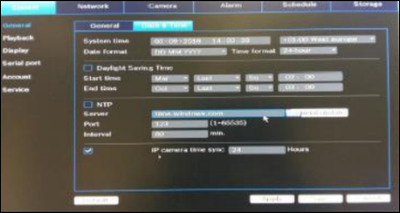
central support 3 1658312375818

• Change the date and the time.
• After setting it to the right date and time don’t forget to save it.

central support 4 1658312405260


warning 2 To verify if the procedure was successfully done, please restart your unit and check afterwards if the date & time are correctly set.

Bosch device remote connection guide, Remote access to Bosch security system, Bosch remote connection software, How to connect to Bosch devices remotely, Bosch remote access setup instructions, Bosch camera remote connection setup, Bosch device remote access tutorial, Bosch remote monitoring software, Bosch IP device remote login, Bosch device remote troubleshooting, Bosch NVR remote connection setup, Bosch remote access configuration, Bosch device VPN setup for remote access, Bosch cloud remote connection, Bosch remote control device support, Bosch remote network access setup,

Bosch device remote viewing software, Bosch IP camera remote connection, Bosch remote access app, Bosch remote device management tool, Bosch remote device connection guide, Connect to Bosch devices remotely, Bosch device remote access tutorial, Bosch remote connection software, Bosch IP device remote login, Bosch security system remote access, Bosch remote connection troubleshooting, Bosch remote device setup, How to access Bosch cameras remotely, Bosch DVR remote access instructions, Bosch device remote configuration, Bosch device remote monitoring software, Remote login to Bosch IP cameras, Bosch network device remote access, Bosch remote access application, Bosch remote access security setup, Bosch device remote access help, Bosch device VPN connection setup, Bosch cloud-based remote access, Bosch device remote control setup

REKLAM
Yazar

XVR AiD

Tüm yazıları
Paylaş X Facebook WhatsApp Link Kopyala
Öneriler

Benzer yazılar

Cinnado Security Camera FAQ
August 21, 2026

Cinnado Security Camera FAQ

Read Full Story
Ultimate Comprehensive Guide to Genius Vision NVR & VMS
June 30, 2026

Ultimate Comprehensive Guide to Genius Vision NVR & VMS

Read Full Story
Geeni Freebird 2K Wireless Security Camera Guide
March 30, 2026

Geeni Freebird 2K Wireless Security Camera Guide

Read Full Story
Önceki How To Use Network Video Recorder A Complete Guide Sonraki Wired vs. Battery Powered Security Cameras
Bosch camera remote connection setupBosch cloud remote connectionBosch cloud-based remote accessBosch device remote access helpBosch device remote access tutorialBosch device remote configurationBosch device remote connection guideBosch device remote control setupBosch device remote monitoring softwareBosch device remote troubleshootingBosch device remote viewing softwareBosch device VPN connection setupBosch device VPN setup for remote accessBosch DVR remote access instructionsBosch IP camera remote connectionBosch IP device remote loginBosch network device remote accessBosch NVR remote connection setupBosch remote access appBosch remote access applicationBosch remote access configurationBosch remote access security setupBosch remote access setup instructionsBosch remote connection softwareBosch remote connection troubleshootingBosch remote control device supportBosch remote device connection guideBosch remote device management toolBosch remote device setupBosch remote monitoring softwareBosch remote network access setupBosch security system remote accessConnect to Bosch devices remotelyHow to access Bosch cameras remotelyHow to connect to Bosch devices remotelyRemote access to Bosch security systemRemote login to Bosch IP cameras
0 comments

Leave a Reply Cancel reply

Your email address will not be published. Required fields are marked *

About Me

The DVR Support site is a private entrepreneur that is not for advertising purposes, which is purely public benefit. The contents are taken from the support departments of the relevant companies. Our website does not require membership, our editors are at your service to help you. Please express your problems in the comments or contact section and we will get back to you as soon as possible.

Our Network: dvrcms.com – cctvfirmware.com – dvrdestek.com – nvripc.com – dvraid.com

Recent Comments

  • MSA on New Firmware for Chinese DVR, NVR (H.264, H.265)
  • Baďura on Latest Firmware for V5.00.R02.V4.02.R12.
  • Abdullah Salah on Longse XVR Firmware Software Download
  • AYOUB on Longse XVR Firmware Software Download
  • Williamisose on Best FREE IP Camera Software for Windows

Makale Kontrolleri

Featured Story

Cinnado Security Camera FAQ
August 21, 2026

Cinnado Security Camera FAQ

Ultimate Comprehensive Guide to Genius Vision NVR & VMS
June 30, 2026

Ultimate Comprehensive Guide to Genius Vision NVR & VMS

REKLAM
XVRAID XVR-DVR-NVR CCTV DESK

security and surveillance blog

Get the briefing in your inbox.

Sections

  • World
  • Politics
  • Business
  • Culture

Company

  • About
  • Team
  • Jobs
  • Contact

Follow

  • X / Twitter
  • Instagram
  • YouTube
  • LinkedIn
© XVRAID XVR-DVR-NVR CCTV DESK. All rights reserved.
  • About
  • Best Deals
  • Contact
  • Contact
  • Home Page
  • Privacy Policy
  • Sample Page
  • Test
  • Tools