Camius, a leading provider of surveillance and security solutions, has announced the launch of its new knowledge base that is designed to provide customers with a comprehensive resource for frequently asked questions. The knowledge base will feature many articles, how-to guides, tutorials, instructional videos, IP, Analog and Wireless security cameras, surveillance NVR network video recorders) and DVR (digital video recorders) manuals to help customers better understand and utilize Camius products.
Is the fan noise on my DVR NVR recorder normal?
Q- Is the fan noise on my recorder normal?
A- Digital or network Vide Recorder’s fan is comparable to one in a mini PC, and the sound coming out of the vent that you may hear is a sign of a DVR that’s working well.
The working fan indicates that the trapped heat is being dissipated, and the DVR can record 24/7 on the hard drive, and without this cooling mechanism, the DVR and hard drive’s life span will be shortened.
How to add IP Camera to Camius DVR (Advanced Security XVR)
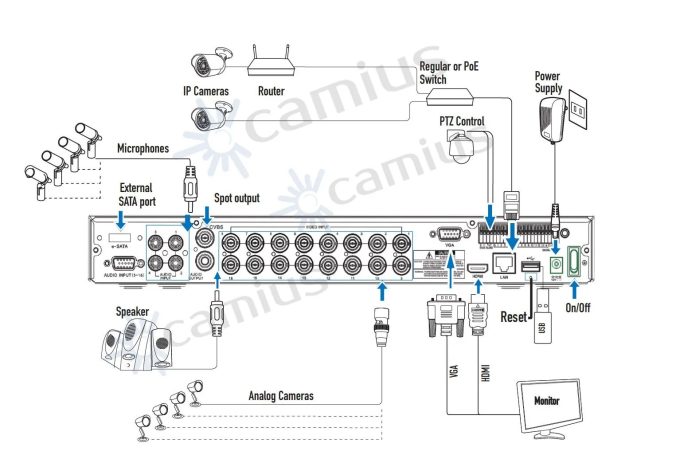
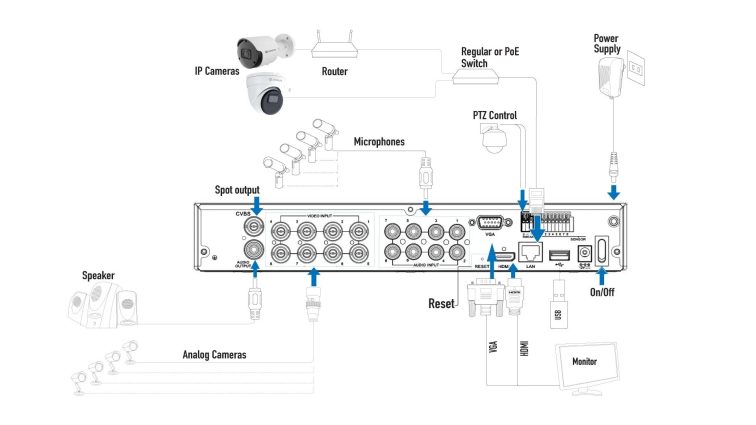
Camius Trivault DVR recorders are designed to support analog security cameras via coaxial wiring and IP cameras over the Network. To add an IP camera to Camius DVR, you’d need to add PoE cameras to your local Network. Then, connect a regular network or PoE switch to the LAN port of the Camius DVR. Based on the example of a Camius 16-channel DVR, the connecting diagram illustrates this process. This system allows users to quickly and seamlessly integrate analog and IP cameras, providing greater flexibility in security camera selection.
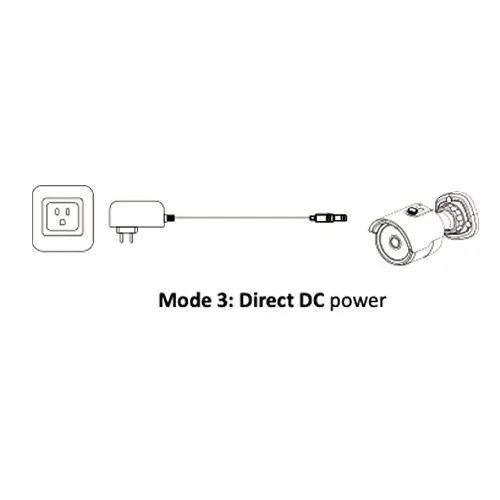
If you are not using a PoE (power-over-ethernet) switch or a PoE injector, you can power the IP camera by connecting a UL-listed 12VDC-2AMP power supply to the DC plug on the camera and an ethernet cable between the IP camera and the router or switch on your local network.

Camius TRIVAULT4K2168R Connection Diagram
Camius TRIVAULT4K184R, TRIVAULT4K184R2 Connection Diagram
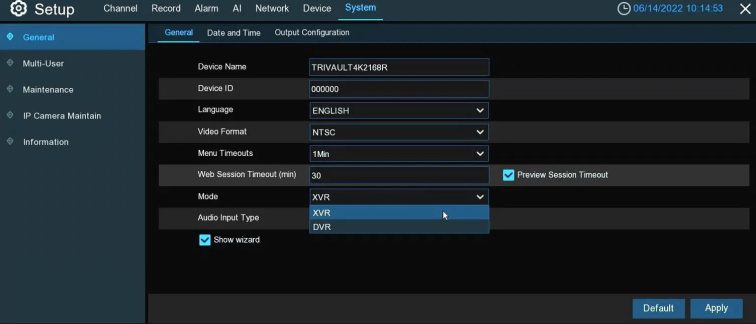
Navigate to the DVR’s Menu >> System >> General >> Mode >> Set to XVR and Apply.
Wait 1 to 2 minutes for the surveillance DVR to reboot in a hybrid XVR mode. This switch will reset the Configuration and Password.
There are a few ways to add IP cameras to the DVR, and we will describe them below.
Adding IP Cameras in the Start Wizard
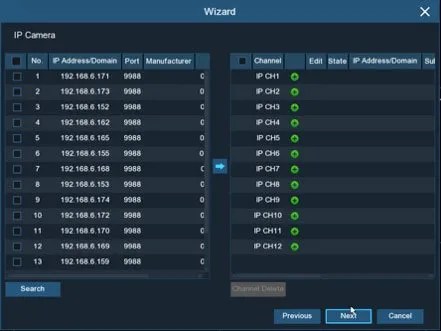
While in the Start Wizard, navigate to the Network>> Date/Time >> IP Cameras.
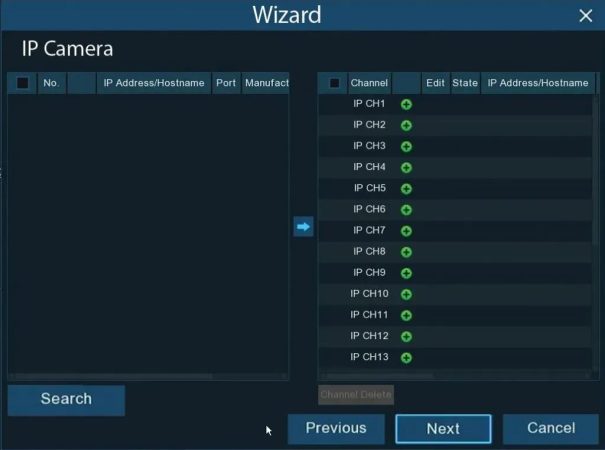
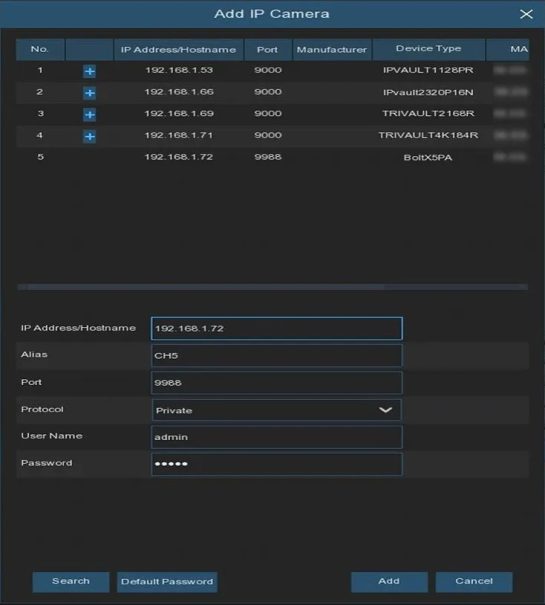
Click the Search button to add compatible IP cameras on your local Network. Next, select the IP camera(s) you want to add, and then click the arrow icon to add them to the DVR, followed by the Next button.
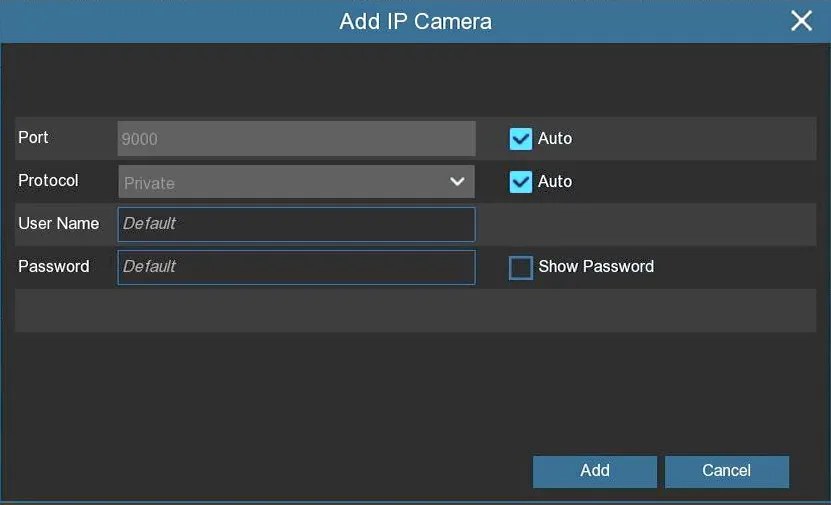
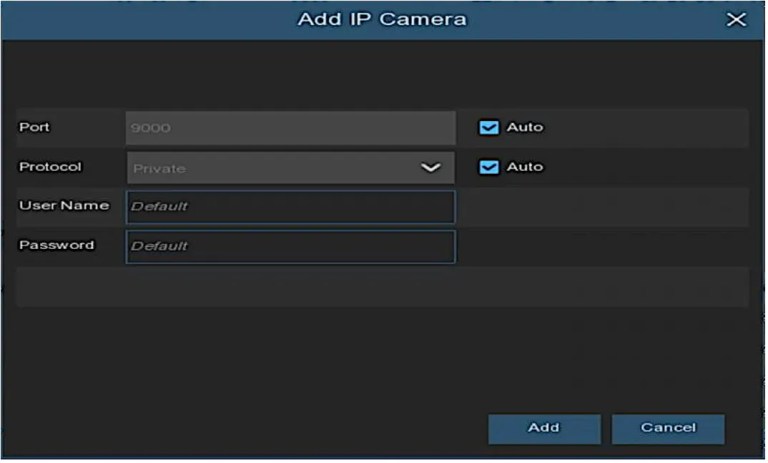
Select the suitable Protocol from the dropdown (Private is for Camius IP cameras), enter the IP camera(s) credentials (User Name and Password), and click Add. Green status indicates a successful connection; grey status could show a password or network error.
Adding an IP camera while in the DVR’s Setup Menu
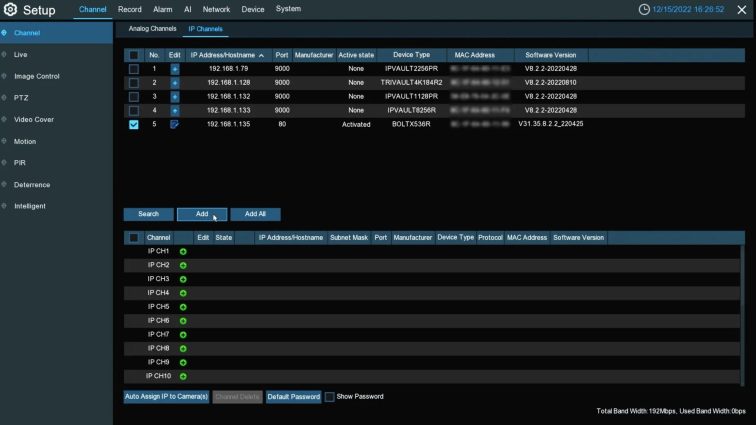
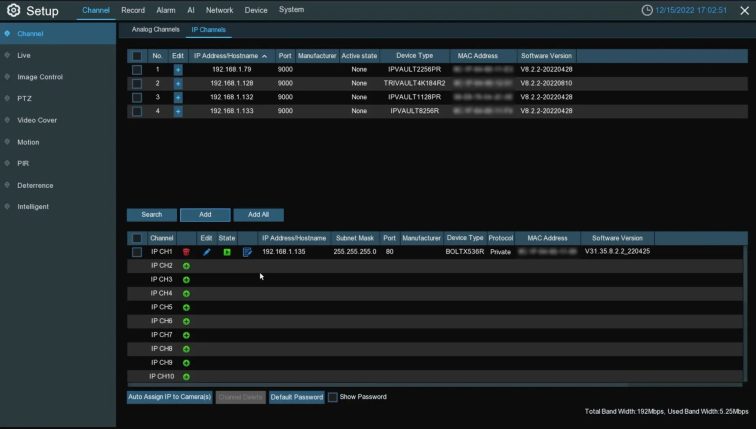
If you add IP cameras to DVR’s menu, navigate to Channel >> IP Channels.
Select the IP camera you wish to add, click the ‘Add‘ tab or use a plus button.
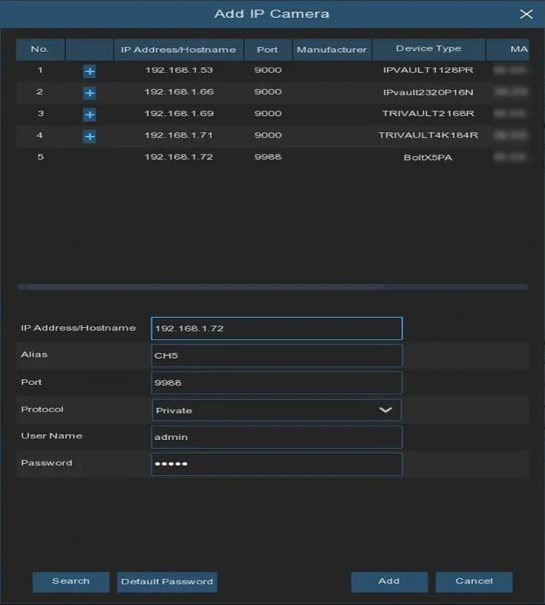
The ‘Add IP camera‘ window will pop up with IP camera details.
How to add IP Camera to Camius DVR (Advanced Security XVR) 21
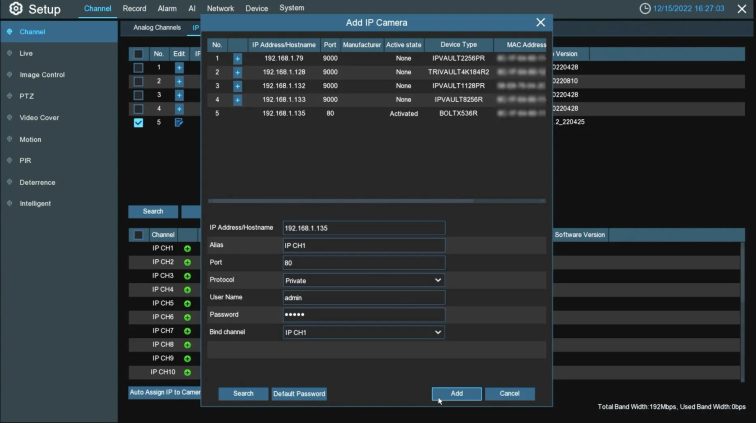
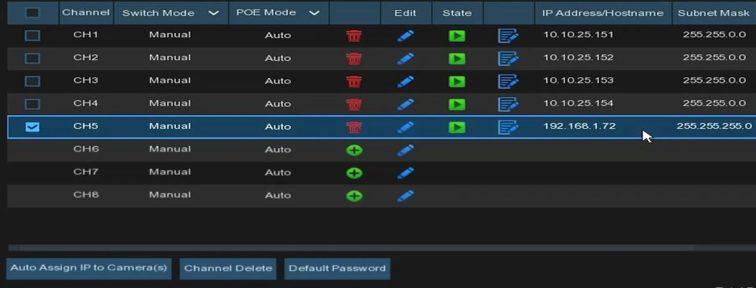
Once the IP camera is added to the DVR, it will appear under the IP channel list. The green state means the camera has been added successfully. A grey color state means the IP camera needs attention, and when you click on the state icon, it will indicate if the error is caused by a wrong IP camera username/password or if it has a network issue.
To avoid network issues, make sure that your camera, DVR, and router are on the same IP address segment, e.g.
How to add IP Camera to Camius DVR (Advanced Security XVR) 22
Using the Camius XVR system, users can quickly and seamlessly integrate analog and IP cameras, providing greater flexibility in security camera selection. In addition, Camius Hybrid 8-Channel DVR recorders support up to 12 and 16-channel DVRs and up to 24 HD cameras, making a scalable solution for residential and commercial surveillance needs.
It is important to note that the cameras’ quality will significantly impact the system’s overall performance and effectiveness. Of course, high-quality cameras will provide better images, enabling more effective monitoring and surveillance, but also, Camius IP cameras offer intelligent motion, sound, and AI detection. Other manufacturers’ IP cameras are usually limited to basic video motion detection.
How to install a hard drive in a Camius DVR or NVR?
Installing a hard drive in a DVR (digital video recorder) or an NVR (network video recorder) (DVR NVR for short) is a relatively straightforward process. Still, it is essential to follow the steps carefully to ensure proper installation and prevent damage to the equipment. Here is a step-by-step guide on how to install a hard drive in your surveillance DVR or NVR recorder.
Camius network and hybrid digital video recorders accept 3.5″ and 2.5″ SSD internal hard drive disks. While 8 channel DVR and NVR recorders accept a single hard drive up to 10 TB in capacity, 16-channel DVR and NVR recording, along with 32-channel NVR will support a 14TB hard drive on each SATA port.
Visit this link to see the tested and recommended hard drives, CLICK HERE
1 – Gather Tools and Equipment
You will need a Phillips head screwdriver, the hard drive you want to install, and any necessary screws (when you order a DVR or NVR from Camius without a pre-installed hard drive, the product box will include a set of screws for the hard drive disk installation).
2 – IMPORTANT: Make sure your DVR / NVR is unplugged and powered off
3 – Removing the Top Cover or the Video Recorder
Remove any screws from the Recorder’s top cover (chassis) using a Philips head screwdriver. Carefully remove the top chassis and set it aside (picture 1)

Picture 1 – 8 channel DVR
4 – Insert the Hard Drive
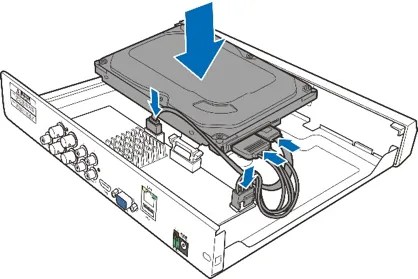
Place the hard drive into the hard drive bay, ensuring the drive is oriented correctly and appropriately seated.
5 – Connect the SATA Data and Power Cables
Connect the Data and Power cables to the two hard disk drives and place the hard disk drives on the video recorder’s case. The Data cable connects the hard drive to the DVR NVR’s motherboard. Locate the SATA port on the DVR’s motherboard and connect one end of the SATA cable to it. Then, connect the other end of the cable to the hard drive. The SATA Power cable provides power to the hard drive. Locate the SATA Power cable and connect one end to the hard drive and another to the Power Supply (pictures 2 and 3)
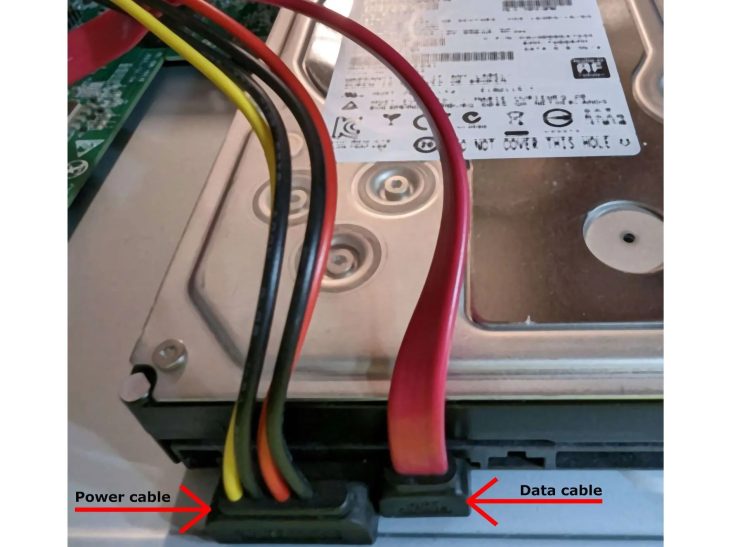
Picture 2 – Power and Data Cables on the Hard Drive
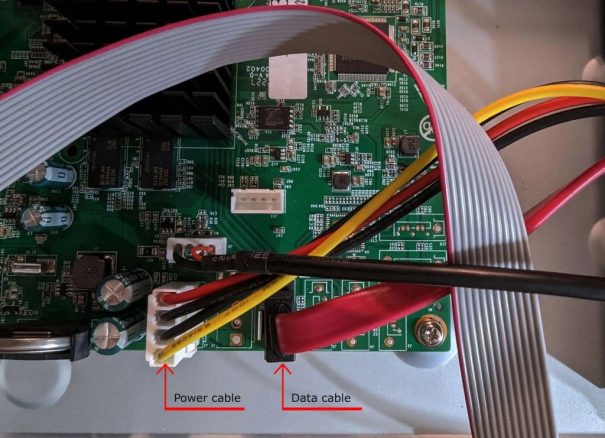
Picture 3 – Power and Data Cables on the DVR or NVR recorder’s board
Read Also : LaView NVR setup and user guide
6 – Secure the hard drive with srews
Carefully flip the video recorder case and secure the hard disk drives to the recorder with the four (4) screws if it is one SATA HDD (pictures 4 and 5) and eight (8) screws for the 2 SATA HDDs (picture 6)
Picture 4 – DVR with one internal SATA bay
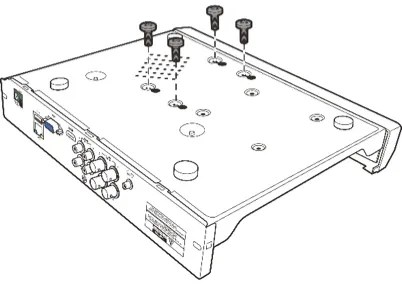
Picture 5 – DVR with one internal SATA bay
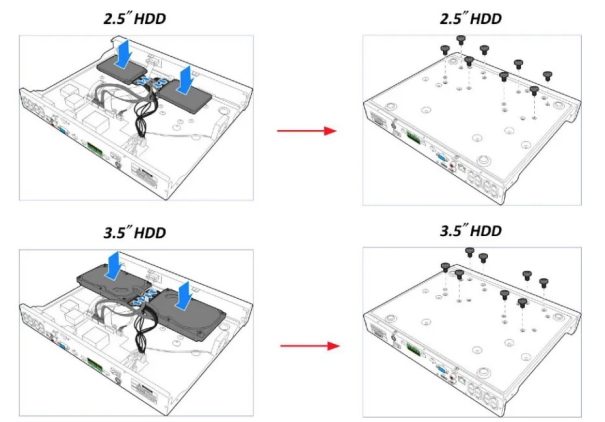
Picture 6 – NVR with two internal SATA bays
7 – Return the DVR NVR top cover
Place the top cover on the DVR NVR and secure it with the screws (picture 7)
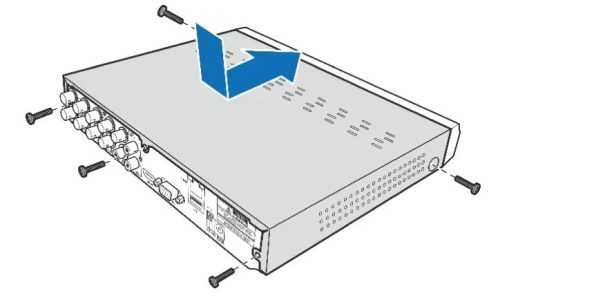
Picture 7 – DVR with one internal SATA bay
8 – Power on the DVR NVR
Power on the DVR NVR and allow it to boot up completely. If the hard drive was installed correctly and is in working condition, it should be recognized by the DVR and ready for use. Remember to format the hard drive (here is the guide on how to format the hard drive). Ensure that you use the power supply with the Camius video recorder.
IMPORTANT: Some users may find an issue when the hard drive is not recognized or not showing on the DVR. One of the primary reasons could be a wrong or defective recorder’s power supply.
That’s it! Your DVR NVR should now have a new hard drive installed, allowing it to store more video footage. Follow these steps carefully and seek additional assistance if you encounter any difficulties.
How to adjust my DVR NVR monitor resolution?
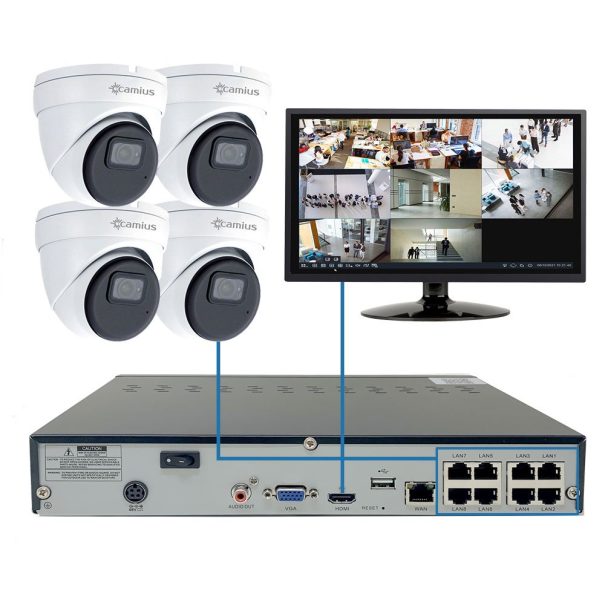
Camius video surveillance DVR NVR camera recorders have HDMI and VGA video output to live video feed on your monitor.
VGA output supports a max resolution of 1080p, while the HDMI video output 4K video resolution. So if the monitor you use with the Camius DVR or NVR recorder is capable of 4K and the camera, you can view live videos in 4K.
TRIVAULT4K2168R
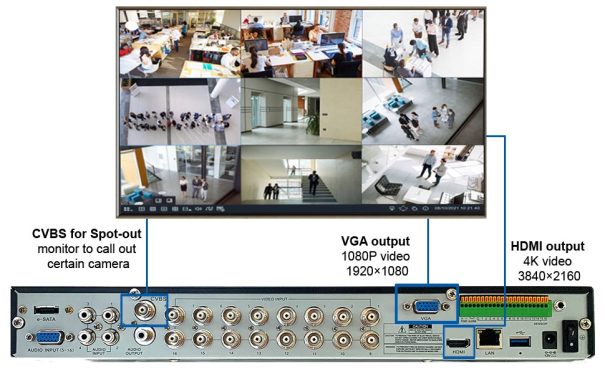
How to adjust my DVR NVR monitor resolution? 19
IPVAULT1128PR
Two ways to adjust the DVR NVR monitor resolution
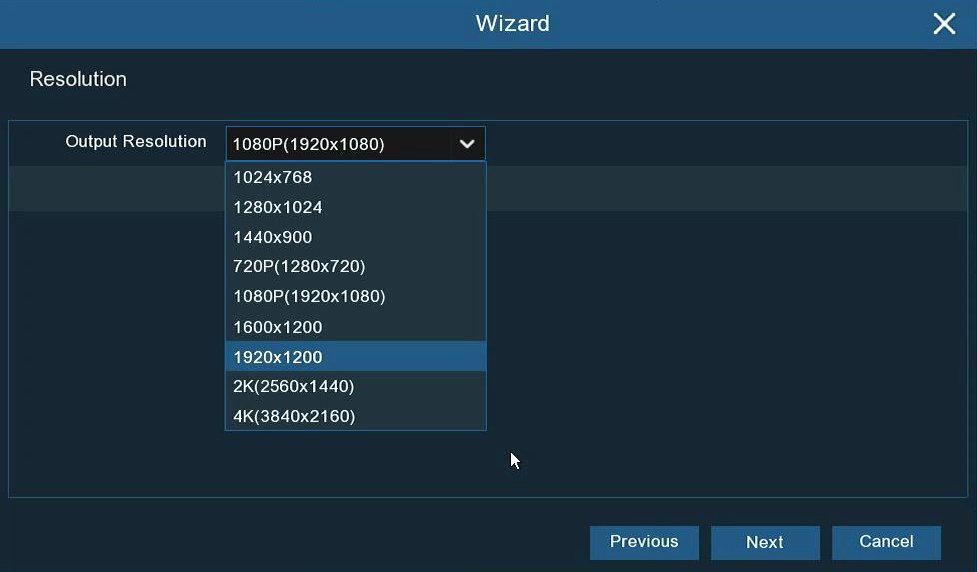
You can adjust the DVR NVR monitor resolution in the Wizard Setup mode or by navigating to Setup >> System >> General >> Output Configuration.
While in ‘Wizard Setup’ mode, choose an output resolution that matches your monitor. The DVR should adjust the output resolution automatically to match the best resolution of your monitor at the system startup.
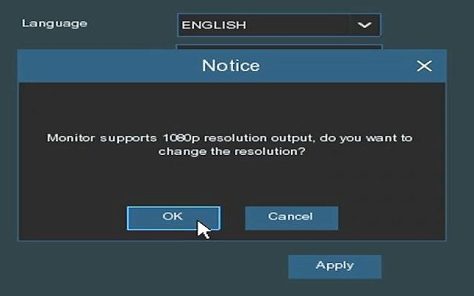
Please note that some legacy monitors could fail to communicate their acceptable resolution. In this case, please manually plug the video surveillance DVR into a newer monitor and change the resolution to the lowest setting, then save and plug the older monitor back to see if it’s supported.
After completing the Start Wizard, you can further adjust the Display Output Resolution using the following Menu Path: Setup – System – General – Output Configuration.
Select the output resolution suitable for your TV/Monitor. 1080P(1920 x 1080) will suit most monitors. If your DVR supports 4K output resolution, you can select either 2K (2560 x 1440) or 4K (3840 x 2160) to take advantage of the higher resolution that your 4K TV provides.
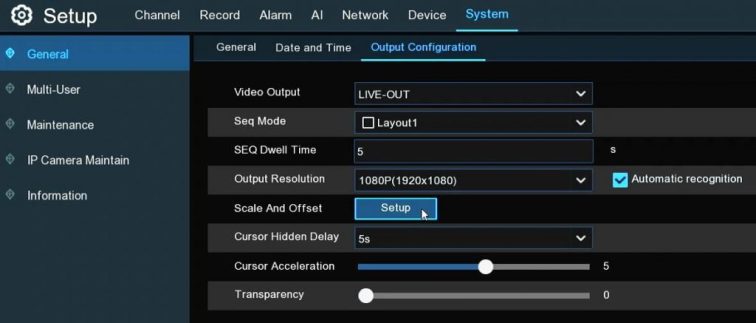
You can also adjust the size & position of the display screen to match your monitor/TV by using the ‘Scale and Offset’ feature; click the tab ‘Setup,’ which allows you to:

Click once or long-press the left button of your mouse on the arrow to adjust the size and position, or you can scroll the supplied USB mouse’s wheel to adjust. Click the right button of your mouse to exit, and click Apply to save your modifications.
How to reset the DVR and NVR video recorder to default factory settings
To reset DVR or NVR to default settings, navigate to the left bottom of the screen to the main menu. Select Setup >> System >> Maintenance >> Load Default
Here you can select the setting you wish to set to default. If you do not wish to reset the password, do not check the System boxes. Please note Load Default settings do not format your hard drive.
You’d need to enter the system password in the Authentication pop-up window (picture 1), which will lead to restarting your recorder (picture 2).
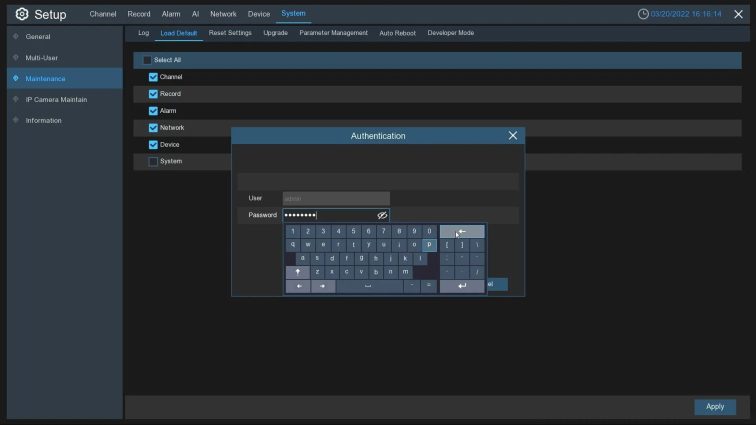
Picture 1
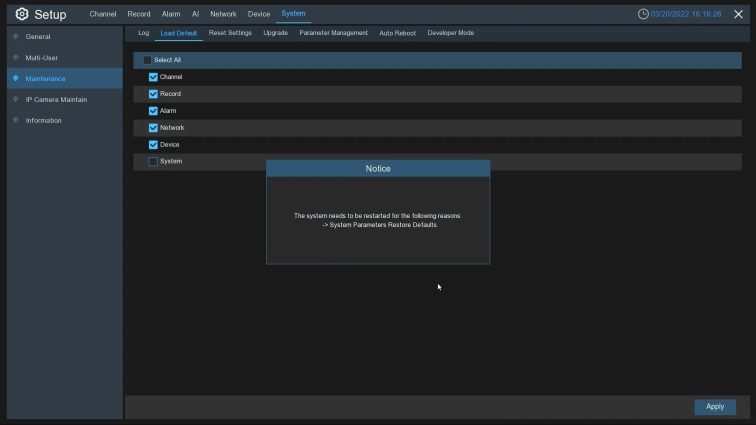
Picture 2
Navigate to Setup >> System >> Maintenance >> Reset Settings (Picture 3), where you can not select settings to reset so that it will reset your system completely, including the login credentials. You can choose ‘Format HDD‘ if you wish to format your hard drive, leading to erasing any recorded footage.

Picture 3
How to change your DVR and NVR password and add a user
You can update the ‘admin’ password by clicking the ‘User Edit’ button. You will need the admin’s current password to authenticate the new password.

Camius NVR and DVR recorder have an advanced user management feature to add multiple users to the system and control their permissions. System administration (admin) can add users, edit their permissions and delete them.
Navigate to the Main Menu in the bottom left corner, select System >> Multi-User (picture 1)
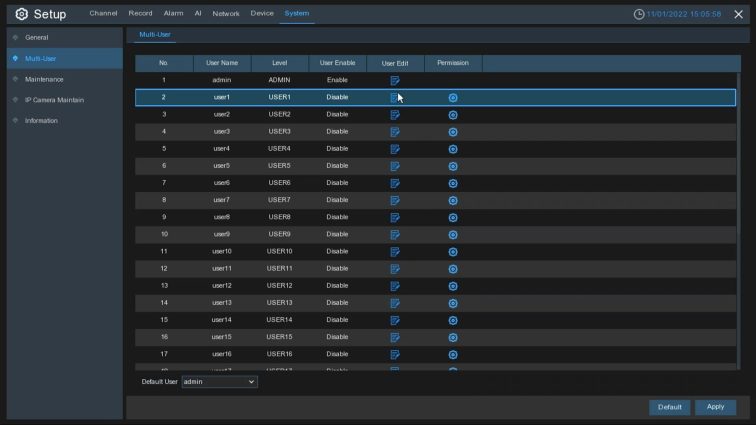
Picture 1
How to add a user to Camius NVR or DVR recorder 15
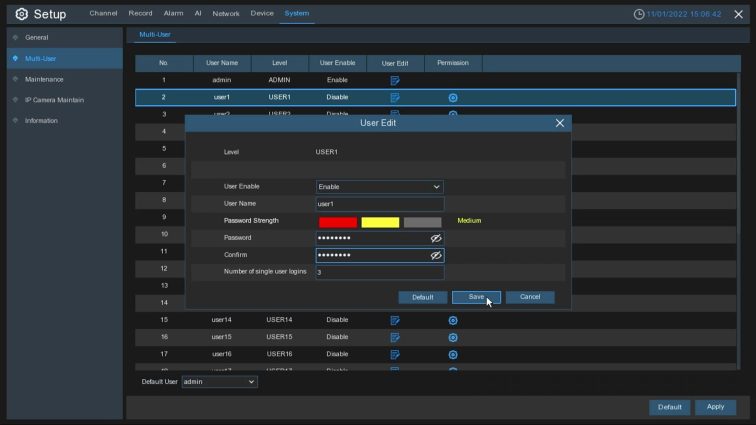
Click on the Edit icon in the User Edit column and select ‘Enable‘ in the User Enable tab. You can change the User Name or keep it as ‘user1‘. Create the new user password, confirm it, and click on the ‘Save‘ tab (pictures 2 and 3)
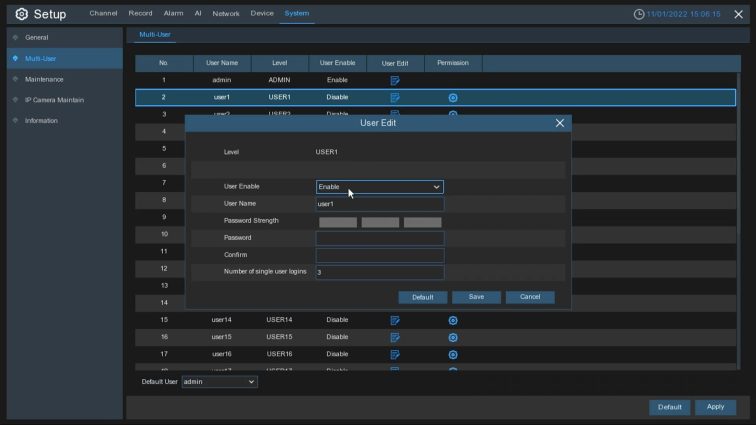
Picture 2
Picture 3
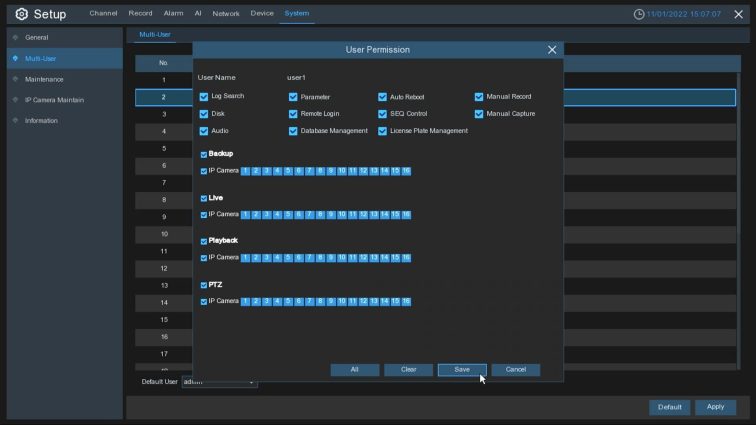
Then click the gear icon in the last Permission column to open the User Permission dialogue. Select (tick checkbox) the permissions you wish to grant to the new user. Click Save (picture 4)
Picture 4
How to troubleshoot if my DVR is not powering on?
If you’re having trouble with your DVR not powering on, here are some recommended troubleshooting steps:
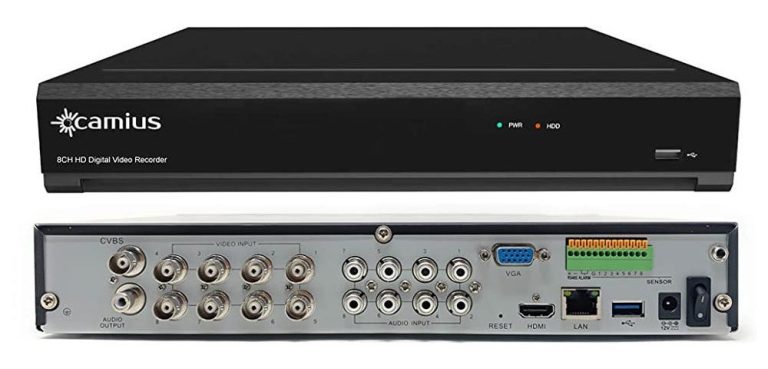
Step 1 – Check the LEDs on the front panel, a steady green LED (PWR) means your DVR is powered on normally, and a blinking red LED (HDD) means ongoing recording on the hard drive.
8 channel DVR
16 channel DVR
Step 2 – Check the sounds coming out of your recorder. A faint fan sound and a faint hard drive sound are normal, and a click sound when you plug in the DC connector and turn on the switch is typical.
Step 3 – If you have the green LED on but no output on the monitor, follow these steps:
Step 4 – Check the power outlet and the power supply unit of the DVR. If the power supply doesn’t have any LED indicator or the LED light is very faint and not bright green, and there is no fan sound coming from the DVR, the power supply may need replacement. If your DVR has running hardware warranty, please contact us. If the DVR is covered with warranty, you can order a new power supply on Camius site.
Why can’t I access my Camius IP cameras, DVR, and NVR on my Camius View app?
If you can not access your Camius IP cameras, DVR (digital video recorder), or NVR (network video recorder) on the Camius View smartphone app, please check the below:
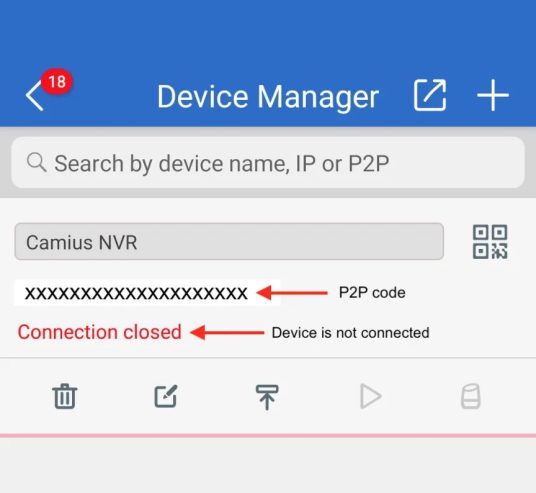
1 – Check if you are using the latest version of the Camius View app
On the App’s ‘Devices‘ page, make sure your recorder is added using P2P (ID) instead of IP (IP Address), and if in doubt, delete it and add it again.
In the Media Port, make sure to enter the right port number:
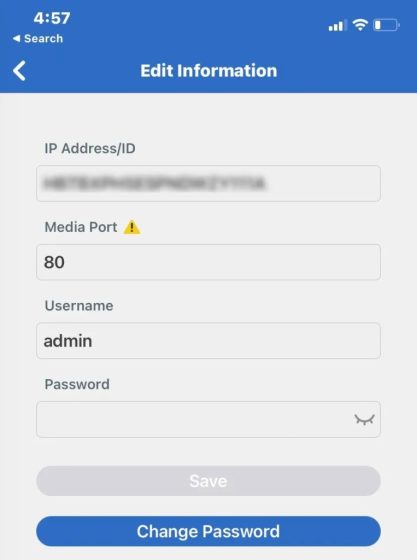
2 – Make sure you’re connected to a reliable network on your phone
3 – Check if your Camius IP camera or recorder is connected correctly to the LAN (Local network).
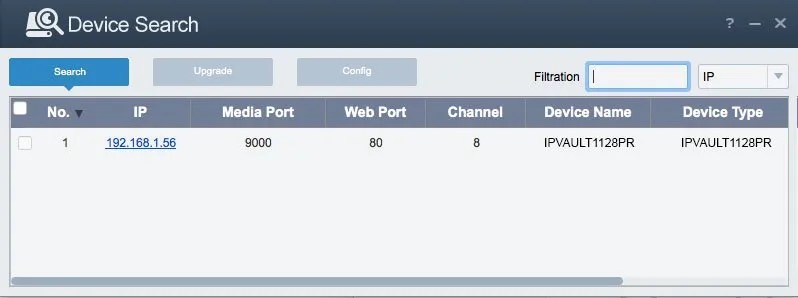
4 – Check for the IP address conflict
5 – Reset the Network settings of your Camius device
Navigate to Setup >> System >> Maintenance >> Load Default >> check the Network box and Apply
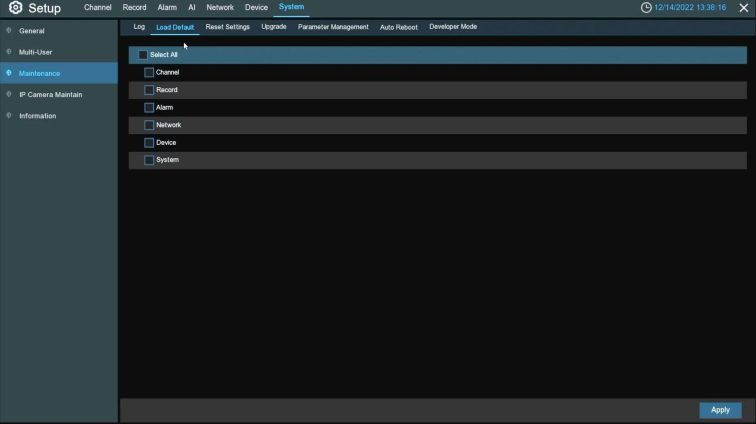
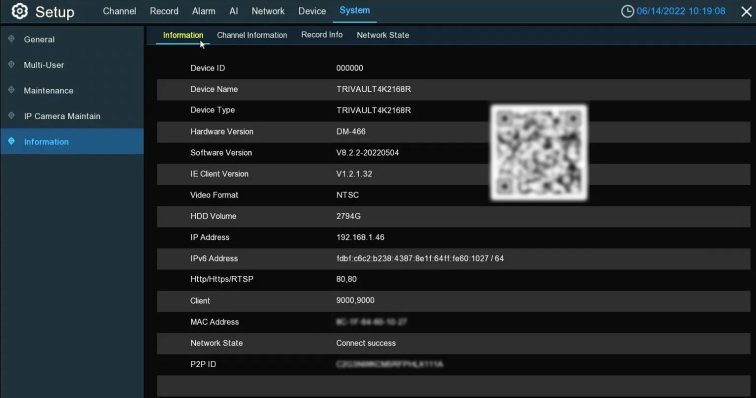
Camius Trivault DVR (local interface via HDMI)
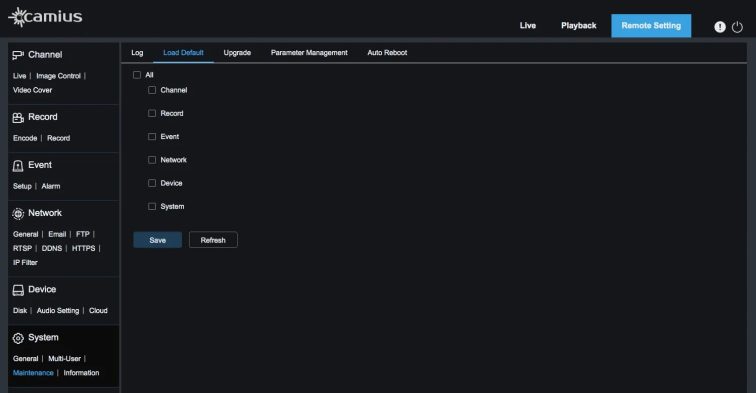
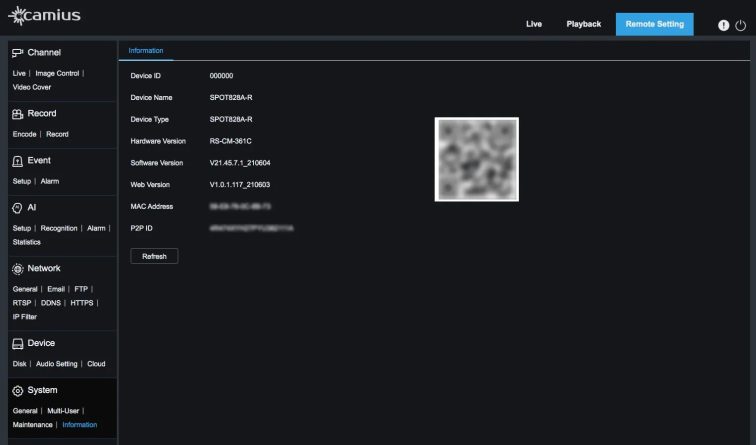
Web browser view
6 – Check the Camius device network status
Navigate to Setup >> System >> Information and check the Network Status if it shows ‘Connect success’.
If the above steps don’t help, submit a support request and include the device model number and the current ’Firmware/Software Version,’ which can be found using the Camius Device Config Tool
HDMI interface: DVR / NVR information is available under Setup >> System >> Information
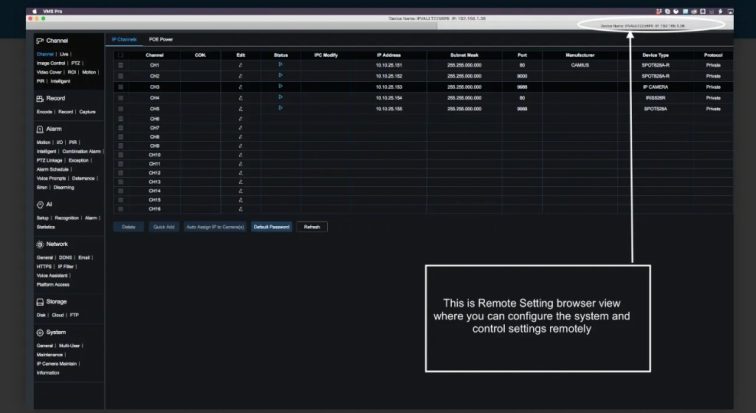
Web browser view: information is available under Remote Setting >> System >> Information (web browser view)
7 – Wrong Password
Before you add the Camius security device to the app, make sure to set a password following the below setup guides:
We got you if you lost your IP camera or DVR NVR recorders password. Follow the below links on how to reset your device password:
You can not set a password on your Camius device using the Camius View app.
Can I install an SSD hard drive instead of a regular one on my Camius DVR and NVR?
The answer is ‘Yes.’
Camius recorders are compatible with 3.5″ and 2.5″ SATA (Serial Advanced Technology Attachment) and SSD hard drives (Sold-State Drive).
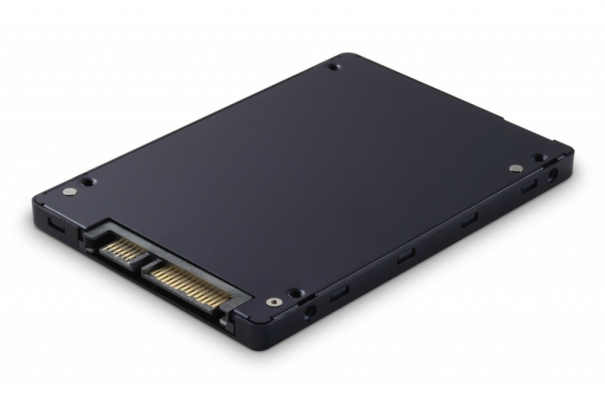
Can I install an SSD hard drive instead of a regular one on my Camius DVR and NVR? 3
How to disable menu logout on the DVR and NVR?
Certain Camius device users prefer to remain logged into the menu of their DVR or NVR without re-entering their login credentials unless necessary. To achieve this, you can follow the steps outlined in this guide.
Move the mouse cursor to the bottom left, and click the main menu button: Setup >> System >> General >> Menu Timeouts >> Off >> Apply.
Optionally, you can set a different time for menu log-out as well. This guide applies to Camius NVR and DVR recorders.
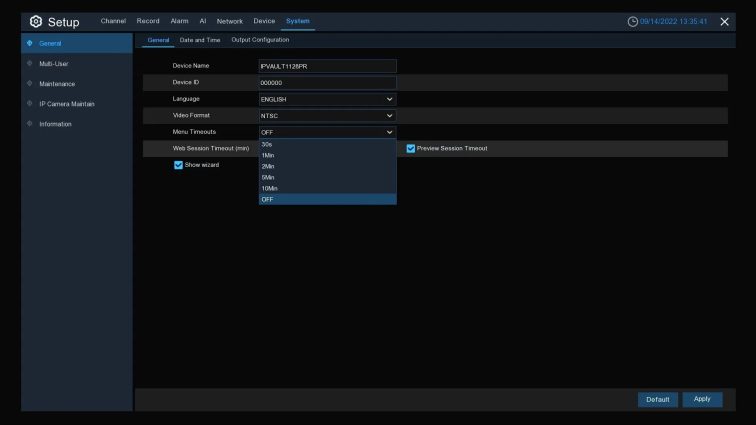
It’s important to note that the web browsers will log you out of the session after some time (even if you set the number of sessions), as this function is implemented by the web browsers to enhance security.
To assist you in managing your login details more conveniently, consider using a password manager such as LastPass or similar services with browser extensions available. These services can help you securely store your login information (such as IP address, username, and password) and provide easy access even after your browser session expires.
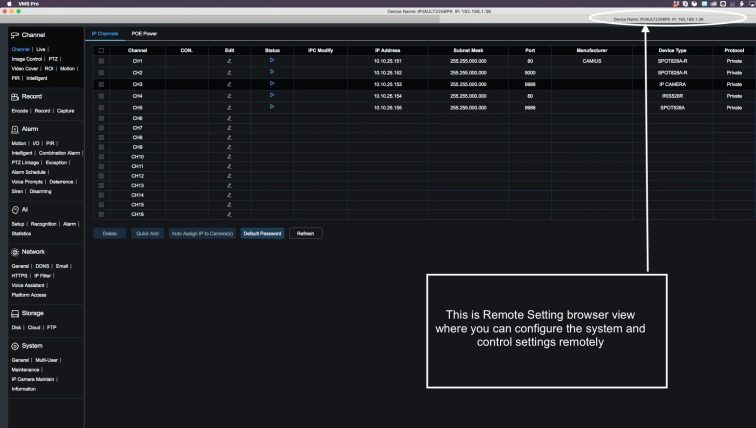
You can also use VMS software on your desktop to add the DVR using a P2P ID and access the DVR’s ‘Remote Setting’ within the VMS; follow this guide on how to add the DVR to the software.
How to add IP cameras on a network that are not connected directly to the NVR’s PoE ports?
For the PoE-enabled NVR, connect Camius IP cameras via the internal NVR’s PoE ports and/or external LAN (WAN) port using the below-described model 2 or 3:
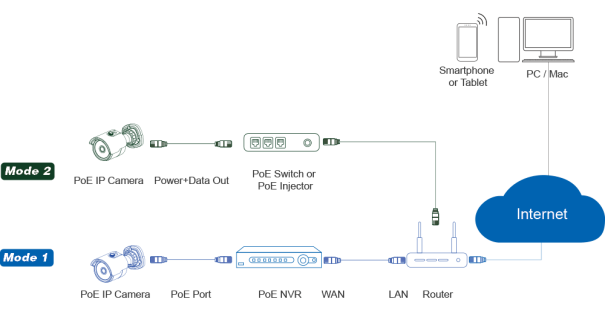
Camius PoE NVR is optimized for Camius PoE cameras making the whole setup process plug-and-play; the NVR assign a unique IP address to each Camius PoE camera and adds them automatically.
NOTE: Connecting multiple cameras via a switch or router to the PoE port is not recommended. One PoE port supports one IP camera.
The below steps are based on the NVR’s local interface via HDMI video output. Navigate the mouse to the screen’s left bottom corner and click on Setup, followed by Channel >> IP Channels.
In the below menu, you configure the connection of wired IP cameras.
Click Search to search for IP cameras from a local network, click Add to add an individual IP camera, and click Add All to add all IP cameras.
Below we will describe a few ways to add IP cameras from a local network using an external LAN (WAN) port.
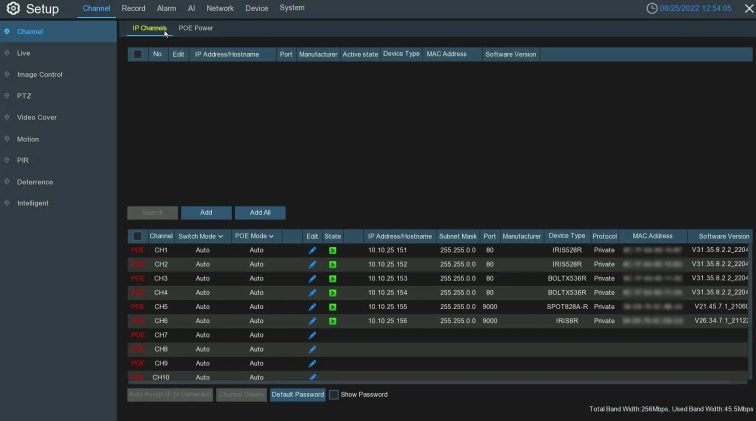
IP channels menu description:
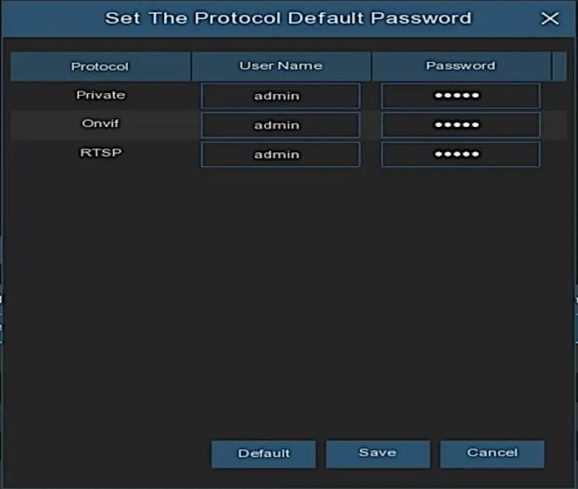
Select the suitable Protocol from the dropdown (Private is for Camius IP cameras), enter the IP camera(s) credentials (User Name and Password), and click Add. Green status indicates a successful connection; grey status could show a password or network error.
Green color State means the camera is added to the NVR

Grey color state icon means the IP camera failed to connect to the NVR. Click the gray icon to show the failure reason:
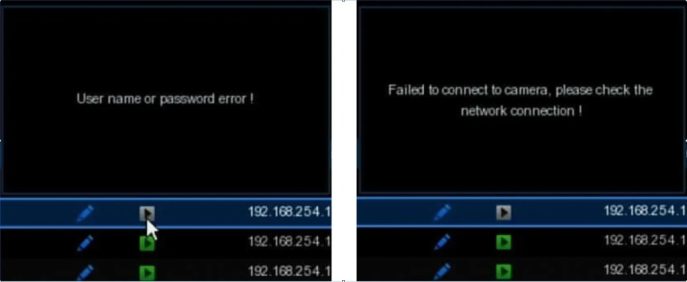
Option 1 – Adding IP Cameras to the NVR within the LAN (local area network )
If you want to connect to an IP camera from LAN (Local Area Network), please make sure your NVR is well-connected to the LAN and the IP camera you want to add is in the same network segment as your NVR.
If you want to add all channels manually, click the dropdown arrow next to Switch Mode and select “Manual.”
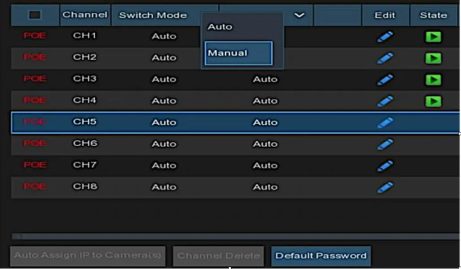
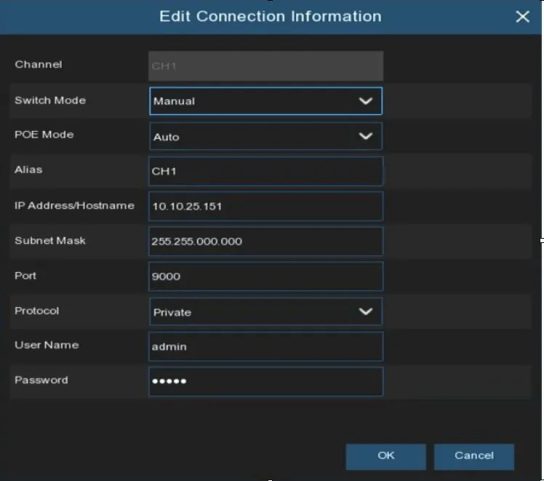
If you want to add an individual channel manually, click the Edit Pencil-shaped icon in the Channel list, and then click the drop-down arrow next to Switch Mode to select “Manual” and click OK to save.
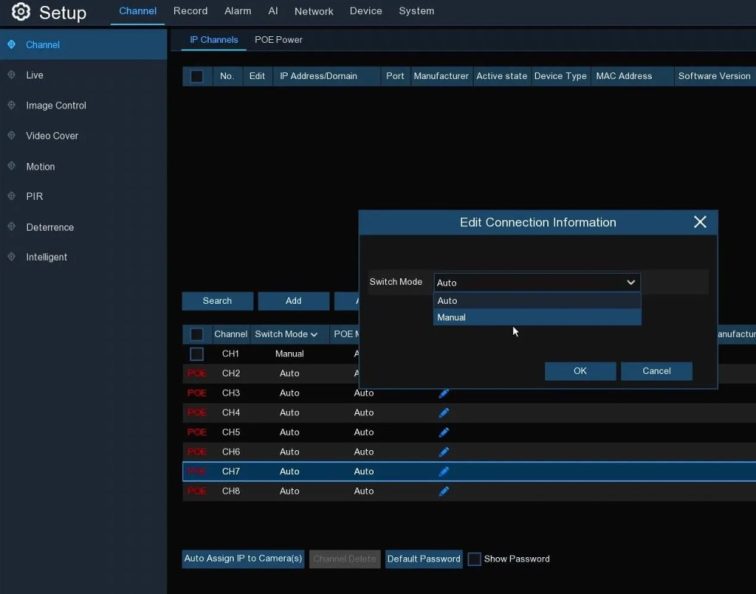
Option 2 – Adding an individual IP camera in the LAN (Local Network area)
STEP 1- Click the Search button; all available cameras in the LAN will be displayed,
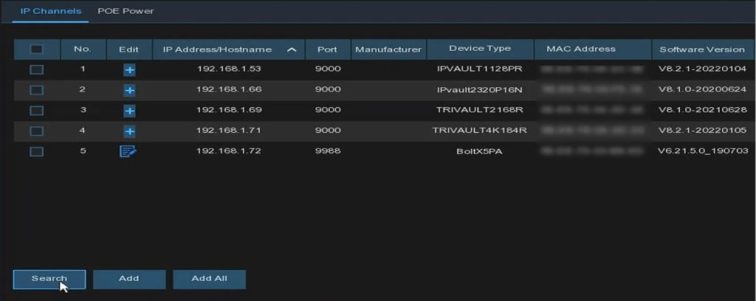
Optionally you click the Add plus-shaped green icon in the IP channels list to add a camera to an individual channel. Click the Search button to show all available cameras in the LAN.

STEP 2 – Select the camera you want to add and then click Add button. Next, insert the user name and password of the camera and click Add button.
STEP 3 – You will see the added camera in the IP channels list

Option 3 – Add Multiple IP Cameras within the LAN
STEP 1- Click the Search button to display all available cameras in the LAN click Add All button, and the NVR will search & add all available cameras in the LAN.
STEP 2 – Select the cameras from the search result and click “Add.” You would need to input the username and password of the cameras. Please ensure all the cameras you want to add use the same username and password. Otherwise, the cameras with different user names and passwords cannot connect.
STEP 3 – The added cameras will show up in the channel list.
Option 4 – Add IP Cameras from another NVR in the same LAN (Local Area Network)
The NVR allows adding IP cameras from other Camius NVRs in the local network.
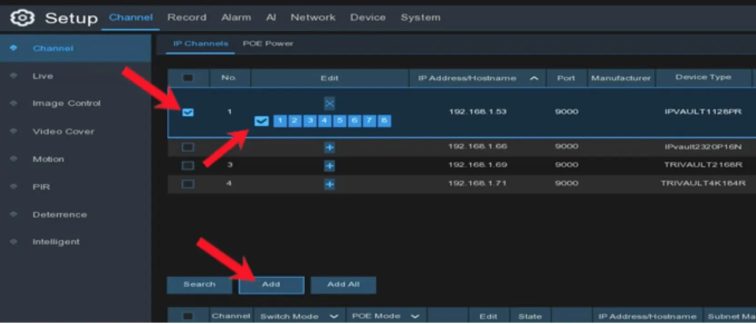
STEP 1 – Click the Search button to display all available devices in the LAN. There is an Edit icon (blue plus) if the device is an NVR.

STEP 2 – Click the Edit icon (blue plus) and select the camera channels one by one or check the box to select all cameras. Click the icon X to go back to the Search list.

STEP 3 – Select the NVR in the search list and click the Add button.
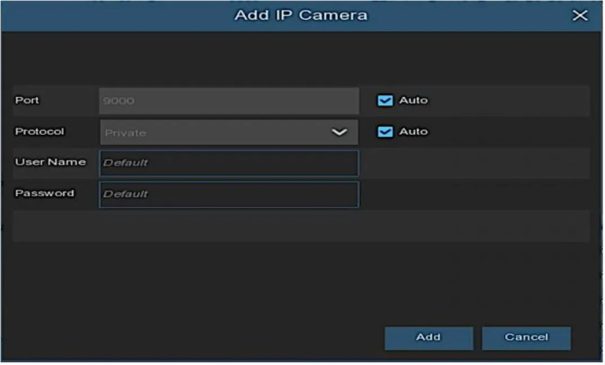
STEP 4 – Input the Username and Password of the NVR and then click Add button
STEP 5 – The added cameras will be displayed in the channel list

Option 5 – Add IP Cameras from the Internet
If your NVR is connected to the Internet, you can add cameras with a WAN (Wide Area Network) IP address.
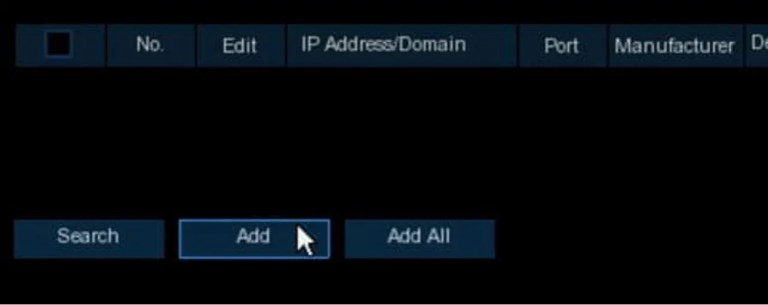
STEP 1 – Click Add button on the search page.
STEP 2 – Input the IP address or Domain name, Alias (name of the IP camera), Port, Protocol (choose the protocol of the IP camera from the dropdown menu: Private, Onvif or RTSP), User Name & Password of the IP camera.Tap the Add button to add the camera.
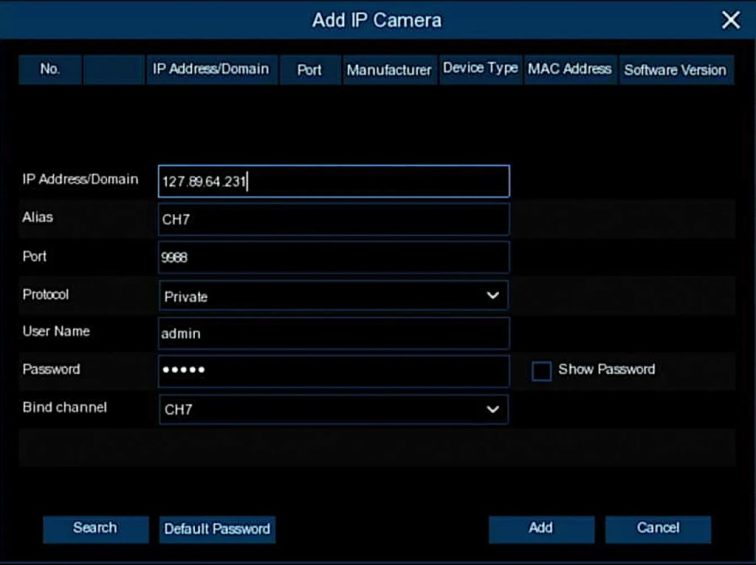
To avoid network issues, make sure that your camera, NVR, and router are on the same IP address segment, e.g.
How to configure Camius NVR using a web browser?
To quickly find the Camius DVR (digital video recorder) or NVR (network video recorder) IP address, visit camius.com/support to download and install the Camius Device Config Tool.
Web browser access
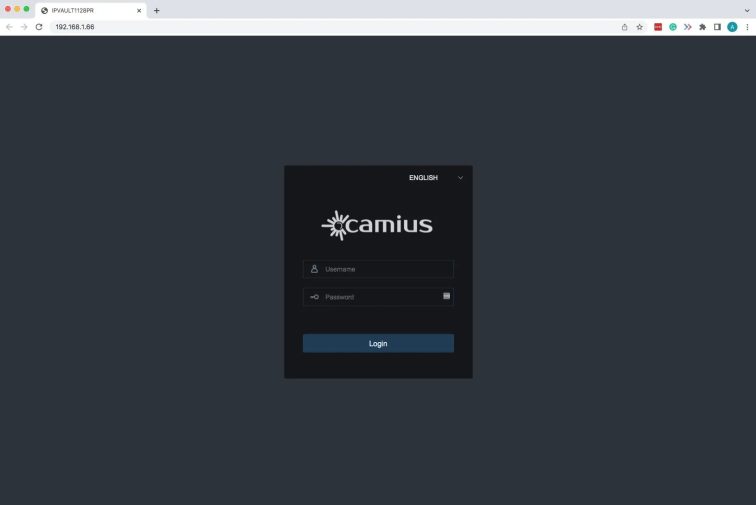
Click on the Camius NVR or DVR’s local IP or type it into your browser’s address bar. The latest Camius surveillance security camera recorders work with multiple web browsers, including Edge, Google Chrome, Mozilla Firefox, Edge, and Safari, and include the following models:
Use your admin username and DVR or NVR password to log in. Your recorder’s Configuration is under Remote Settings.

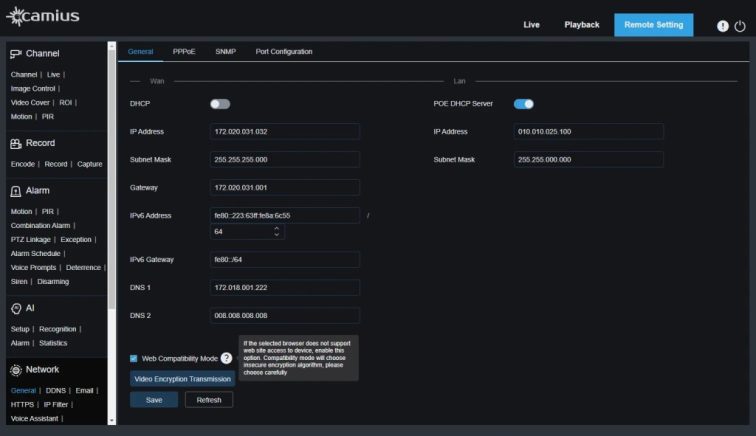
You can check the ‘Web Compatibility Mode‘ in the Camius NVR/DVR and even IP camera settings (this can be done from the Camius recorder’s local user interface (Via HDMI/VGA) and in the web browser viewer.
The below picture is based on the IPVAULT1128PR’s web browser view
Accessing web client through VMS software
For certain Camius DVRs, NVRs, and IP camera models, we recommend installing the VMS Software on your Windows or Mac computer to access the device’s remote settings since the VMS software has a built-in web client using the P2P ID. Here is the link to the guide on how to add the device to the VMS software. This applies to Camius IPVAULT2320P16N, SCOUT20PTZ, GUARDMA
