LaView NVR setup and user guide, No, unfortunately each port on the back of the NVR is only designed for 1 camera. This will only allow about 2 cameras to show up. To use a switch, you’ll have to connect the switch to the same router that the NVR is connected to. Then you’ll proceed to setup the cameras over the network. Please see the Adding cameras over the network FAQ.
Can I add cameras over the network?
Yes, you can add cameras over the network, they do not have to always be connected directly to the NVR. You can use a switch on the network that connected to the same router as your NVR. Please follow these steps to set this up:
Log into the NVR and go to Camera>Camera Management, click on Manual Add, and enter the IP information for the camera. Use the default username: admin password: 123456
Can I connect all the cameras to a switch, then the switch to one of the NVR ports?
No, unfortunately each port on the back of the NVR is only designed for 1 camera. This will only allow about 2 cameras to show up. To use a switch, you’ll have to connect the switch to the same router that the NVR is connected to. Then you’ll proceed to setup the cameras over the network. Please see the Adding cameras over the network FAQ.
Can I use my PC to view my cameras remotely?
Yes, you can use your external IP address to view your cameras and manipulate configuration via Web Browser. Our plug in will only work on Internet Explorer or Mozilla Firefox. Once one of those browsers are open, type in your external IP address in the URL bar. If the port forwarding is done correctly, it should bring you to your NVR log in page. Log in using the same credentials as you would directly on the system. After you’re logged in, click the link to download and install the plug in. Restart the browser and click the “All Main” button on the left-hand side, and it should bring up your camera streams.
LaView NVR setup and user guide
Read Also : LaView DVR User Guide
Can I use port forwarding to setup remote viewing for my NVR?
Yes, you can setup your system via port forwarding. Although, this setup is recommended for more advanced users. You will need to note the IP Address of the NVR/DVR. To obtain this, go to Main Menu>Maintenance>System Info>Network, your IP address will be the IPv4 address at the top. Then you’ll need to log into your router via web browser on a PC. Once logged in, you’ll need to add ports 80, 8000, and 554 to the port forwarding rules. For help with port forwarding for your router, contact the manufacturer or your ISP. There are also guides for a lot of various models of routers here https://portforward.com.
The port forwarding setup should look something like this:
Application Start End Protocol IP Address
DVR1 80 80 TCP 192.168.x.x.
DVR2 8000 8000 TCP 192.168.x.x.
DVR3 554 554 TCP 192.168.x.x.
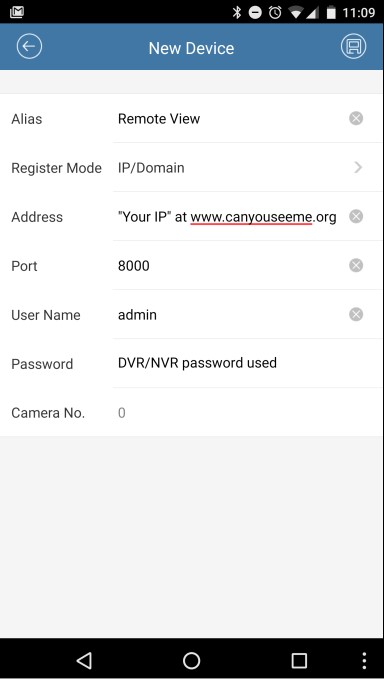
To make sure test the ports on www.canyouseeme.org, and if they are open you can add the information to your phone app.
LaView Net App Setup:
*Make sure Wi-Fi is off on the phone when attempting the remote view.
How do I change the camera names on my system?
To change the camera names go to Menu>Camera Management>Advanced>Basic>IP Camera Name. In that section, you can edit the “Camera Name” Option, please click apply at the bottom before selecting another camera.
How Do I Set up Remote Viewing for My Surveillance System?
Assuming you have the IP address of the NVR/DVR, there is a 4-step process to set up remote viewing. Learn more about remote view camera set-up here.
Are There Any Cameras that Also Allow Me to Monitor the Audio as Well as the Video?
Yes, we have multiple solutions available to our clients. Here is our most popular audio camera.
Does the Surveillance System Come with All of the Wires, Switches, and Accessories I Need?
Yes. The kit comes with everything you need to install the system and begin recording immediately, including any necessary wire, PoE switch, or AC 12v adapter required for the system to operate.
How far Apart Can I Set up My Wireless Cameras?
The environment, particularly barriers such as cement walls, steel structures, or large trees, play a big role in transmission distance. A wifi camera will typically transmit well for about 150 feet outdoors and 50 feet indoors.
How do I connect my NVR to my Phone?
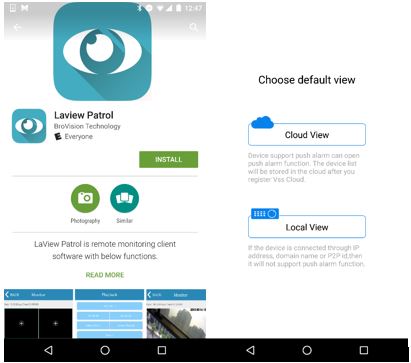
Please download and use LaView Patrol:
Note: The app set up is done on an Android device, the iPhone set up will be almost identical.
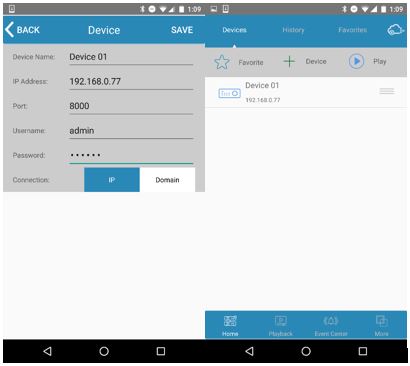
2. Click on the “BACK” button. Tap the “+ Device” option to add a device.
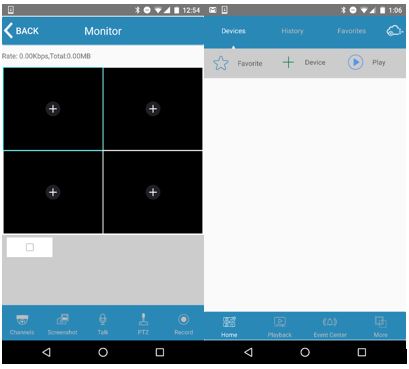
3. Enter IP address information and click “Save”. Your new device will be on the previous screen. To obtain his IP address go to Main Menu>Configuration>Network. Your IP address will be the “IP address”. (Please note: This setup will only work inside the local network. To enable remote viewing, setup port forwarding and use your WAN IP address from your network. See port forwarding instructions.)
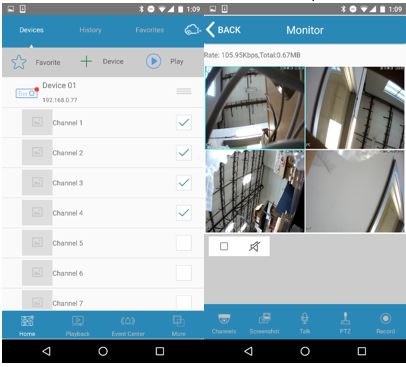
4. Select new device and choose the channels you wish to see, click the Play/Live button.
How Do I find my system’s IP address?
To find your system’s IP address go to Main Menu>Configuration>Network. The IP Address at the top is your local IP. If your IP address is 0.0.0.0 or 192.0.0.64, this means your system is offline. There are a few causes from this, but usually it’s a bad ethernet cable or the cable is not plugged in properly to either the NVR or Router. If those are checked to be correct, try restarting your router by unplugging it for a minute and restarting the DVR.
Do I Need Internet to Activate My Wireless Security Camera System?
Not exactly. You can set up your wireless security camera system without any internet at all, as this is not a requirement to begin recording. In order to access remote viewing on your mobile devices, you will need a live internet connection.
Does the Surveillance System Come with All of the Wires, Switches, and Accessories I Need?
Yes. The kit comes with everything you need to install the system and begin recording immediately, including any necessary wire, PoE switch, or AC 12v adapter required for the system to operate.
Are There Any Cameras that Also Allow Me to Monitor the Audio as Well as the Video?
Yes, we have multiple solutions available to our clients. Here is our most popular audio camera.
What are the Advantages of Installing a Wifi Security Camera System?
A wifi security camera system is significantly easier to install than a traditional system, because there is no need to run special wires to each wifi camera. This not only helps the day of installation, but also allows clients to position cameras in places they might not otherwise be able to place them.
How Do I format my HDD?
To format your HDD you’ll need to go to the Main Menu>System>Storage>Management Tab. Once in the HDD menu, highlight the HDD information. Then click on “Format” at the bottom. Please note this will delete all information off the HDD.
How do I playback my recordings?
To playback videos go to Main Menu>Playback. In that section choose your camera(s) on the right-hand side. Then double click any of the days on the calendar. This should automatically start playback for that day. Use the bar at the bottom to jump to a specific time during that day.
How Do I set up my recording schedule?
To set the recording schedule you’ll need to go to Main Menu>Configuration>Schedule>Record Plan. In that section, you’ll have access to each channel’s recording schedule. The camera’s will automatically start and stop, recording, at desired times. If you want to set up only motion recording to each camera, select “Setting” on the right-hand side for the desired day. Choose MD for Motion Detection for the day and set a desired time, if not all day. Then you can copy the schedule to other days at the bottom. Click apply then ok, then apply again. You can now click copy at the bottom and copy the schedule to other channels as well. Or choose another channel at the top to setup a different schedule.
How Do I upgrade my system’s Firmware?
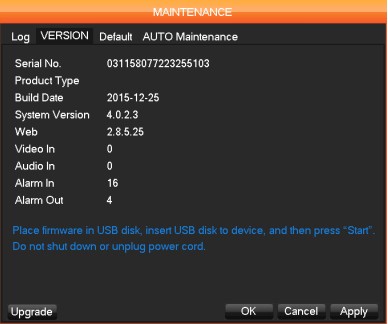
Make sure to download your firmware from our website here: https://www.laviewsecurity.com/cms/download/
Once the file is downloaded, extract the file and place it onto a flash drive. Then connect the flash drive to a USB port on the NVR.
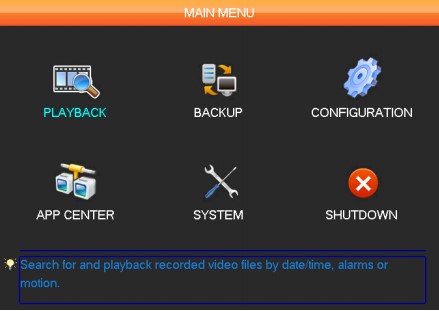
Please go to Main Menu>System>Maintenance>Version and select upgrade. Choose your Firmware file from the list.
How to I download videos off my NVR?
To download video footage you’ll need a flash drive inserted into one of the USB ports on the system. Then go to Main Menu>Backup. Once in the Backup page, you’ll need to select the USB device from the list. Then click on “Backup” at the bottom and you’ll have the file selector screen show up. Make sure AVI is checked, then proceed to backup. You can select a specific channel along with date and time you want to backup. Click on Add, then the list should update. Each file will have a start and end time. Check mark the files desired for back up and click backup at the bottom. Once the progress bar finishes, you now have the files on your USB drive.
I forgot the password for my system, how do I reset it?
Please email us at info@laviewusa.com to reset the password for this system. In the email please mention you need a password reset along with the model number and date that displays on the main view of the system. A technician will reply with some instructions and a temporary password for your system.
I have port forwarding setup, but my external IP address keeps changing. Can I fix this?
Yes, you can either contact your ISP and ask them for a static IP address or setup a DDNS. LaView does offer a free DDNS service that you can setup with these instructions:
To set up a DDNS please go to www.laviewddns.com and register.
After registering and creating your domain name we need to enable the DDNS feature.
Please go to Main Menu>App Center>DDNS.
Enable DDNS: √ (Checked)
DDNS Type: Laview
Domain Name: “yourdomainname”.laviewddns.com (“yourdomainname” is the name you created don’t use that or the “ “)
User Name: your email account used for www.laviewddns.com
Password: password used for www.laviewddns.com
Server IP: Laviewddns.com
Port: 8000
Please note, in order for the DDNS to work, port forwarding must be setup. You can now use your Domain name to access your system instead of IP.
I have some trees in my yard that are triggering my motion detection. How can I fix this?
You can setup areas for your motion recording within the camera’s configuration. Go to Main Menu>Configuration>Alarm>Set Area “Setting”. In that section, you’ll have a preview of one of the camera along with a red grid over it. You can clear the area and only draw specific areas with motion detection. Or you can just remove the areas by clicking and dragging over the red boxes. Everything in red will trigger motion, anything clear will not.
Which mobile app do I need?
-If you have DVR starting from LV-N52xxxx please download “LaView Patrol”

-If you have DVR starting from LV-N9xxxx, LV-D11xxxx, LV-D21xxx, or LV-T94xxxx, please download “LaView Net”

-If you have DVR starting from LV-D04xxxx, or LV-D51xxxx please download “LaView Mobile”

The system worked seamlessly until last week when it suddenly shut off and now won’t come back on
Would suggestion you follow the instruction below for troubleshooting,
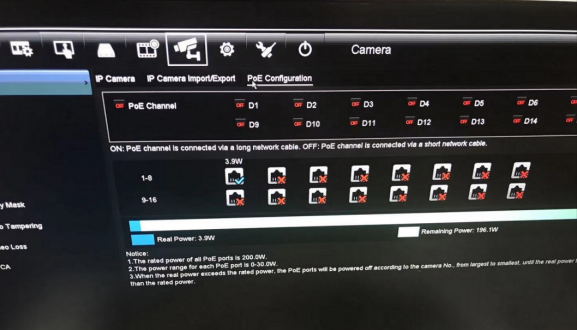
Please contact our support team for further support if it does not help.
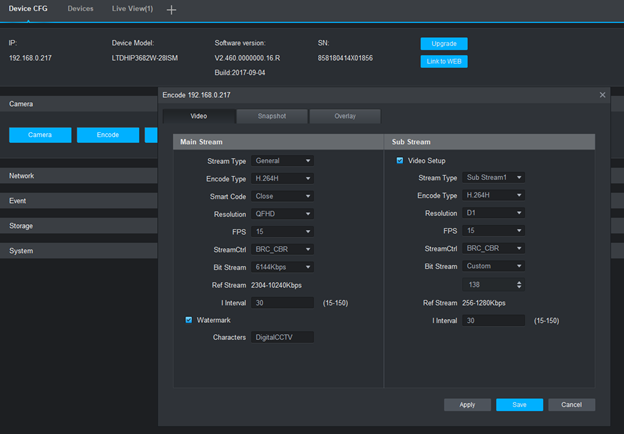
What should I do if I connect a LaView Saturn Camera to LV-N96, LV-N95, LV-N98 series NVR but only get 720P maximum resolution in main stream?
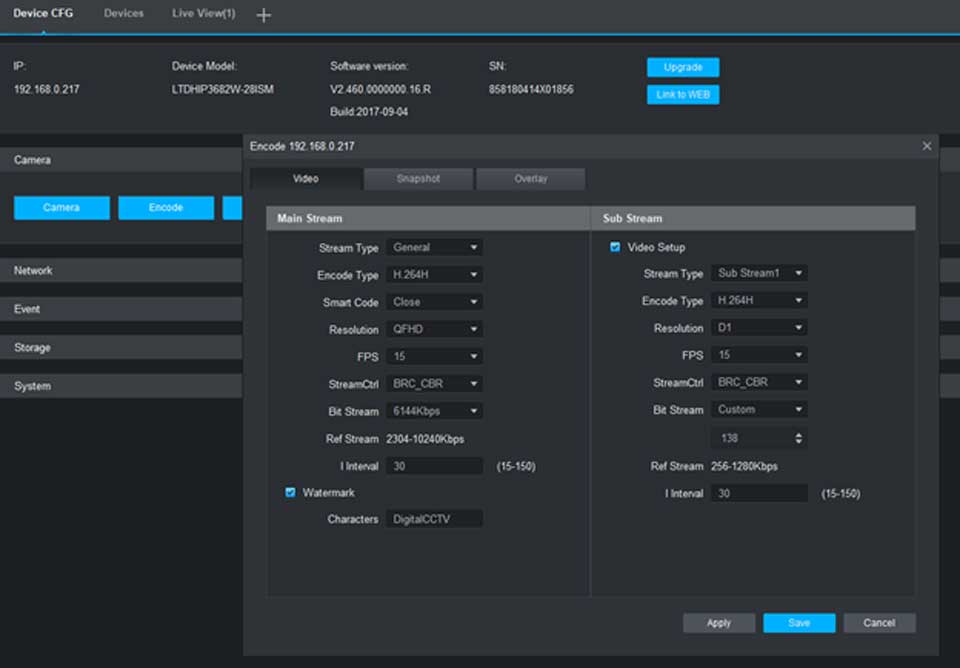
If you only get 720p in mainstream, it means the IP camera is set to H.265. Please use the following instruction to switch the camera to H.264 compression.
What features are LaView Saturn Series Camera compatible with LaView (LV-N95, LV-N96, LV-N98, LV-N99) Series NVR?
LaView Saturn Series IP Cameras have many great features designed to work with LaView Saturn Series NVR. If you already have a LaView NVR and wish to add a LaView Saturn IP Camera, you can do so using this instruction. However, we recommend using LaView Saturn Series IP Cameras with a LaView Saturn Series NVR for best performance.
The following features of LaView Saturn IP Camera are compatible with LaView Series NVR:
The following features may NOT be compatible
How to reset LaView Saturn IP Camera
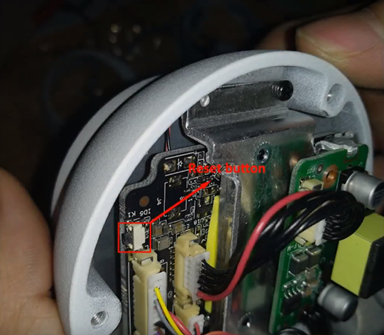
3. Press and hold the reset button for at least 5 seconds until the camera restarts, and then the camera will be restored to factory default settings.
How to connect a LaView Saturn Series IP Camera to a Non-Saturn Series NVR
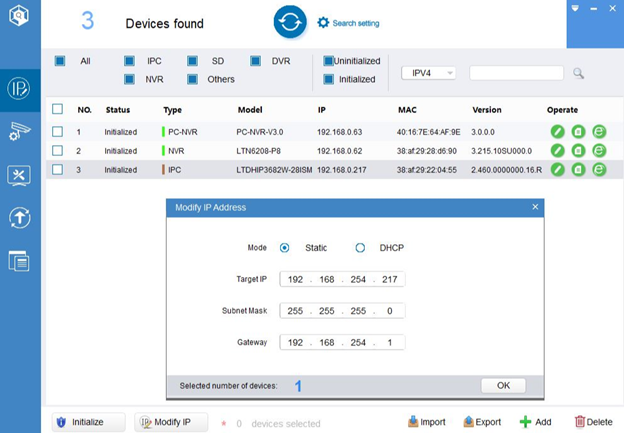
5a. If you are connecting the camera to the NVR PoE port, set up the Target IP to 192.168.254.xxx (xxx being a random number from 2-254), and Gateway to 192.168.254.1, Subnet Mask 255.255.255.0. Then unplug the camera from the PoE switch or Router and connect it to the NVR using Cat5e cable.
5b. If you are connecting the camera via LAN, use DHCP or set up the IP address to your network range. For example: Target IP 192.168.0.217, Subnet 255.255.255.0, Gateway 192.168.0.1
6. Go the NVR Menu => Camera => Camera.
7. Click on the channel which the camera is connected to (ie if the camera is connected to port 3 on the back of the NVR, click on channel 3). If you are connecting the camera via LAN, Click on any unused channel.
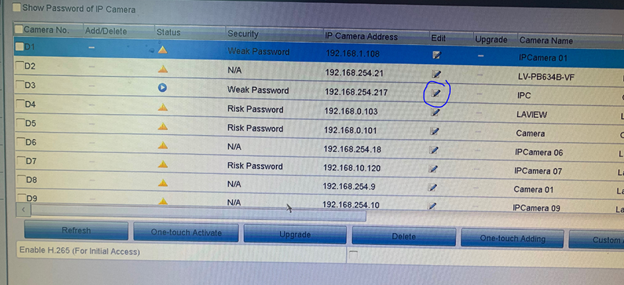
8. Change ‘Plug and Play’ to ‘Manual’ and enter the camera IP address (192.168.254.xxx or 192.168.0.217 as in previous example)
9. Change protocol to ONVIF and Management port is 80
10. Enter user name and password you set up when you activated the camera in step 3.
