How to optimize WiFi connection between cameras and NVR? While using wireless security camera system, customers may experience video freeze, video lag or even “no video” issue. This is typically caused by weak WiFi signal from cameras to the NVR.
Based on 2.4Ghz WiFi, all cameras connect to the NVR’s own WiFi, just like your phones/ tablets connect to your home WiFi router.
In line of sight, Yeewise WiFi cameras can be mounted 1000ft (300m) away from the NVR. The camera system handles distance very well. However, like any WiFi devices, the cameras do not handle obstacles very well. Each wall reduces its WiFi strength noticeably.
How Obstacles Affect Your Signal Strength
When your wireless signal is transmitted through various materials, such as walls and windows, the signal strength is affected. Though the NVR and wireless camera may be very close in proximity, you could still notice high signal interference if the signal passes through certain obstacles. For instance, if the signal passes through a concrete wall it will be severely weakened. Please reference the below chart to see which obstacles highly affect your signal and which do not.

Based on the facts, below are some suggestions of how to optimize your cameras’ WiFi connection.
1. Select a WiFi channel with least interference for your NVR.
As the only hub, the NVR’s WiFi performance is crucial. To select a least-interfered WiFi channel for the NVR, ensures its performance not affected by other WiFi devices.
This is how to,
A) In NVR’s System setting – Network setting – WiFi setting. Click “Auto Select Channel“, the NVR will automatically select a WiFi channel with least WiFi interference.

2. Place your NVR and cameras reasonably.
The NVR is the only WiFi hub, all cameras are WiFi devices that need to connect to the hub. Centralize the position of the NVR so it reaches all cameras well.
Principle of placing NVR and cameras: avoid any possibly avoidable wall, in the line from NVR to cameras.
Do not place near high voltage wires or other sources of electrical interference. Electrical interference will degrade the quality of the signal.
Below are some more tips:
If there has to be obstacles between the NVR and camera, adjust the height of camera or NVR to avoid floor. Floors are normally heavier than walls.
Always find possible open between NVR and camera, mount camera and place NVR’s spot accordingly to allow signal to pass.
Metal walls (including metal garage gate) absorb wifi signal. Use extra extendable wifi antenna to bring camera’s antenna inside the wall. This also works for heavy concrete wall.
Try to keep camera and NVR’s antennas parallel to get better signal pick-up.
3. Bring the camera’s antenna through a wall.
If a camera needs to be mounted behind a wall, you may use a WiFi antenna with extension cable to pass the wall.
Search “WiFi antenna with extension cable” on retail website like Amazon, you will find a lot of options.
Mount the camera behind the wall, drill a hole, wire through the hole to bring the antenna inside the wall.

4. Take advantage of XMARTO Dream Liner WiFi Relay technology.
The WiFi Relay technology uses cameras in middle as repeaters. That way, further cameras connect to closer cameras 1st, and then to the NVR as a group. And Yeewise wireless security camera systems do it automatically.
Auto WiFi Relay

5. Use a WiFi camera repeater.
Add a physical WiFi camera repeater for that camera,
https://www.amazon.com/dp/B086VMCTTC
6. Hard Wire Cameras.
If you cannot get a camera to work via WiFi anyway, you should consider to hard wire that camera, especially when it’s PTZ camera.
Here is how to hard wire a camera,
1. Plug the camera to power with included power plug.
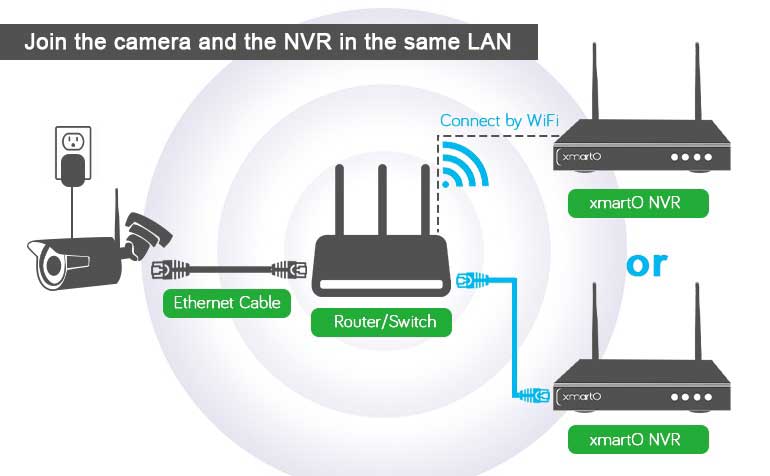
2. Use a standard CAT5/ CAT6 Ethernet cable to hardwire the camera to your router, or to a switch in your LAN network. (camera joins the LAN)
3. Connect your NVR to your home network. This should have already been done if you’ve connected your NVR for Internet access. Most XMARTO NVRs nowadays can connect to your WiFi wirelessly. Otherwise you can also hard wire the NVR to your router/ switch. (NVR joins the LAN)
Now, the camera and the NVR is in the same LAN network. They can recognize each other. Below is a diagram showing you the connection map,

4. Add the camera to an NVR channel.
a) On the NVR screen, right click – Device/ Camera Manage, refresh till you see the camera listed in above box with IP 192.168…(192 IP means the camera is connected through the cable). Click the IP to select the camera.
b) Then, in below box select an empty channel. If you are changing a camera from WiFi to Ethernet, you need to delete that channel from below box to get an empty channel.
c) Click “Add One” to add the camera to channel.

The camera’s IP remains to be 192.168…now, your camera is streaming and working through the Ethernet cable. You can go ahead to mount your camera.


I can’t upload
hi how can i do
problem not solved thanks