Object Detection via AI Security Cameras
2023 Update! Before you proceed with the below instructions, we wanted to mention that CCTV Camera Pros now offers AI security cameras that are capable of people and car object detection. AI object detection is so much more reliable than traditional video motion detection. AI object detection is over 99% accurate which means no more false positives from trees blowing in the wind! You can learn about our new AI security cameras here and the IP camera NVRs they work with here. You can watch demo videos using our AI security cameras here.
Motion Detection Sensitivity Settings
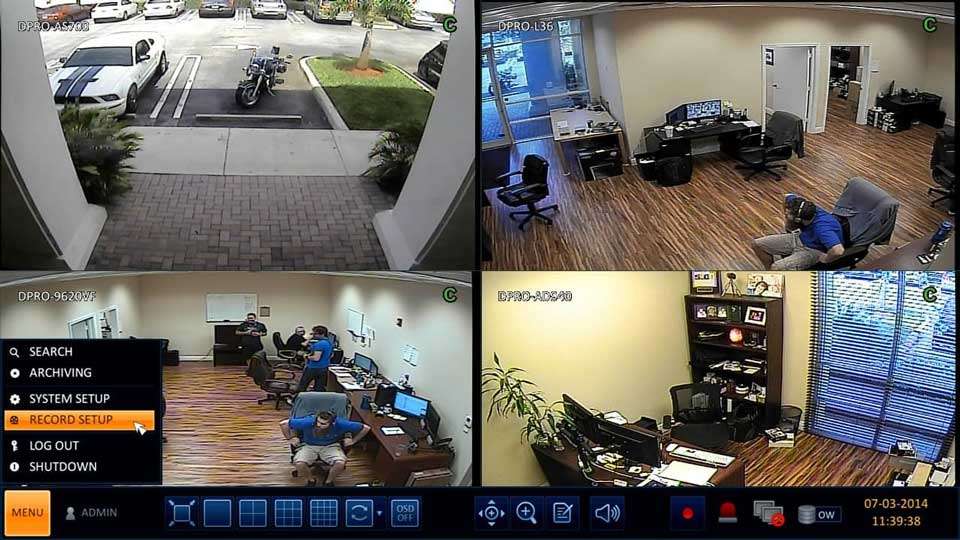
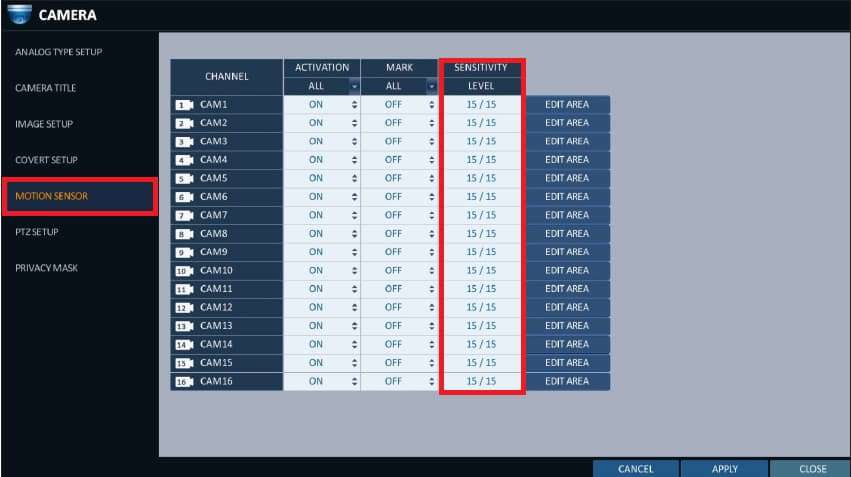
1. On your DVR, navigate to MENU > SYSTEM SETUP > CAMERA > MOTION SENSOR.
2. Click on the SENSITIVITY LEVEL for the camera you would like to adjust.
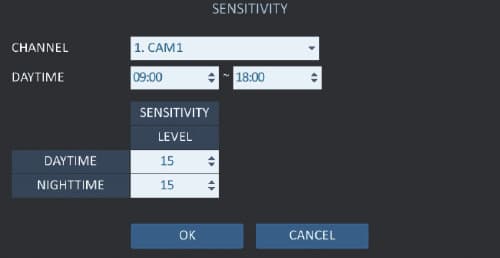
3. You will now see the following pop up window.
The sensitivity Level by default is set to 15. We have found this to be a very good starting point. You may need to adjust this to fit your specific application. The lower the number the lower the sensitivity. the higher the number the higher the sensitivity. So the higher the number the easier the motion sensor will trip.
You can also setup different DAYTIME and NIGHTTIME sensitivities. We typically recommend lowering the sensitivity for night time use. In some applications where there is not enough lighting, you can get video noise caused by pixelation. The DVR will see this as motion and cause false alarms to be triggered.
Motion Detection Mask Zones
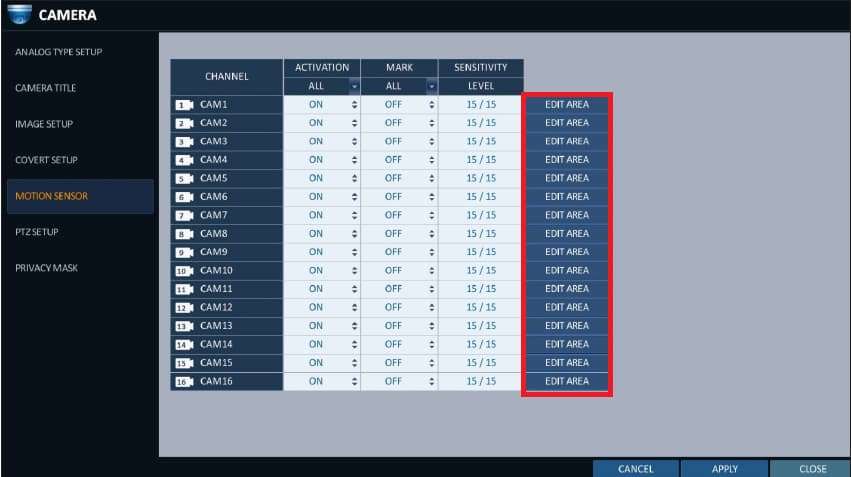
4. Now that we have the sensitivity adjusted, let’s move on to editing the motion zones / masks. So if we go back to MENU > SYSTEM SETUP > MOTION SENSOR > Click the EDIT AREA button next to the camera you would like to edit the motion zones for.
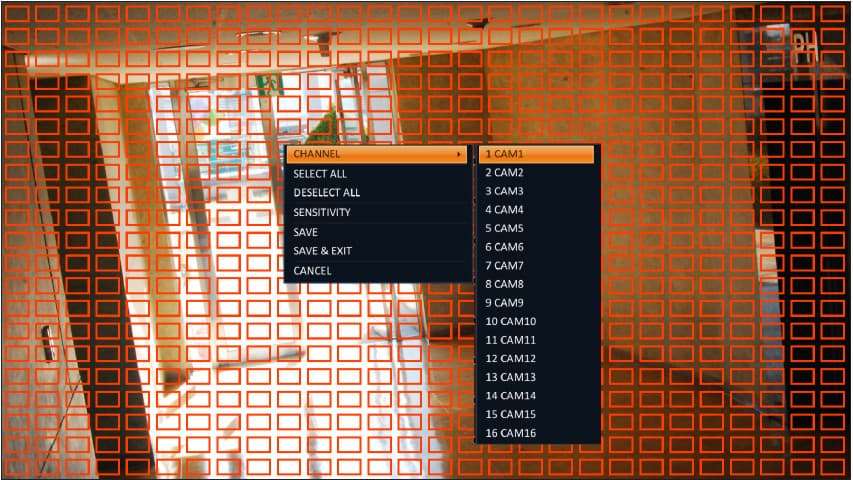
5. You will now see red squares overlaid over the camera image. The red squares indicate that there is an active motion zone in that area. By default, the entire image is set to detect motion. If you have areas that are consistently moving due to trees moving etc. You may want to set these areas so they are not triggering false alarms. To do so simply take your mouse and click the square/s that you would like to deactivate. Once you click the square it will disappear. This zone is now set to not detect motion.
NOTE: If you right click on the screen you will get additional options like the ability to toggle between camera channels, select all, deselect all, sensitivity etc.
Once you go through these settings for all of your cameras, you should notice a lot less false alarms. It is sometimes a process of multiple tries to tweak and get it just right.
If the false alarms are still being triggered due to the environment the camera is in you may want to consider using a PIR motion sensor to trigger motion alerts instead of video motion detection.
Here is a link to an article on how-to configure your CCTV DVR with an external alarm sensor to trigger recording.
Viewtron are now our Best DVRs & NVRs

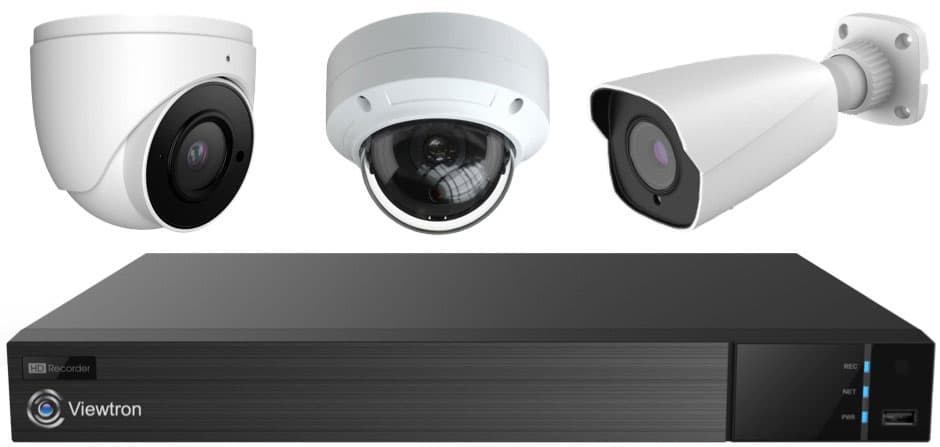
CCTV Camera Pros has replaced our iDVR-PRO product line with Viewtron. Viewtron is our best product line by far. You can learn more about the latest Viewtron Hybrid Security Camera DVRs and NVRs for IP cameras with built-in PoE here. We also have BNC security cameras, IP cameras, AI security cameras and the best LPR camera system that we have ever tested.
Works with Analog CCTV, Network IP, and HD BNC Security Cameras
Users can mix and match different camera technologies. This is perfect for customers that have existing CCTV cameras and want to upgrade to high definition over time. Hybrid iDVR-PROs work with the following security camera types and resolutions. 4K security cameras
Complete Security Camera Systems
Did you know? CCTV Camera Pros can provide a complete surveillance system quote that includes any Viewtron DVR or NVR model? We can include security cameras, cables, connectors, power supplies, and monitors. We can even mix and match IP cameras and HD BNC security cameras because Viewtron DVRs are hybrid. This means that they work with just about any type of security camera. As you have probably already seen on our website, we have 2, 4, 8, and 16 camera surveillance systems in pre-made packages. However, it is not possible for us to package up every combination and quantity of all the different camera models that we carry. So, we can also provide you with a custom quote with as many cameras as you need and a mix of any combination of camera model(s) based on your project requirements. Please request a quote when you are ready.
Archiving Recorded Video Surveillance Footage
How-to Permanently Save Recorded Video Surveillance on iDVR-PRO HD CCTV Camera DVRs.
When a significant event is recorded by your security cameras and DVR, you should promptly save the recorded video surveillance footage on the DVR so that it is not overwritten. If you forget too much time lapses, your DVR may record over the event. iDVR-PRO HD CCTV DVRs have a reservation feature that allows you to permanently save segments of video which prevents them from being overwritten (even if your DVR is set to overwrite the oldest video when the hard drive is full). Once the video footage is reserved, it can easily be located later for playback and export to a UDB drive. This process to save video events on iDVR-PROs is known as archive data reservation.
Select Archiving Screen
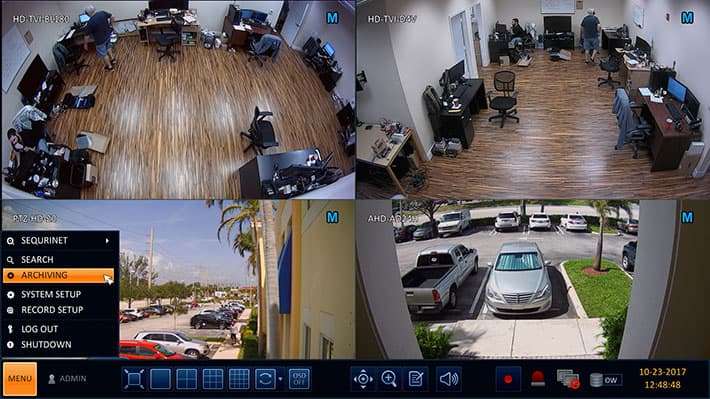
Step one: select Archiving from the Main Menu.
Specify Time Frame
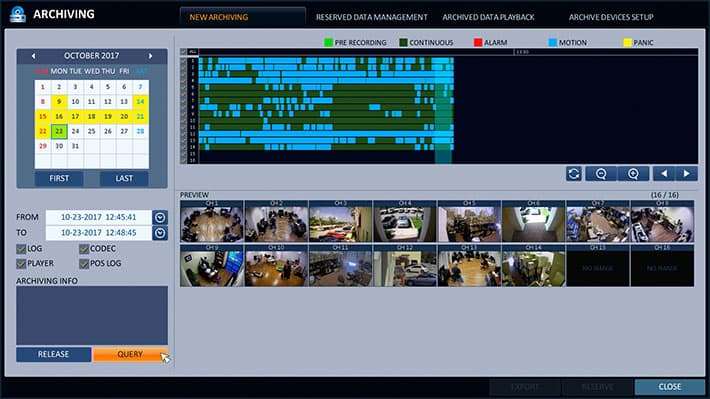
On the archiving screen, the new archiving tab is selected by default. On this screen, select the day of the month that the event occurred on the calendar. Then, select the time frame using the timeline scrubber by clicking and dragging with the mouse. You can also select the timeframe by clicking on the From and To date/ time fields. Once the time frame that you want to reserve is selected press the Query button. The amount of disk space that the archived video requires will be displayed.
Reserve Video
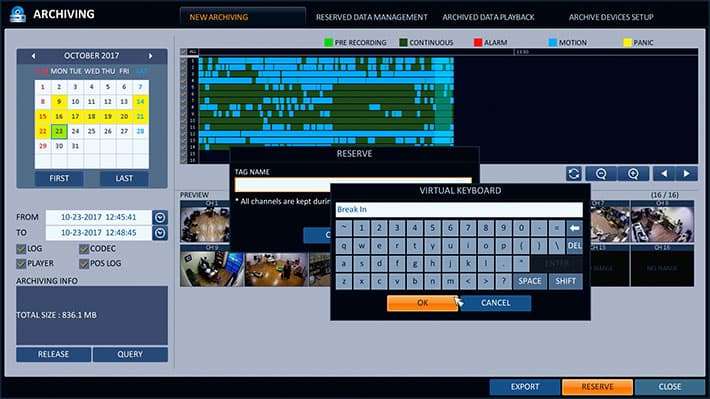
After you press Query, the Reserve and Export options are available in the lower right of the screen. Press the Reserve button, then double click on the Tag Name field. The Tag Name is a name used to identify the event that you are reserving. For example. “Break In”. When you are done, click OK. Then, OK again.
Accessing Reserved Video
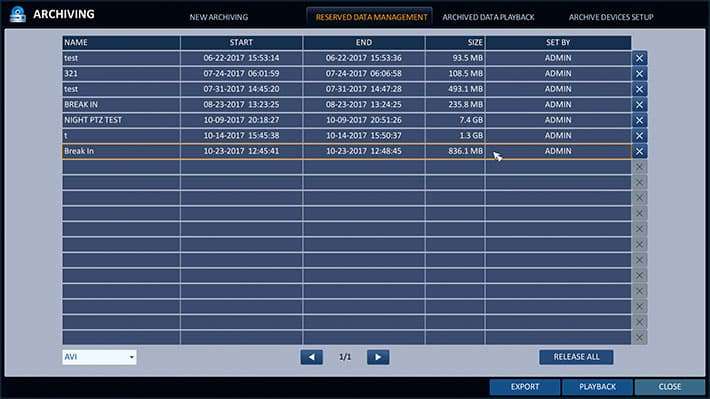
To access recorded video that you have reserved, click on the Reserved Data Management tab on the top of the Archiving screen. This screen displays a list of the events that have been reserved. On this screen, users can playback and export these video archives by selecting one, then clicking Export or Playback in the lower right.
Video Playback from Archives
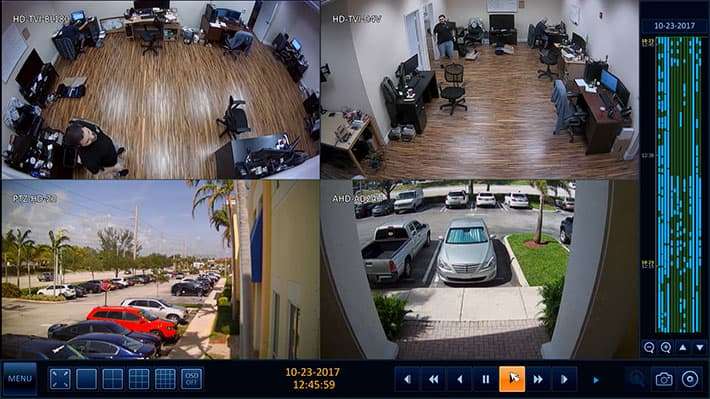
When playback is selected, the video playback screen is opened and the video segment begins to playback. The controls on the bottom of the screen allow the user to change between single screen, 4 camera, 9 camera, and 16 camera views. Users can also double-click on any camera to switch to the single camera view for that particular camera. The player controls in the lower right allow the user to play the video in forward, reverse, pause, and speed up the video in either direction.
Archived Video Export to USB Drive
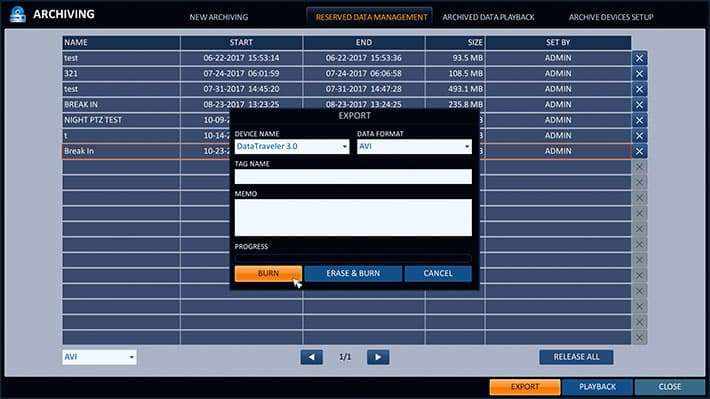
On the previous screen, users can also select Export if they want to export the reserved video to a USB thumb drive. Please note that you must insert the USB thumb drive into the rear USB port of the DVR before selecting Export. The thumb drive should be formatted as FAT32. On the export screen, users must specify the device that they want to export to. If you want to export to a USB thumb drive, select it from the device name dropdown. FTP export is also available. Users must also specify a “Tag Name” which will serve as the filename for the exported video. Click Burn to export the video. Click Erase & Burn if you want the reserved video archive to be removed from the DVR after the export is complete. The Erase option is NOT recommended.
Audio Surveillance Mic Recording Setup – iDVR-PRO CCTV DVRs
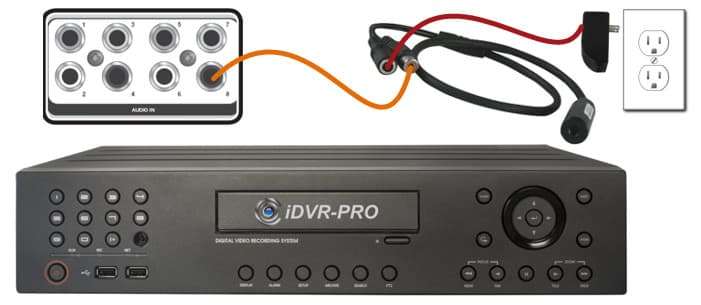
iDVR-PRO CCTV / HD camera DVRs can be connected to microphones to record audio surveillance onto the same hard drive as the security cameras being recorded. Depending on the model, iDVR-PROs can support 4, 8, and 16 microphone inputs. Each mic can be associated with a security camera so that when recording is played back, video and audio are synchronized. All iDVR-PRO models, including the original and the latest HD hybrid models, support audio surveillance. In addition to the recording capability on the DVR, users can also use the client applications to remotely access live audio and recorded playback. At this time, remote audio is supported by the iDVR-PRO viewer app for Android.
Surveillance Mic Wiring
The MIC-CCTV-02 is an extremely popular surveillance microphone that we supply. It can be seen in the above image and in the below video. Besides having very good audio quality for small to medium-sized rooms, it is simple to wire to DVRs. Watch the below video to see how it is done using premade Siamese coax cables (the same ones used for CCTV cameras). Basically, coax cable with RCA connectors are used to connect the audio output of the mic to one of the inputs on the DVR. If you use Siamese cable, like the video shows, you can power the mic from a source near the DVR.
https://youtu.be/a_kGwJGy2uU?list=TLGG5-9qCvItYDMyODEyMjAyMw
Another option for wiring a microphone to your DVR is to use a spool of RG59 Siamese cable. This requires a bit more work because you need to cut the cable and attach connectors on the ends. Take a look at this RG59 cable kit with compression connectors and tools. There is a video on that page that shows how to cut and crimp cable. That kit includes BNC connectors. Microphones use RCA connectors. The process is the same to connect a compression-type male RCA connector like this one.
Audio Surveillance Recording Setup
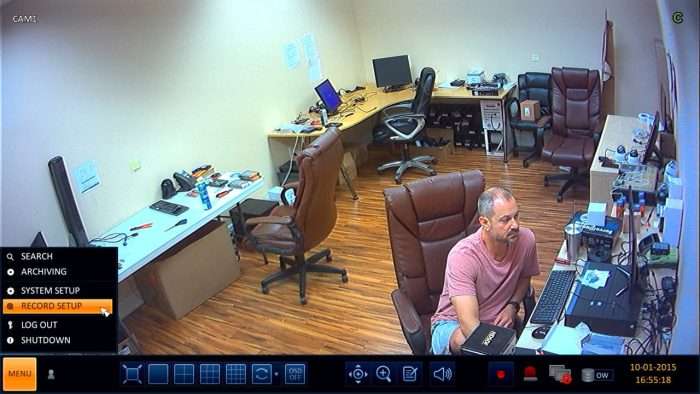
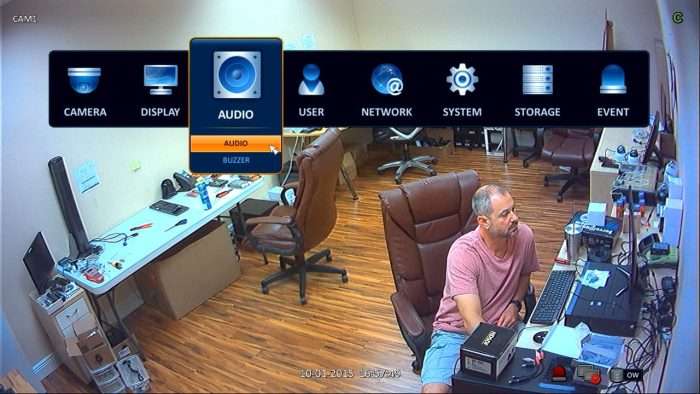
After your alarm device is properly wired to the DVR input, you can begin configuring the software on the DVR. Using the USB Mouse that is included with the DVR, click the Menu button in the lower left portion of the screen, then select Recording Setup. (Shown Below)
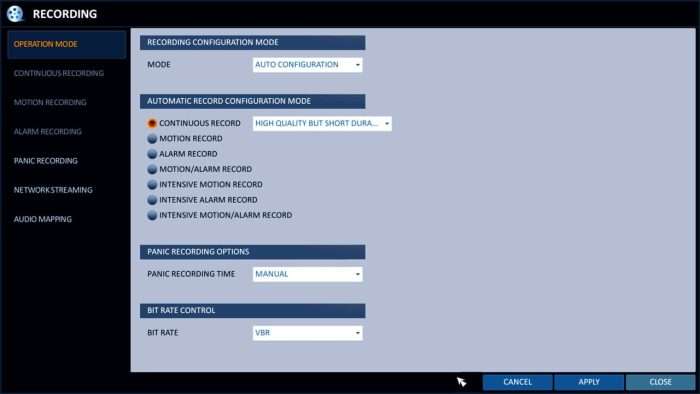
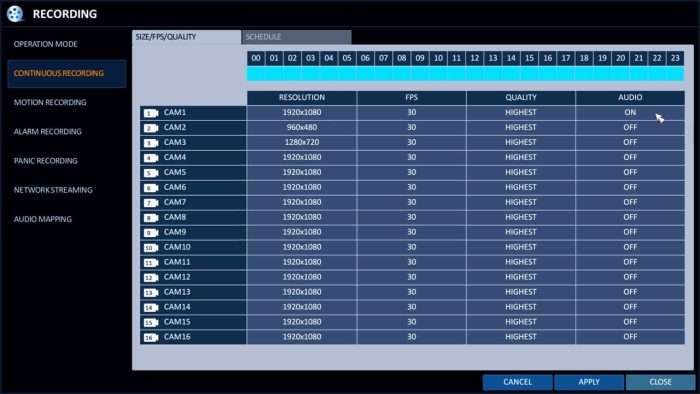
On the recording setup screen, the operation mode tab will be selected on the left. Check to see if your recording mode is set to “Auto Configuration” or “Manual Configuration”. If you are using Auto Configuration, then audio will automatically be recorded on all channels. If mode is set to manual, then click on the type(s) of recording that your DVR is configured for (Continuous, Motion, Alarm).
You can see the continuous recording screen below. For each camera, you can specify if you want recording turned on or off. You can specify the times of the day that you want recording enabled for by clicking and dragging the mouse across the hours at the top of the screen to select them. You can then select On / Off using the drop down for each camera. Repeat these steps for motion detection and alarm recording.
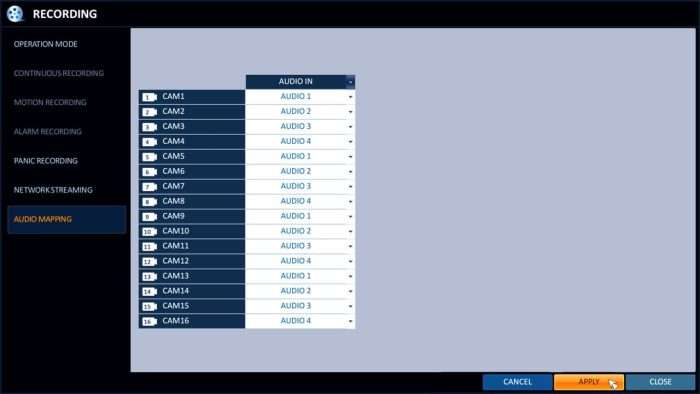
After you set up the recording schedule for each recording type, click on the Audio Mapping tab on the left. This screen lets you associate cameras with microphones.
Click Apply, then close when you are done. Audio recording is now set up on the DVR.
Audio Output Setup
You can listen to the audio being captured from the mic(s) connected to your DVR by connecting speakers to the DVR or by using an HDMI monitor that has built-in speakers. If you are going to use stand-alone speakers, there is a single RCA audio output on the back of the DVR.
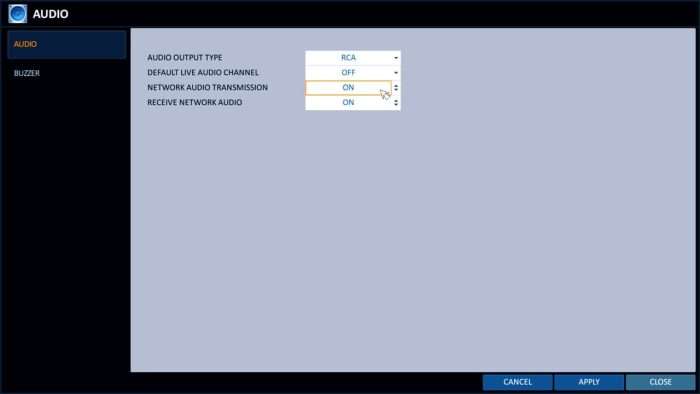
To set up audio output, click on the Menu button in the lower left portion of the screen, then select System Setup. On the main menu, click on Audio, on the Audio menu.
On this screen, you can setup the following.
After you select your settings, click on apply, then close.
Recorded Video Backup Export & Playback for iDVR-PRO CCTV DVRs

Export and Playback Instructions
Follow these instructions to backup / export recorded video surveillance footage from the iDVR-PRO 960H / AHD / H.264 CCTV DVRs from CCTV Camera Pros. These instructions also show users how to playback the backup video files. Users can choose to export the video in the native video format or in AVI format. The AVI format will allow the user to playback the video using a standard Windows media player (or any media player that supports AVI files), while the raw file format will have to be played with the iDVR-PRO Backup Player. In the example below, we will be using the AVI format. You can find the iDVR-PRO CCTV DVRs here that this setup article is applicable to.
