How to Motion Detection on Lorex Devices
Set preferences for motion detection on each channel, and select channels you want to enable smart Person/Vehicle detection on.
NOTE: Depending on your system configuration, the maximum number of channels that support Person/Vehicle detection will vary. Check your recorder’s documentation for the maximum number of supported channels.
To configure motion detection:
 From the Live View display, right-click to open the Quick Menu, then click Main Menu.
 Click ALARM. Click the MOTION tab on the side panel, then Motion Detect on the top panel.
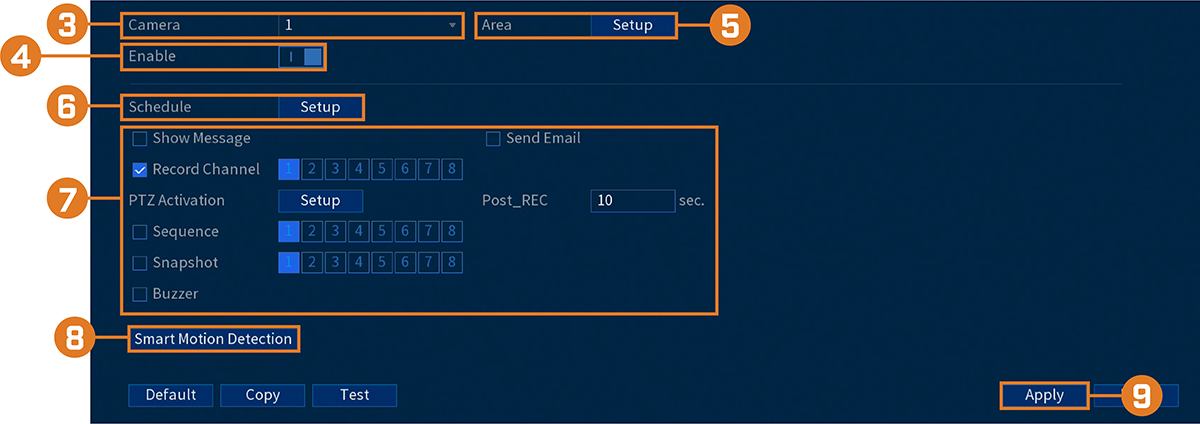
 Select a channel to configure motion detection for.
 Click to enable (
 ) / disable (
 motion detection on the selected channel.
 Click Setup next to Area to configure which areas of the image will be enabled for motion detection. A grid will appear on the monitor:
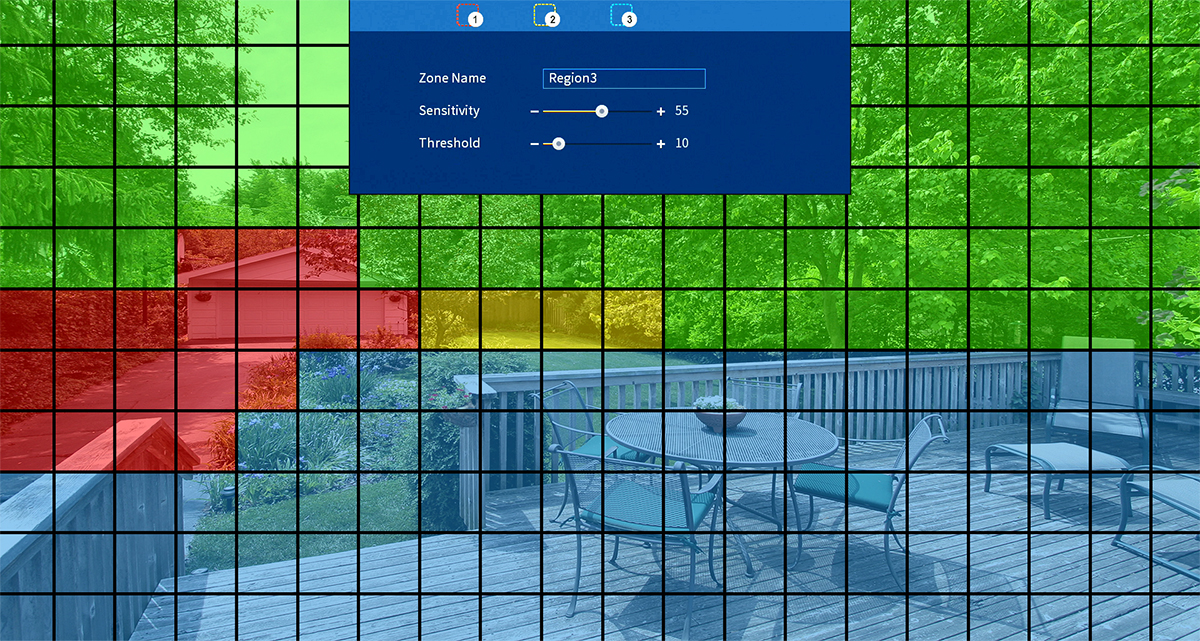
- The camera image appears with a red grid overlay. This means the entire image is enabled for motion detection.
- Click or click-and-drag to add / remove boxes from the active area. Cells that have been removed from the active area appear green.
- Hover near the top of the image to reveal zone selection. You can set up to 3 different zones with different sensitivity and threshold values.
- Right-click when finished.
 Click Setup next to Schedule to choose which days and times of the week to enable motion detection:
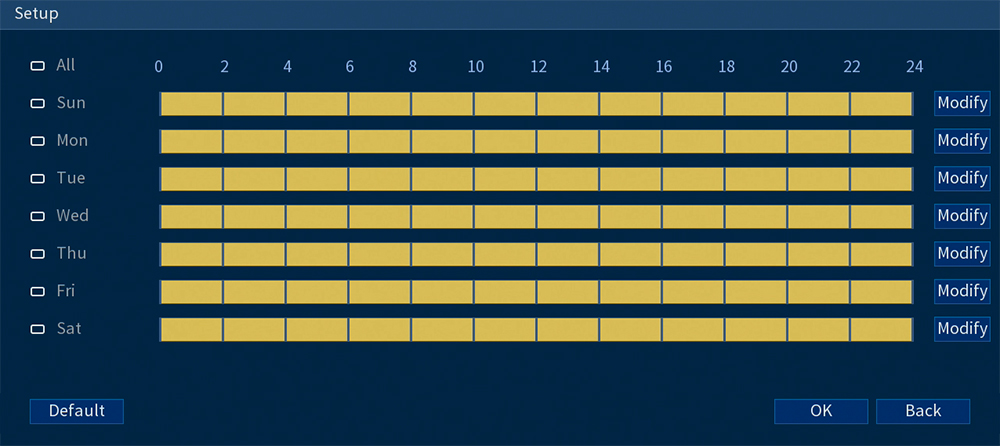
- Click or click-and-drag along the each of the yellow timelines to quickly add or remove time from each day’s schedule in 15–minute segments.
- Click
 beside 2 or more days to link schedules (
 ). This allows you to quickly change multiple schedules at once.
 - To make fine adjustments to a schedule, click Modify. This will allow you to set exact start and end times for a schedule.
 Choose how the system will react when motion is detected:
- Show Message: Check to enable an on-screen pop-up when one of your cameras detects motion. On-screen pop-up shows the channels an event occurred on and the type of event.
- Send Email: Check to enable email alerts. You must configure email alerts before you will be able to receive them.
- Record Channel: Select the channels that will record when motion is detected on the selected channel. Set the length of recording following a video loss event in the Post_REC field.
- PTZ Activation: Set connected PTZ cameras to start a tour, pattern, or go to a preset location.
- Sequence: Sequence mode will begin. Select the numbered tiles next to this option to include the corresponding channels in the sequence.
- Snapshot: Select the numbered tiles next to this option to save a snapshot of the corresponding channels.
- Buzzer: Check to enable the system buzzer.
 Click Smart Motion Detection to enable Person/Vehicle detection:
- Click Enable to activate Person/Vehicle detection on the selected channel.
- Select a Sensitivity level (a high sensitivity value will detect smaller objects than a low value).
- Check Person/Vehicle.
- Click OK when finished.
 Click Apply.
Load More :
How to set up Face Detection
Watch our easy-to-follow tutorial on how to set up Face Detection on your N842 Series NVR and E892 IP camera.
LHB Series: Recording time for motion detection
When a Wire-Free camera detects motion, the camera streams live video and records for a set period of time before returning to Standby mode. You can choose how long each camera records for when motion is detected.
REMINDER: In order to conserve battery life and decrease the amount of footage for review, continuous live-streaming and recording is not available with Wire-Free cameras.
To configure recording time:
- In the Live View, click the Main Menu icon (
 ) > Settings > Camera.
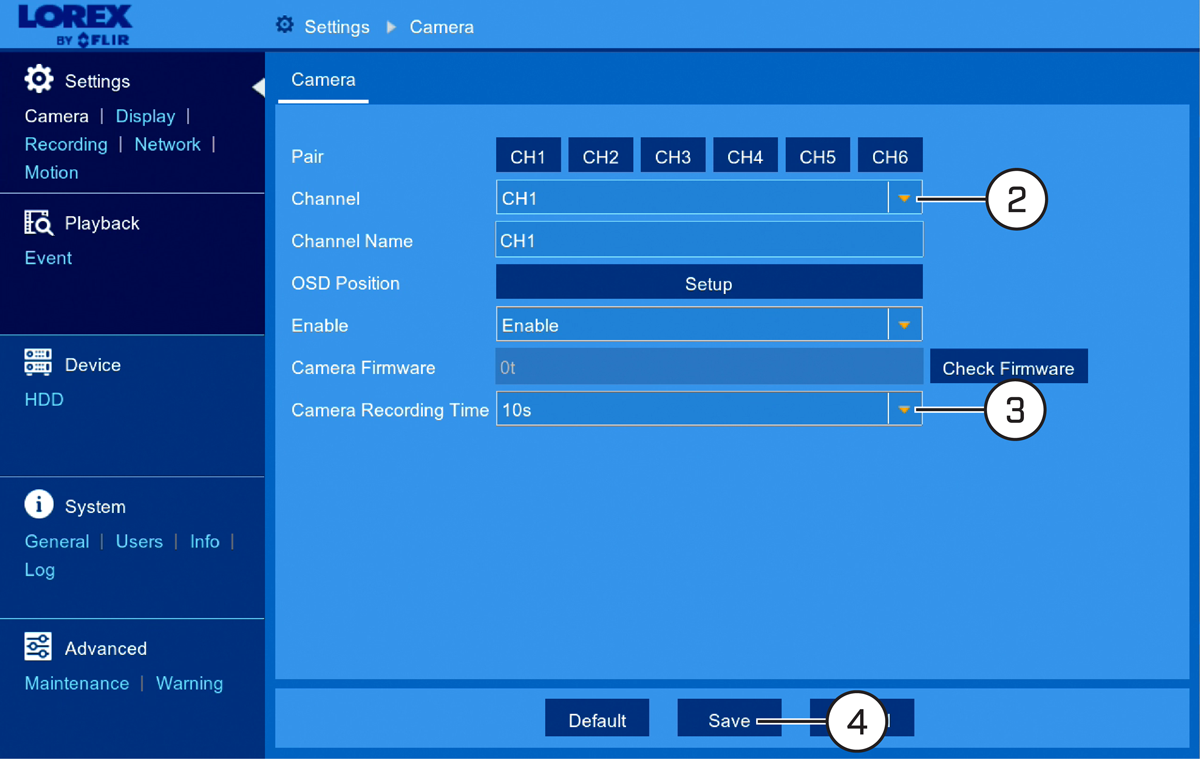
- Select the channel for the camera you want to configure.
- Select the duration the camera will record video for when motion is detected (10s, 20s, or 30s).
- Click Save to set the recording time.
- Click OK.
REMINDER: If motion is detected within the final 2 seconds of the preset Camera Recording Time, the system will record an additional 10 seconds of video to ensure the entire event is captured.
LHV / LNR Series: Enabling snapshots during Motion Detection Alerts
The first step to setting up snapshots is to enable them in your LHV / LNR Series DVR / NVR menu. Click here for more information on enabling snapshots. Snapshots can be saved during motion detection alerts and can be sent to you in an email attachment.
Prerequisite:
To save snapshots during motion detection alerts:
- In the motion detect window click the Snapshot checkbox.
- Click OK to save settings.
To locate and review your snapshots:
- Right-click on the Live View window to open the Quick Menu.
- Click Main Menu, and then click the Search icon (
 ).
). - Click Search.
- Click PIC.
- Select a date to search.
- Click the File List button (
 ) to see a list of snapshots for that date.
 - Click the Play Forward button (
 ) to view each snapshot.
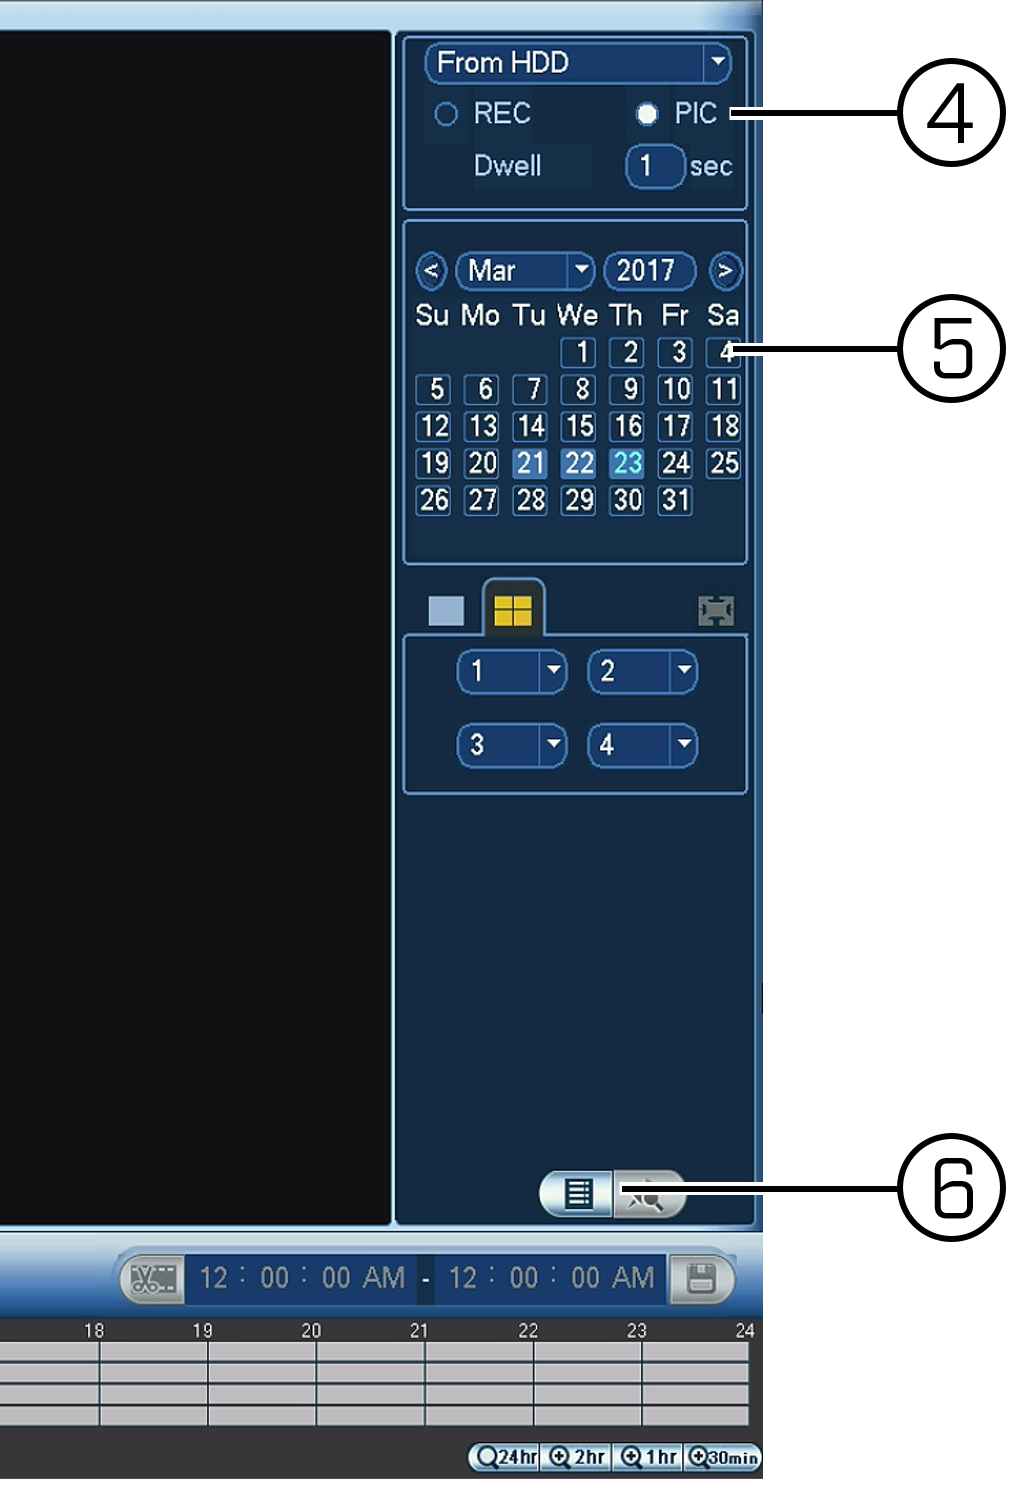
To enable snapshots as email attachments (optional):
- Right-click on the Live View window to open the Quick Menu.
- Click Main Menu, and then click the Setting icon (
 ).
). - Click Network > Email.
- Click the Enable checkbox to turn on email notifications.
IMPORTANT: Email must be configured to receive email notifications
- Click Test to send a test email.
- Click OK to save settings.
LHV / LNR Series: Enabling motion detection
You can configure your LHV / LNR Series DVR / NVR system to record motion detection events.
To enable motion detection:
- Right-click on the Live View to access the Quick Menu.
- Click Main Menu and then click the Setting icon (
 ).
). - Click Event > Motion.
- Click the Motion Detect tab.
- Select the channel to be configured and check the Enable checkbox.
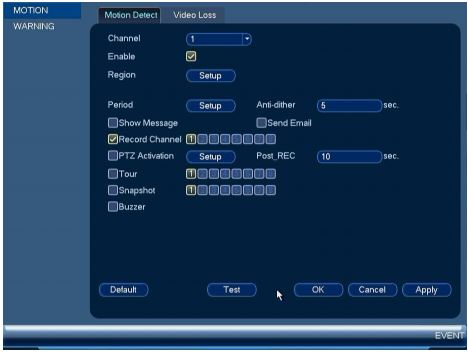
You are now ready to configure your motion detection settings. Refer to your user manual for details on available options for your system. Click here for downloads and documentation for your product.
After enabling motion detection, you can set a schedule for the recorder to run motion detection during certain times. Click here for instructions on how to set a motion detection recording schedule.
LHA / LNK Series: Configuring motion detection settings
You can configure your LHV / LNR Series DVR / NVR system to record motion detection events.
The following instructions require you to access your system using your DVR / NVR and a monitor.
To enable and configure motion detection:
- In the taskbar, click the Main Menu icon (
 ), and then click Settings > Alarm > Motion.
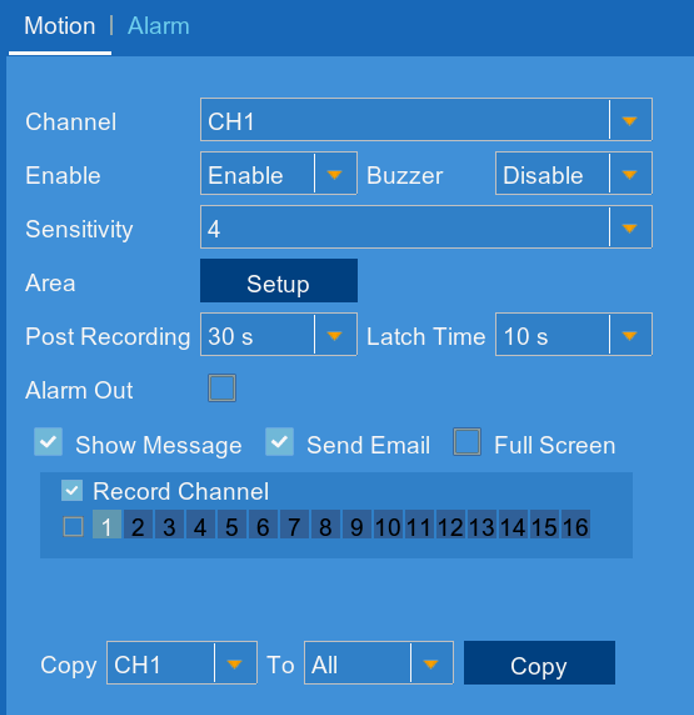
- In the Channel drop-down, select a channel to configure motion detection.
- In the Enable drop-down, select Enable.
- In the Buzzer drop-down, select the duration the system will beep when an event triggers, or select Disable to disable the buzzer.
- In the Sensitivity drop-down, select a sensitivity level for motion events. The lower the sensitivity value, the more movement is required to trigger motion detection. It is recommended to select a Sensitivity between 30~70.
- Click Setup to configure the areas of the image that will be enabled for motion detection. The red grid indicates the active area for motion detection. Click and drag to add / remove the active area.

REMINDER: Motion detection will be disabled for areas of the image without red overlay. Disabling motion detection in certain areas of the image is an effective way to eliminate unwanted recordings and notifications caused contact movement like trees blowing in the wind or regular traffic.
- Once you complete setting your active motion detection area, right-click anywhere on the screen to exit.
- In the Post Recording drop-down, select how long the system will record video for after motion is detected.
- Select the actions to occur when motion is detected:
- Show Message: Display a message on the system when motion is detected.
- Send Email: Receive an email notification when motion is detected. Ensure you have enabled email notifications.
- Full Screen: Check to have video from the selected channel appear in full screen when motion is detected.
- Record Channel: Record video from the selected channel(s) when motion is detected.
- Numbered Boxes: The channels to record when motion is detected. Click the checkbox to select all.
- Click Save to save your motion detection settings.
- Click OK.
Ensuring accurate person and vehicle detection
The following are important camera installation notes to ensure accurate Person/Vehicle detection on compatible security systems. For your specific camera’s mounting instructions, search for your camera model number at lorex.com.
- Angle the camera so that objects of interest appear in the bottom ⅔ of the camera image.
- Choose a location where objects of interest will be no further than 50ft (-15m) from the camera.
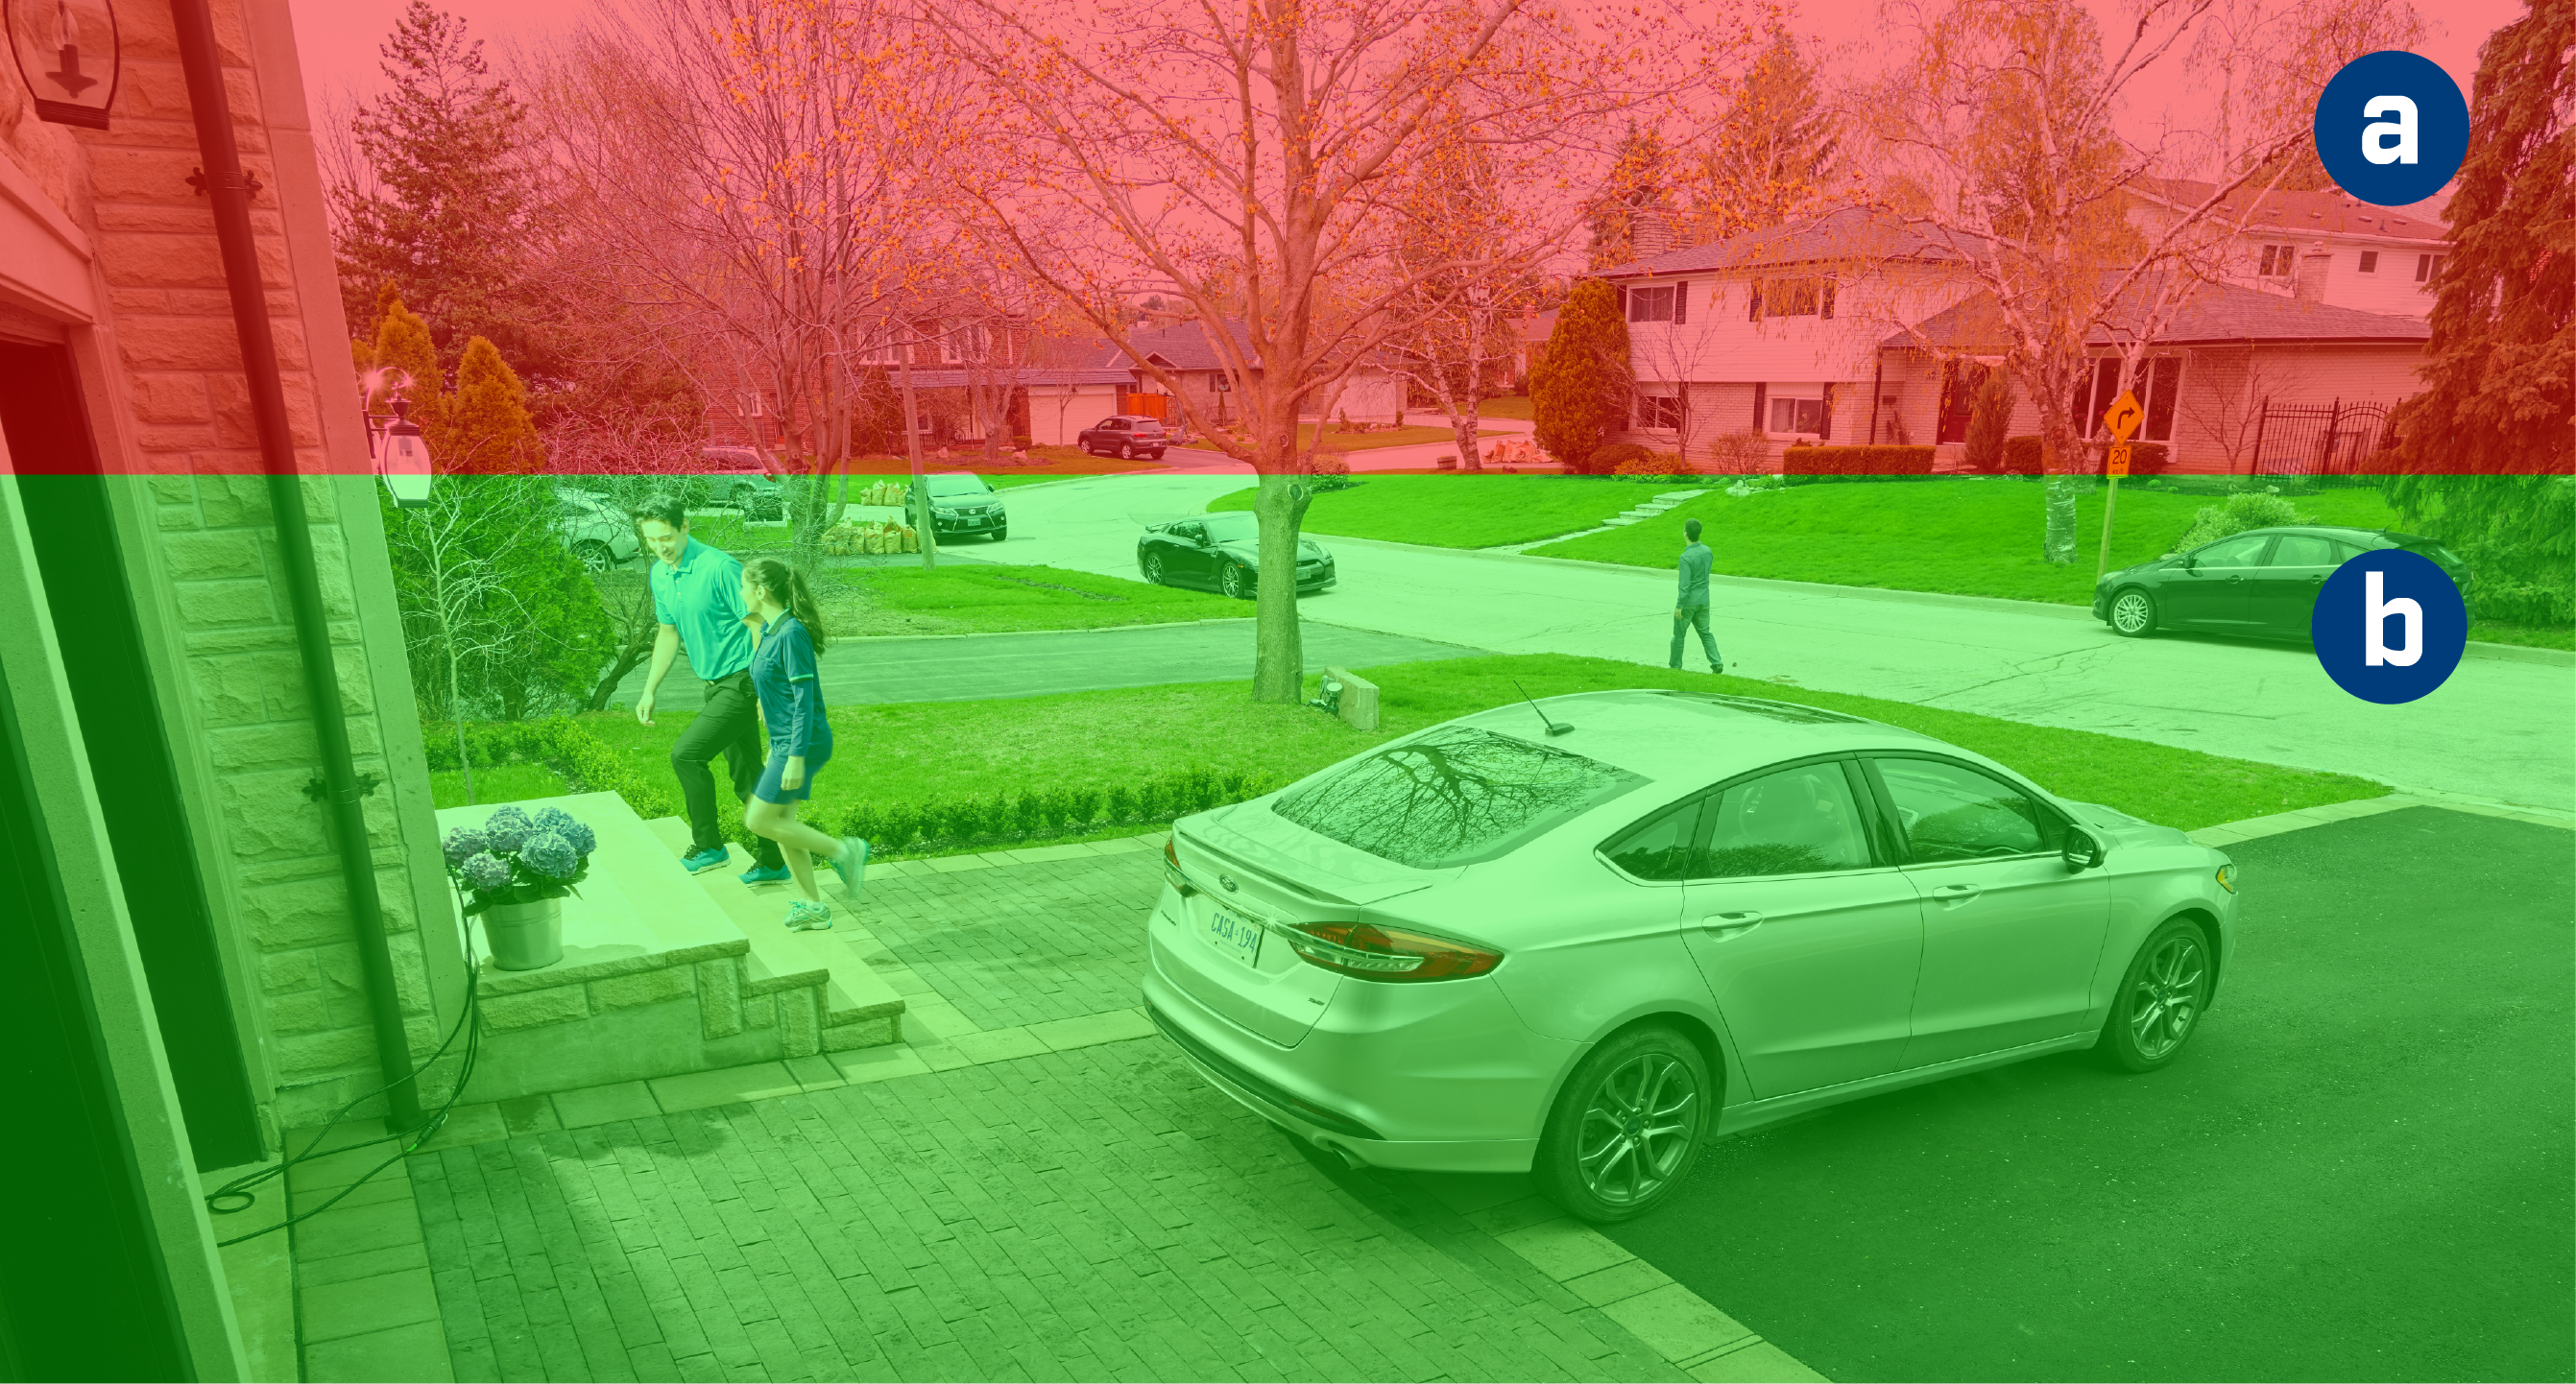
 Lower accuracy for objects further away than 50ft (~15m) and/or in the top ⅓ of the image.
 Optimal accuracy for objects within 50ft (~15m) and in the bottom ⅔ of the image.
- Angle the camera between 30~60° down from the level position.
- Install the camera between 8-16ft (2.5-5m) off of the ground.
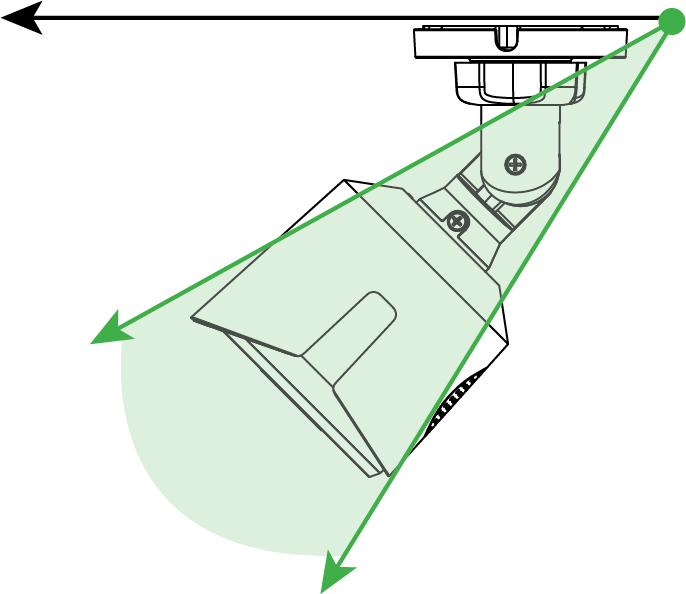
NOTE: Accuracy of person and vehicle detection will be influenced by multiple factors, such as the object’s distance from the camera, the size of the object, and the height and angle of the camera. Night vision will also impact the accuracy of detection.
Additional Installation Tips:
- Point the camera where there is the least amount of obstructions (e.g., tree branches).
- Install the camera where vandals cannot easily reach.
- Secure cabling so that it is not exposed or easily cut.
- This camera is rated for outdoor use. Installation in a sheltered location is recommended.
DVR – Face Recognition
The D861, D862, D871 series recorder is equipped with face recognition. You can configure the system to detect faces and respond with various actions.
To configure face recognition:
Step 1. From the Live View display, right-click to open the Quick Menu, then click Main Menu.
Step 2. Click EVENTS, then click the Face Recognition tab on the side panel.
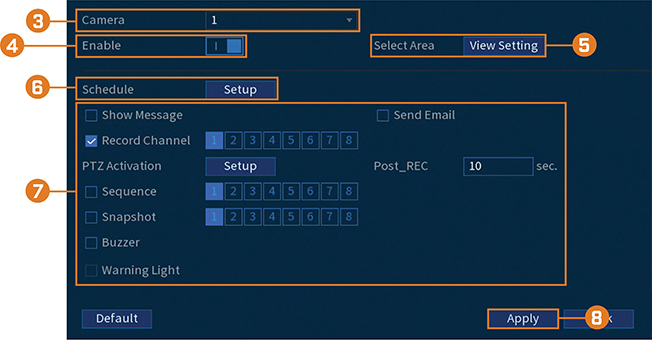
Step 3. Select a camera to configure face recognition for.
Step 4. Click to enable / disable face recognition on the selected channel.
Step 5. Click Setup next to Schedule to choose which days and times of the week to enable face recognition:
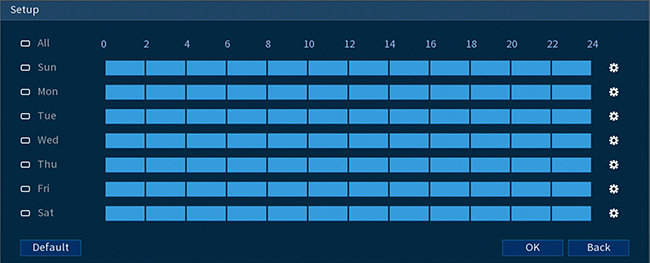
- Click or click-and-drag along the each of the blue timelines to quickly add or remove time from each day’s schedule in 15–minute segments.
- Select 2 or more the days to link schedules. This allows you to quickly change multiple schedules at once.
- To make fine adjustments to a schedule, click settings. This will allow you to set exact start and end times for a schedule.
Step 6. Click Setup next to Target Face Database.
- Check the box next to the face database that you want to use for Face Recognition.
- Click OK.
Step 7. Click to enable Unfamiliar Face Alarm. Setup alarms if a face has been detected that has not been added to the face database (also labeled “stranger” in AI mode).
Step 8. Click the icon under modify to adjust the Similarity value.
- Enter a value for the Similarity from 1% being the lowest to 100% being the highest.
- Click OK.
Step 9. Click the icon under Parameters to set the alarms for face recognition.
Step 10. Click Apply to save all changes.
Congratulations! You have successfully configured face recognition on your D861 Series recorder.
How to create a face database?
To build a face database, you can create a face database list and add faces to each database from a USB drive or live captured faces in AI mode.
To create a database:
Step 1. From the Live View display, right-click to open the Quick Menu, then click Main Menu.
Step 2. Click EVENTS, then click the Face Database tab on the side panel.
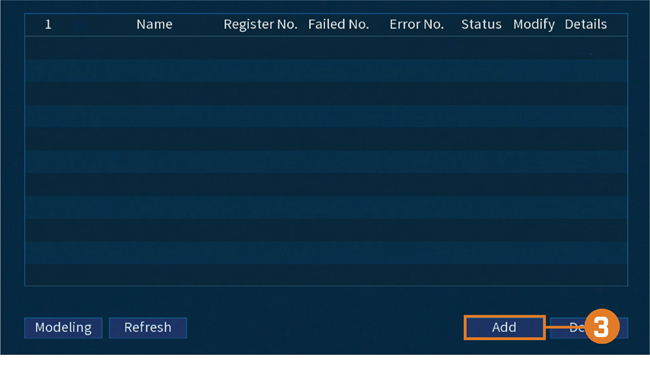
Step 3. Click Add in the bottom right of the screen to add a new database.
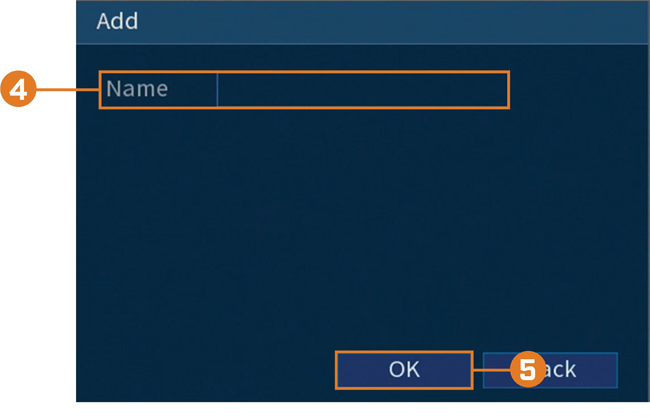
Step 4. Enter a name for the database.
Step 5. Click OK.
The created database will appear in the face database list.
How to add a face to the database by USB?
To add a face to the face database:
Step 1. From the Live View display, right-click to open the Quick Menu, then click Main Menu.
Step 2. Click EVENTS, then click the Face Database tab on the side panel.
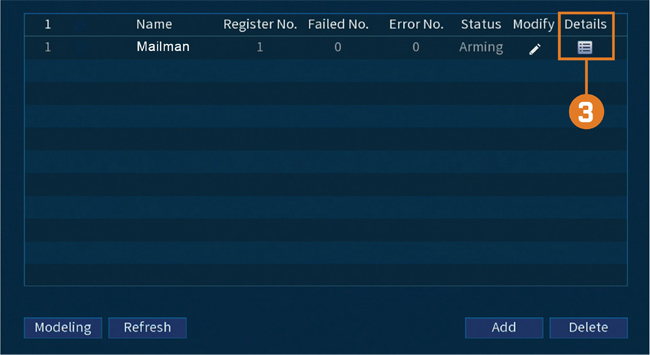
Step 3. Select a database from the list and click the details icon to configure.
Step 4. Click Register to add a face to the database. The USB drive will automatically load.
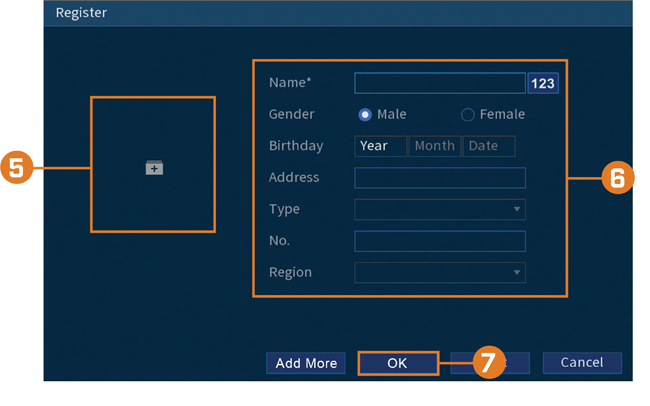
Step 5. Click + to upload a new face image.
Step 6. Use the Register window to add additional information to the face entry, including name and gender.
Step 7. Click OK to save.
The added face will appear in the face database.
Add by USB Drive (Batch Add)
Face pictures can also be imported in batches which is useful when adding a large number of faces at one time.
Add Captured Faces
You can add images to build the face database by using images that have been captured in AI mode.
NOTE: To capture faces using Face Detection, AI mode must be enabled in Live View. From the Live View display, right-click Quick Menu and hover over the Live View option. Click on AI mode to enable.
How to add a face captured by AI mode?
To add a face captured by AI mode:
Step 1. From the Live View display, AI mode will display recently captured faces on the right side of the screen.
Step 2. Double-click on the face that you want to add.
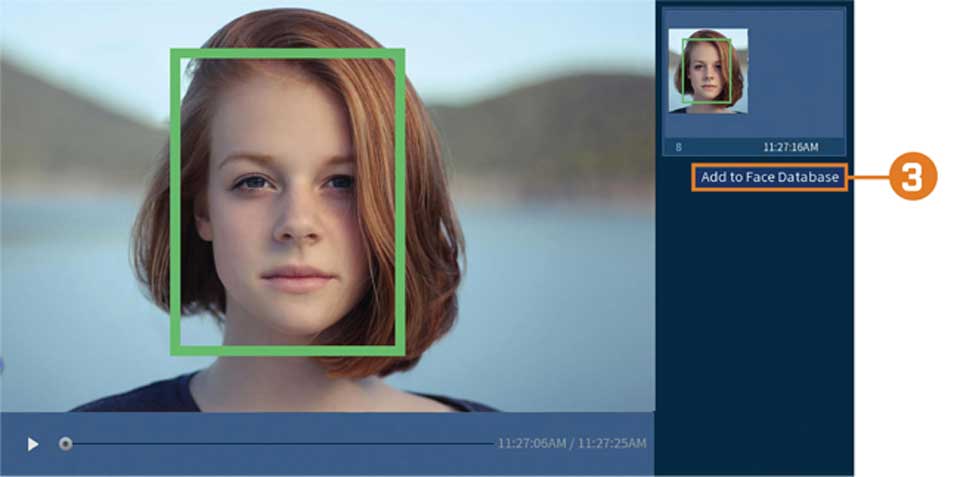
Step 3. Click the button Add to Face Database for the register window to appear.
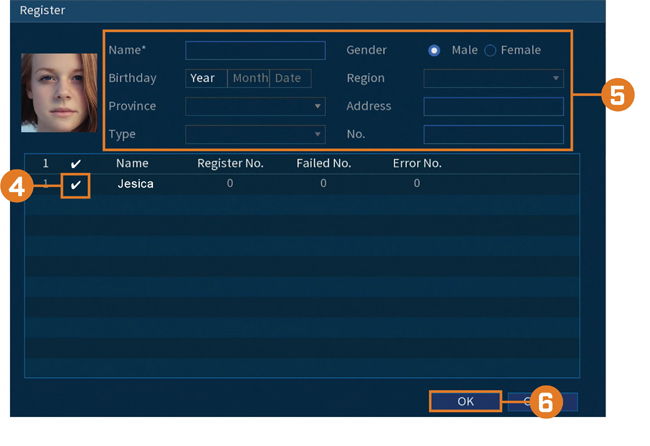
Step 4. Check the box next to the database that you want to add the face to.
Step 5. Add additional details for the face entry including a name.
Step 6. Click OK to save. The added face will appear in the face database.