Veilux Devices Firmware Software Manuals, Veilux Inc. is a privately-held video security systems manufacturer, has proven to be a world leader in providing innovative products and technologies for the video security industry. Veilux, with its headquarters in Dallas, Texas, was founded in 2002. Veilux has quickly earned a legendary reputation by implementing a number of programs designed to achieve 100% customer satisfaction, along with employee performance incentives based on quality, not quantity.
DVR
Software
VMS v.231 (Windows)
1 file(s) 50 MB
.
VMS v.336 (Windows)
1 file(s) 57 MB
.
VMS v.344 (Windows)
1 file(s) 82 MB
.
VMS (MAC)
1 file(s) 2.5 MB
.
User Manual
.
VR-X User Manual
1 file(s) 6 MB
.
Read More :
NVR
Software
.
.
ConfigTool
1 file(s) 24 MB
.
.
.
Ionvision Corp.
1 file(s) 67 MB
.
Veilux
.
VEILUX APP
1 file(s) 35 MB
.
User Manuals
.
.
AI NVR User Manual
1 file(s) 27 MB
.
.
.
Ionvision Corp. User Manual
1 file(s) 6.5 MB
.
.
2M Station (Windows)
1 file(s) 48 MB
.
Software
.
Tools
1 file(s) 20 MB
.
IP Cameras
.
.
2M Tool
1 file(s) 29 MB
.
.
.
ConfigTool
1 file(s) 24 MB
.
.
.
General IP Search Tool
1 file(s) 6 MB
.
Veilux
.
pConfig
1 file(s) 3 MB
.
.
.
ONVIF Device Manager
1 file(s) 20 MB
.
.
.
Tools
1 file(s) 20 MB
.
Veilux
.
Update Tool
1 file(s) 5 MB
.
.
.
VPIP-5MIR30X-PRO User Manual
1 file(s) 2 MB
.
Keyboards
.
.
VKPRO-N1000 User Manual
1 file(s) 882 KB
.
Veilux
Veilux Firmware
Note: Please be careful when updating firmware as there is a risk of damaging the device if the update is not done correctly.
.
VSIP-2-W
1 file(s) 26 MB
.
.
VBIP-2E v3.5
1 file(s) 22 MB
.
.
VBIP-2E v3.6
1 file(s) 28 MB
.
.
VBIP-2V
1 file(s) 35 MB
.
.
VBIP-2V-H5Z
1 file(s) 29 MB
.
.
VBIP-2V-I
1 file(s) 34 MB
.
.
VBIP-2V-IZ-PRO v2.6
1 file(s) 22 MB
.
.
VBIP-2V-IZ-PRO v2.8
1 file(s) 24 MB
.
.
VBIP-2V-M-H
1 file(s) 27 MB
.
.
VBIP-2V-M-H5Z
1 file(s) 29 MB
.
.
VBIP-2V-W
1 file(s) 29 MB
.
.
VBIP-4V-H5Z
1 file(s) 39 MB
.
.
VBIP-4V-I
1 file(s) 26 MB
.
.
VBIP-13V
1 file(s) 35 MB
.
.
VDIP-2VH v2.0
1 file(s) 32 MB
.
.
VDIP-2VH v3.4
1 file(s) 28 MB
.
.
VVIP-2E
1 file(s) 22 MB
.
.
VVIP-2V-E
1 file(s) 29 MB
.
.
VVIP-2V-I
1 file(s) 34 MB
.
.
VVIP-4V-E
1 file(s) 29 MB
.
.
VVIP-4V-I
1 file(s) 26 MB
.
.
VVIP-4V-IZ-PRO
1 file(s) 24 MB
.
.
VFIP-12M-PRO
1 file(s) 29 MB
.
.
VPIP-MINI-3M12X
1 file(s) 44 MB
.
.
VPIP-3MIR30X v3.4
1 file(s) 34 MB
.
.
VPIP-3MIR30X v3.5
1 file(s) 26 MB
.
.
VPIP-5MIR36X-120-PRO-E
1 file(s) 9 MB
.
.
VPIP-13M22X
1 file(s) 35 MB
.
.
VR-5B-16S-2
1 file(s) 58
.
.
VR-824E
1 file(s) 12 MB
.
.
VPRO-NVR-4
1 file(s) 50 MB
.
.
VPRO-NVR-32
1 file(s) 66 MB
.
.
VPRO-NVR-64N
1 file(s) 101 MB
.
.
VPRO-NVR-64R
1 file(s) 101 MB
.
.
VPRO-NVR-128
1 file(s) 104 MB
.
.
VPRO-NVR-128N
1 file(s) 127 MB
.
.
VX-NVR-32
1 file(s) 60 MB
.
.
Keyboard Quick Start Guide
About the Manual
This series keyboard has the following features
Besides above mentioned features, network keyboard also has the following features:
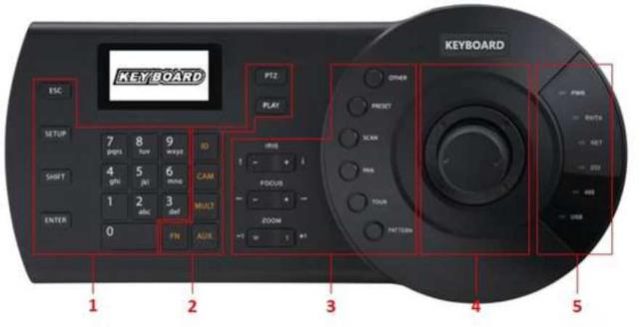
The keyboard front panel is shown as below. See Figure 1-1.
Figure 1-1
Please refer to the following sheet for detailed information.
| SN | Note | Icon | Button Name | Function |
| 1 | General function panel | ESC | ESC |
• Cancel/return. Delete the previous space of
the buffer input contents. • In playback mode, click this key to go back
to realtime surveillance mode. |
| SETUP | Switch mode | Switch between PTZ/decoder control interface. |
.
| SN | Note | Icon | Button Name | Function |
| . | . | . | . |
• [Setup] :Set|use mode switch
• 1+ [Setup] :Main stream|sub stream
mode switch. |
| SHIFT | Change input method |
• Switch between input methods
• Go to the previous video channel.
|
||
| ENTER | Confirm button |
• On DVR main menu, confirm current
operation • Go to the next video channel.
|
||
| 0 9 | Character and numerals | Switch between numeral/characters, click [SHIFT] to switch. | ||
| 2 | DVR control panel | ID | ID shortcut | Shortcut key to go to ID zone search, After successful zone connection, click the [ID] to disconnect the device. |
| CAM | Device channel number | Control DVR channel.
• 0+ [CAM]: Close the video source of
current window. • 1+[CAM] : Output the video source No.1
to the TV wall. |
||
| MULT | Split button |
• Control DVR window split
• 4+ [MULT]: Split current window to 4-
split. |
||
| AUX | Auxiliary |
• User aux record
• Open DVR local PTZ interface.
|
||
| FN | Function key | Work with the number buttons.
• [FN+1] : Go to DVR assistant interface.
• [FN+2] : Tour
• [FN+3] : Electronic zoom
|
||
| PTZ | Window|PTZ button |
• Control channel PTZ.
• Select specified window.
1+ [PTZ] :Select the first window of current screen. |
||
| PLAY | Screen|Playback button |
• Control DVR playback
• Select the specified screen of the TV wall.
1+ [PLAY]: Select the No.1 output screen. |
||
| 3 | Speed dome control panel | IRIS | Iris | Control iris. |
| FOCUS | Focus | Control focus | ||
| ZOOM | Zoom | Control zoom. | ||
| OTHER | Speed dome menu |
• Set mode: Go to speed dome menu.
• Use mode: Clear buffer.
|
||
| PERSET | Preset |
• Set mode: For example, 11+ [PRESET] is
to set preset No.11. • Use mode: For example, 11+ [PRESET]
is to call preset No.11. |
||
| SCAN | Scan |
• Set mode: Click [SCAN] to go to setup
interface. • Use mode: For example, 5+ [SCAN] is to
call scan No.5 and then click [SCAN] to stop. |
||
| PAN | Pan | • Start pan
• Stop pan |
||
| TOUR | Tour |
• Set mode: Click [TOUR] is to go to tour
interface. • Use mode: For example, 5+ [TOUR] is to
call tour No.5 and then click the [TOUR] |
.
| SN | Note | Icon | Button Name | Function |
| . | . | . | . | to stop. |
| PATTERN | Pattern |
• Set mode: Click [PATTERN] is to go to
setup interface. • Use mode: For example, 5+ [PATTERN]
is to call pattern No.5 and then click the [PATTERN] to stop. |
||
| 4 | 3D
Joystick |
– | – | Aux menu and function operation. |
| 5 | Indicator light panel | PWR | Power indicator light | The light is on when the keyboard is properly connected to the power supplying. |
| TR/TX | Network data receive and send indicator light | The light is flashing when the keyboard is connected to the network. | ||
| NET | Network indicator light | The light is on when the device is connected to the network. | ||
| 232 | RS232 indicator light | The light is flashing when there is 232 data transmission. | ||
| 485 | RS485 indicator light | The light is flashing when there is 485 data transmission. | ||
| USB | USB indicator light | The light is on when the keyboard is connected to the USB device.
• For network keyboard, the light is on when
the keyboard is connected to the PC. • For analog keyboard and speed dome
keyboard, the light is on when the keyboard is connected to the USB device. |
||
| 6 | LCD | – | – | OSD menu |
1.3.1 Network Keyboard Series
Please refer to Figure 1-2 for network keyboard port information.
Figure 1-2
Please refer to the following sheet for detailed information.
| SN | Port Name | SN | Port Name | SN | Port Name |
| 1 | USB port | 2 | RS422 port | 3 | RS485 port |
| 4 | Network port | 5 | RS232 port | 6 | Power socket |
1.3.2 Analog Keyboard Series
Please refer to Figure 1-3 for analog keyboard port information.
Figure 1-3
Please refer to the following sheet for detailed information.
| SN | Port Name | SN | Port Name | SN | Port Name |
| 1 | USB port | 2 | RS422 port | 3 | RS485 port |
| 4 | RS232 port | 5 | Power socket | . | . |
1.3.3 Speed Dome Keyboard Series
Please refer to Figure 1-4 for speed dome keyboard port information.
Figure 1-4
Please refer to the following sheet for detailed information.
| SN | Port Name | SN | Port Name | SN | Port Name | SN | Port Name |
| 1 | USB port | 2 | RS422 port | 3 | RS485 port | 4 | Power socket |
within 10m.
The keyboard uses DC12V 1A, you can use the adapter included in the accessories bag.
| . | IBS
PW: |
: admin |
Figure 2-1
Note
After you exit the system, unplug the power cable to turn off the device.
The menu may vary due to different products. The following figure is based on the network keyboard.
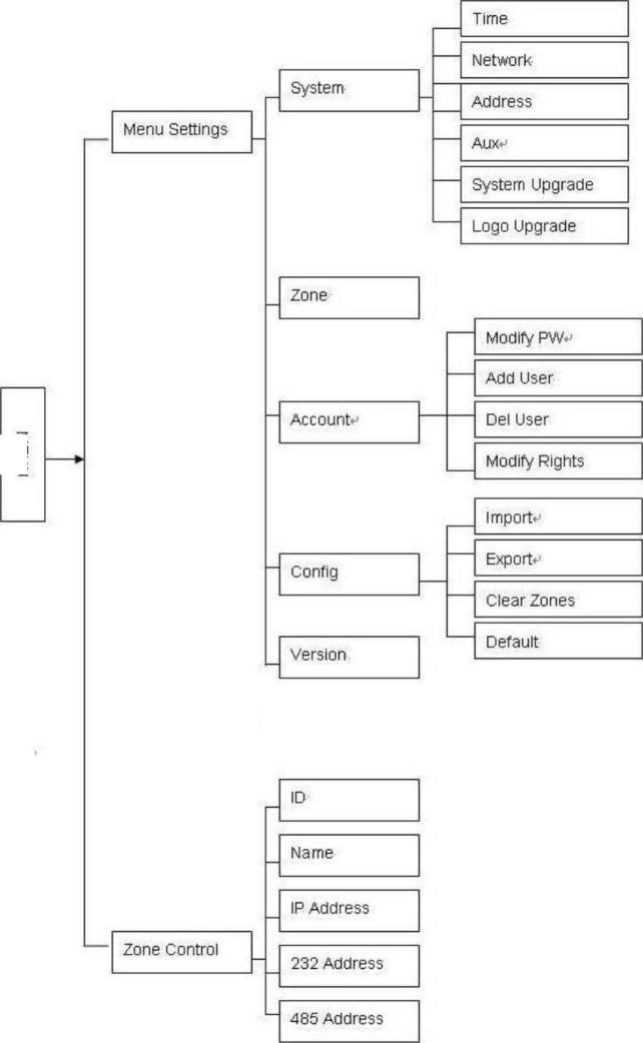
The main menu list is shown as below. See Figure 2-2.
MENU
Figure 2-2
Use the joystick on keyboard to move up/down/left/right to select items.
Use keyboard to input number or character to set parameters.
Click [ENTER] to confirm current operation. Click [ESC] to exit.
The system manager includes time setup, network setup, address setup, aux setup, system update and logo update. See Figure 2-3.
Figure 2-3
It is to set keyboard system time. It includes year, month, date, minute and second. See Figure 2-4.
0: 2015 123
M: 7
D: 16
Mode: 12
Figure 2-4
Figure 2-5
The address value ranges from 0 to 255. The default setup is 0. When there is cascade connection, the 0 has the highest priority and the 255 has the lowest priority. See Figure 2-6.
Lddress
Figure 2-6
It is to set screen backlight and auto logout function. See Figure 2-7.
on
AutoLogout: Off
Figure 2-7
Do not remove the flash disk during the whole process. Otherwise it may result in upgrade failure and the network keyboard can not boot up properly.
Please select system update interface and click [ENTER] button to go to the update interface. Follow the prompt to click the [ENTER] to update.
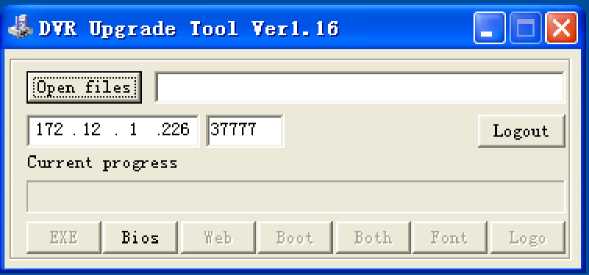
Please contact your local retailer or visit our official website to get the Windows upgrade tool. The REC Upgrade or REC Upgrade are both OK. If the ConfigTool can not search the keyboard, please upgrade manually.
Now we use REC Upgrade for an example. The interface is shown as below. See Figure 2-8.
Figure 2-8
Note
If you can not use the 37777 to upgrade, it means the application layer did not boot up properly. Please use port 3800 to upgrade. The upgrade process can become successful no matter the application layer properly booted up or not.
2.3.1.6 Logo update
The logo upgrade function is for speed dome keyboard or analog keyboard series product. You can update logo.bin file if necessary.
It is to set control point information. See Figure 2-9. All the items listed below shall be set. You can use the ID, device name, COM address or the IP address to search a device easily in chapter 2.4.
| S3: 0 | 123 |
| Name: | . |
| Type: DVR | . |
| Link: NET | . |
Figure 2-9
| Zone IP | RS232 Address | RS485 Address |
| Port | Baud Rate | Baud Rate |
| Protocol | Protocol | Protocol |
| User | Data Bit | Data Bit |
| Password | Parity
Stop Bit |
Pairty
Stop Bit |
Figure 2-10
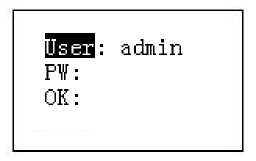
When your link mode is net, please input corresponding administrator password to login.
Please go to the controlled device to set the user name and password. The DVR and NVR have the rights management to realize password verification.
Here is for you to change password, add user, and delete user and its rights. See Figure 2-11.
©Modify FW
©Add User
©Del User ©Modify Rights
Figure 2-11
Select a user and then input new password. Usually we recommend 6-digit password and you can change the input method to input password value. Input password again to confirm. You can see the corresponding dialogue box if your two passwords input here are not the same. Please click [ESC] to return to modify and click [ENTER] button to save. See Figure 2-12.
Figure 2-12
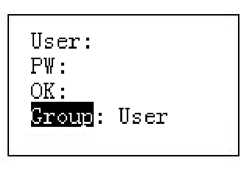
Please input user name (max 8-digit) and then set corresponding password. The group options include user/guest. See Figure 2-13,
Figure 2-13
• PTZ Control
OBackup
OAdvanced
Figure 2-14
Note
Please go to the controlled device to set rights.
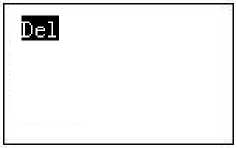
Select a user first and then click [ENTER] to remove.
It is to change user rights.
Note
The configuration files import/export function is for speed dome keyboard and analog keyboard series product only.
The configuration manager includes configuration files import/export, clear zones and factory default setup. See Figure 2-15.
©Import
©Export ©Clear Zones ©Default
Figure 2-15
Insert the flash disk that contains the upgrade files to the keyboard and the go to the import interface. Click [ENTER] to import the configuration files.
Insert the flash disk to the keyboard and then go to the export interface. Click [ENTER] to export the configuration files.
Go to the clear zones interface and then click [ENTER] to clear all control points.
Go to the default interface and then click [ENTER] to restore keyboard configuration to factory default setup.
It is for you to view current version information and etc. See Figure 2-16.
Version:
Build Date: 2015-07-16
Figure 2-16
2.4 Zones
In this interface, you can quickly search a device via device ID, device name, COM address, IP and etc. See Figure 2-17.
Figure 2-17
3 Keyboard Control Speed Dome
Please connect keyboard A/B line to speed dome A/B line connection.
Note
On the keyboard, click [ID] to go to the control point interface to set speed dome ID to connect to the speed dome.
After successful connection, the interface is shown as below. See Figure 3-1.
Figure 3-1
On the keyboard, click [IRIS] button, use button [+]and[-]or turn joystick up/down to control the iris.
On the keyboard click [FOCUS] button, use button [+]and[-]or turn joystick left/right to control the focus.
On the keyboard click [ZOOM] button, use button [+]and[-]or turn joystick clockwise or counter clockwise to control the zoom.
Shortcut Mode
[PRESET], the interface is shown as below. See Figure 3-2.
On the keyboard click
| Preset | |
|---|---|
| IPr eN o. MmM | 123 |
| Goto | . |
| Set | . |
Figure 3-2
Input preset number and then select [Set], click [ENTER] to save preset setup.
Input preset number and then select [Goto], click [ENTER] to go to the corresponding preset position.
Input the preset number and then select [Del], click [ENTER] to remove it.
Shortcut Mode
On the Use mode, use keyboard to input [No.]+[Scan], you can call a scan. Click [Scan]to stop it.
General Mode
On Set mode, click [SCAN] button, the interface is shown as below. See Figure 3-3.
Scan
Stop Set
Figure 3-3
Please follow the steps listed below.
Scan Set
Set Right
Figure 3-4
Shortcut Mode
On the Use mode, click [Pan]button on the keyboard, the speed dome begins pan. Click [Pan]again to stop it.
General Mode
On Set mode, click [PAN] button on the keyboard, the interface is shown as below. See Figure 3-5.
Fan
Stop
Figure 3-5
Shortcut Mode
On the Set mode, use keyboard to input [No.]+[Tour], you can call a tour. Click [Tour] again to stop it.
General Mode
On Set mode, click [TOUR] button on the keyboard, the interface is shown as below. See Figure 3-6.
| Tour | . |
| [TourNo. | 1E3 |
| Start | . |
| Stop | . |
Del
Figure 3-6
3.3.6.1 Set tour
TourNo. : 0
‘resetNo.
PresetAdd PresetDel
Figure 3-7
Note
You can add several presets to add to a tour.
3.3.6.2 Call tour
3.3.7 Pattern
Shortcut Mode
On the Use mode, use keyboard to input [No.]+[Pattern], you can call a pattern. Click [Pattern]again to stop it.
General Mode
On Set mode, click [PATTERN]on the keyboard, the interface is shown as below. See Figure 3-8.
Figure 3-8
| a) b)
c) |
Select tour number and then input a value.
Select tour set button and then click [ENTER] button. Use joystick to set pattern and then click [ENTER] to end. The speed dome can memorize your whole operation. |
Select pattern No. and then input a pattern number, select start and then click [ENTER] button, system begins pattern operation.
Select pattern No. and then input a pattern number, select stop and then click [ENTER] button, system stops pattern operation.
Note
Please refer to chapter 8 to make COM cable.
The default setup is shown as below.
Please note keyboard setup should conform to DVR setup.
Note
The network connection steps are similar to the COM setup. Please note, on the zones interface, the link type shall be NET.
Please input DVR IP address, the control point port is 37777. The protocol is the same as the COM setup. Please refer to chapter 2.3.2 control point for detailed information.
The DVR local user has the higher priority than the keyboard user. Before you login, please logout the DVR local menu user, otherwise, you can not use the keyboard to control the device.
You can select ID, device name, IP address, RS232, RS485 and etc to login.
System auto connect to the DVR after successfully search operation.
Tips
Click [ID] on the keyboard and then input ID number. Click [ENTER] to quickly find the device.
Click [ID] on the keyboard and then click [ESC] to exit current menu.
For example, input 16 and then click split button, you can realize 16-split function on the DVR.
If you use the joystick now:
Input 9 and then click CAM button, the DVR displays the video from channel 9.
Click [PLAY] on the keyboard, you can go to the DVR search interface. Use joystick to control the playback buttons such as stop, fast play, slow play and etc. Click [ENTER] to confirm. See
| . | ||
| /►/II | . | 91/11 |
| 4h | 511 | 64- |
| 1 H | 214 | 3-4 |
Figure 4-1
| SN | Function | SN | Function | SN | Function |
| 7 | Play | 8 | Stop | 9 | Playback |
| 4 | Slow play | 5 | Play backward frame by frame | 6 | Previous record |
| 1 | Fast play | 2 | Play frame | 3 | Next record |
.
| SN | Function | SN | Function | SN | Function |
| . | . | . | by frame | . | . |
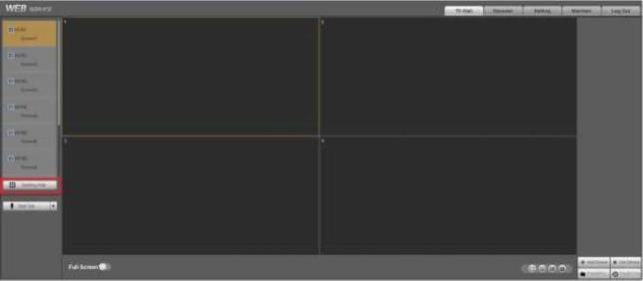
Login the Web of the decoder, you can see the following interface. See Figure 5-1.
Figure 5-1
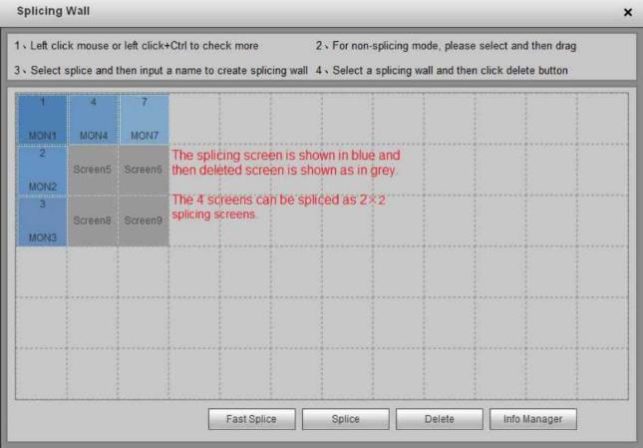
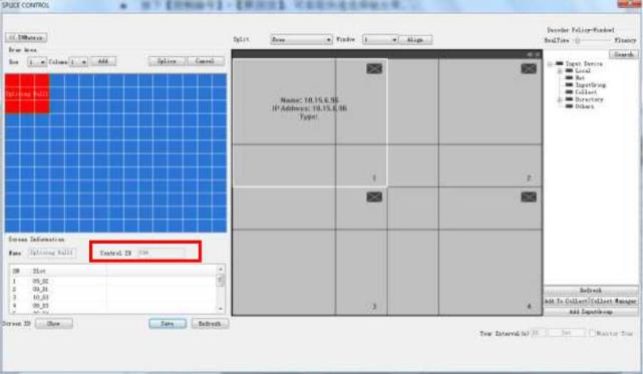
Click the Splicing wall on the left pane; you can go to the following interface. See Figure 5-2.
Click Fast splicing button, you can realize 1 X1 setup conveniently.
For the network keyboard, it support 2X2 and etc splicing setup. Please follow the steps listed below.
Figure 5-2
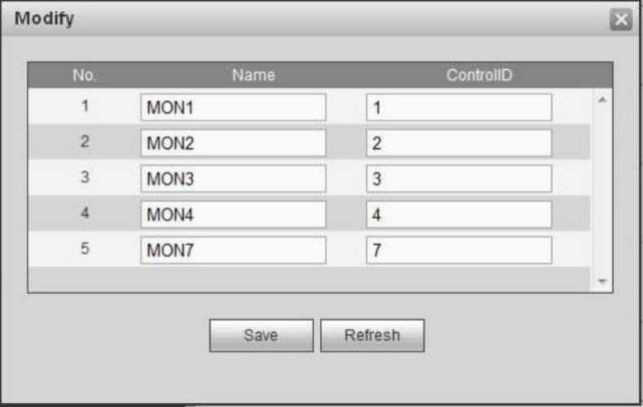
In Figure 5-2.click Info manager button, you can view and edit the corresponding screen control SN.
For network keyboard, click the [Control ID] + [PLAY] one by one, you can select the output screen quickly. See Figure 5-3.
Figure 5-3
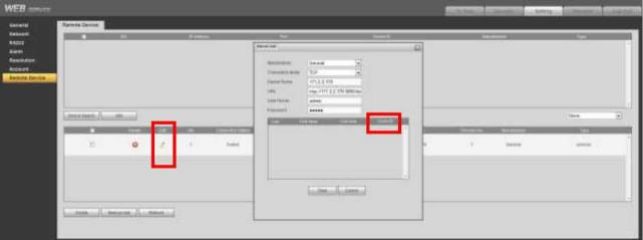
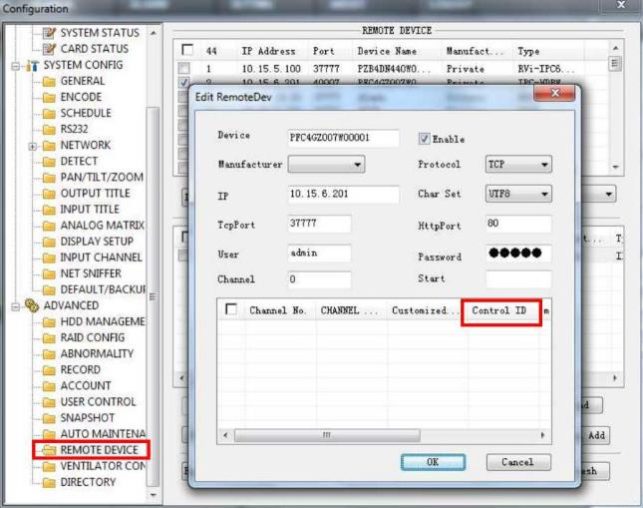
Login the WEB of the decoder, from [Setting] -> [Remote device] , you can add the
corresponding input source. Click the edit button — ,you can edit the correspondong control SN.
See Figure 5-4.
For network keyboard, click the [Control ID]+[CAM], you can output the video to the TV wall.
Figure 5-4
Please refer to chapter 2.3.2 Zone (control point) for detailed information.
The device type is NVD and step default value is 64.
Please refer to chapter 8.1 to use RS232 COM to connect the network keyboard to the analog matrix.
Network keyboard can control the analog matrix to realize the following function. See Figure 6-1.
Figure 6-1
screen.
keyboard control point setup.
When you are using the network keyboard to control the analog matrix, please click the [No.]+ [CAM], you can use the front panel of the matrix to switch the video.
For example, click [016]+[032]+[CAM], you can switch the 32nd channel video input of the front panel of the matrix to the 16th output channel.
Note
Please refer to chapter 2.3.2 Zone (control point) for detailed information. The device type is
MATRIX.
Login the WEB of the video matrix platform (M60/M70), and then select splice control you can go to the following interface. See Figure 7-1.
The network keyboard supports TV wall combination on the video matrix platform. You can add the video wall you want to control as the splicing screen and then add the plan for each TV wall.
• Follow the steps listed below to add the plan.
• Follow the steps listed below to control the splicing screen.
Click [Cancel], you can cancel the splicing operation.
Figure 7-1
Login the Web of the video matrix platform (M60/M70).
For network keyboard, click the [Control ID] + [CAM] one by one, you can output the video
on the wall to preview.
Figure 7-2
Figure 7-3
Please refer to chapter 2.3.2 Zone (control point) for detailed information.
The device type is DVM and step default value is 64.
8 Make COM Cable
Please refer to the following figure to make RS323 cable.
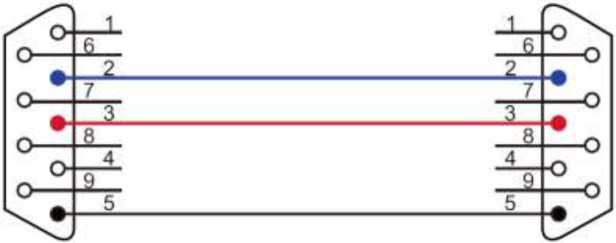
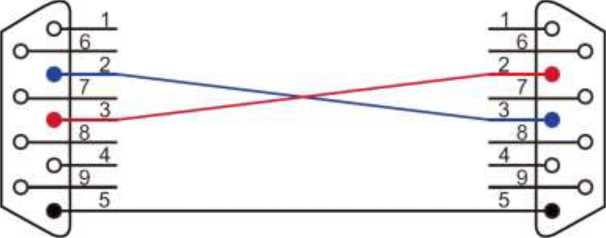
When use the network keyboard to control the analog matrix, RS232 Com adopts the straight mode: 2-2, 3-3, 5-5. Straight through connection mode is shown as in Figure 8-1.
Figure 8-1
When use the keyboard to control other device, RS232 Com adopts the crossover connection mode: 2-3, 3-2, 5-5. Crossover connection mode is shown as in Figure 8-2.
Figure 8-2
Note
time, please use RS485 mode.
can connect to 8 DVRs.
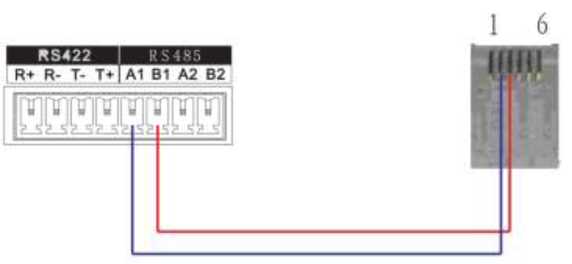
You can refer to Figure 8-3 if you are connecting the keyboard with the switcher box.
RS485 Port of Keyboard
RS485 Switch Box Port
(Green alarm socket)
(6-pin crystal )
Figure 8-3
RS232 Port
(DB9)
Figure 8-4
Connect switch 25-pin box RS232 port with DVR RS232 port. (25-pin outlet supports maximum twelve RS232 ports. Switch is just for sending not for receiving. So you can use two cables: GND and TXD)
Please refer to the following figure if you are connecting 485 switch box to DVR See Figure 8-4.
Note
485->232 switch box does not need the TXD cable. The 1 to 8 COM port already supports this function.
RS485 Switch Box 25-Pin Port
(DB25)
If you are using network keyboard, you can use the network to connect. The direct connection mode is shown as below. See Figure 8-5.
Network Cable (Crossover)
DVR
Figure 8-5
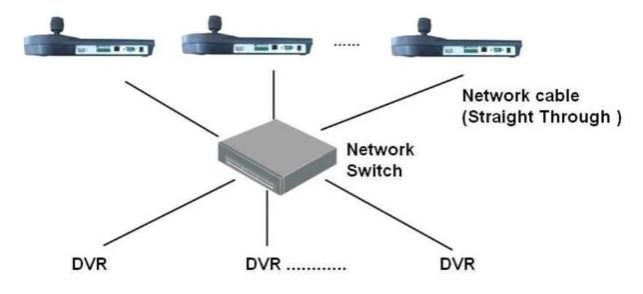
Please refer to the following figure if you are connecting via the hub. See Figure 8-6.
Figure 8-6
Note:
